The Best Fluffy Pancakes recipe you will fall in love with. Full of tips and tricks to help you make the best pancakes.
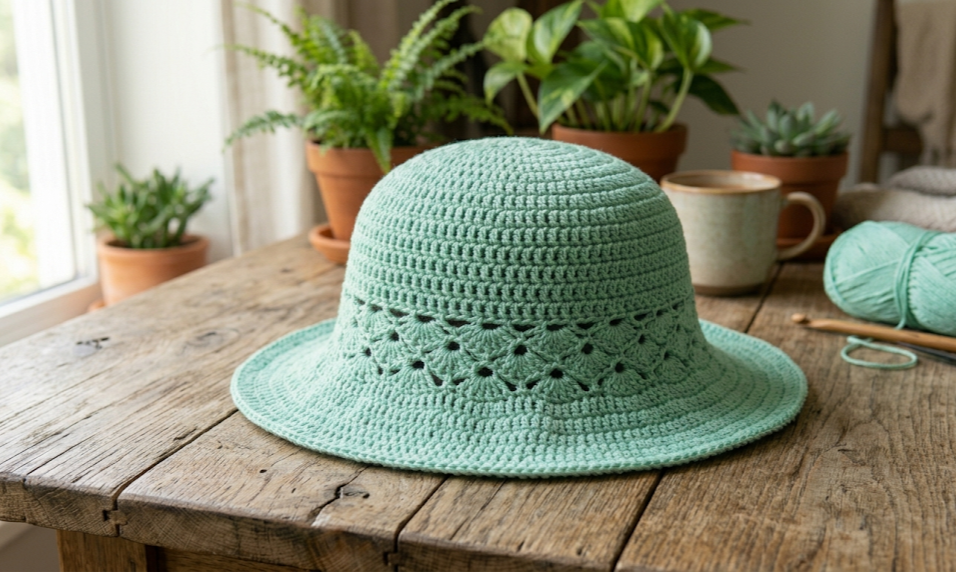
If you’ve been looking for the perfect crochet summer hat pattern, your search ends here. This free crochet bucket hat pattern is beginner-friendly, endlessly stylish, and uses just one skein of lightweight yarn to create a structured, wearable sun hat with a gorgeous shell stitch lace band. Whether you’re heading to the beach, a farmers market, or a summer picnic, this mint green crochet hat will become your go-to accessory all season long.
In this post, we’ll walk you through everything you need to know — materials, abbreviations, full pattern instructions, and tips to make your first (or tenth!) crochet bucket hat a success.
|
Difficulty
Easy–Intermediate
|
Time
4–6 Hours
|
Hook Size
4.0 mm (G/6)
|
Yarn Weight
DK / Light Worsted
|
Finished Size
21–22 in. circumference
|
Why You’ll Love This Pattern
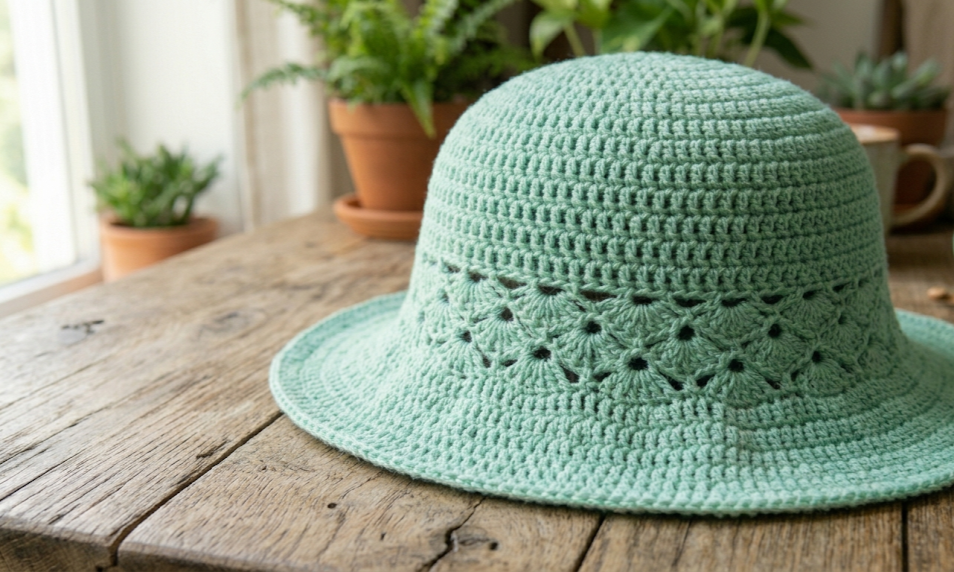
This crochet bucket hat combines two textures beautifully: a dense, sturdy double crochet crown that gives the hat its structure, and a delicate open shell stitch band that adds a boho, feminine touch right above the brim. The wide brim lies flat and provides real sun coverage, making this hat as practical as it is adorable.
The construction is worked in joined rounds from the top down, which makes it easy to try on as you go and adjust the fit before you commit to the brim. It’s rated as an intermediate project, but confident beginners who are comfortable with double crochet and basic stitch counts will have no trouble at all.
Best of all? This hat works up in about 4–6 hours, making it a perfect weekend project.
Materials List
- Yarn: Approx. 150–200g of DK / Light Worsted (Yarn Weight 3) cotton or cotton-blend yarn in mint green. The hat in this photo uses a Caron Simply Soft or similar smooth, light cotton yarn.
- Crochet Hook: Size 4.5mm (US 7 / UK 7)
- Stitch markers: 2–3 removable markers
- Yarn needle for weaving in ends
- Scissors
Yarn Tip: Cotton yarns work best for sun hats as they hold their shape and are breathable in warm weather. Look for a yarn with good stitch definition so the shell stitches really pop.
Finished Size
- Head circumference: Approximately 22–23 inches (56–58 cm) — fits most adult heads
- Crown depth: 4.5 inches (11 cm)
- Brim width: 2.5 inches (6 cm)
- Total hat height: 7 inches (18 cm)
To adjust sizing, increase or decrease the number of foundation chain stitches or add/remove increase rounds in the crown.
Abbreviations
| Abbreviation | Meaning |
|---|---|
| ch | chain |
| sl st | slip stitch |
| sc | single crochet |
| dc | double crochet |
| hdc | half double crochet |
| sk | skip |
| sp | space |
| st(s) | stitch(es) |
| MR | magic ring |
| rep | repeat |
| RS | right side |
| [ ] | repeat instructions in brackets the number of times indicated |
Pattern Instructions
Part 1: The Crown
The crown is worked from the center top down in continuous joined rounds.
Round 1: Using a magic ring (MR), ch 3 (counts as first dc), work 11 dc into the MR. Join with sl st to top of ch-3. Pull ring closed. (12 dc)
Round 2: Ch 3, dc in same st, 2 dc in each st around. Join with sl st to top of ch-3. (24 dc)
Round 3: Ch 3, dc in same st, dc in next st, [2 dc in next st, dc in next st] around. Join. (36 dc)
Round 4: Ch 3, dc in same st, dc in next 2 sts, [2 dc in next st, dc in next 2 sts] around. Join. (48 dc)
Round 5: Ch 3, dc in same st, dc in next 3 sts, [2 dc in next st, dc in next 3 sts] around. Join. (60 dc)
Round 6: Ch 3, dc in same st, dc in next 4 sts, [2 dc in next st, dc in next 4 sts] around. Join. (72 dc)
Rounds 7–11: Ch 3, dc in each st around. Join. (72 dc each round) — This creates the straight side walls of the hat.
Part 2: Shell Stitch Lace Band
This is the decorative section of the hat. Work this band over 2 rounds to create the open shell pattern.
Round 12 (Shell Setup): Ch 1, sc in first st, [sk 2 sts, 5 dc in next st (shell made), sk 2 sts, sc in next st] around. You should have 12 shells. Join with sl st. (12 shells + 12 sc)
Round 13 (Shell Continuation): Sl st into center dc of first shell, ch 3, 4 dc in same st (half shell), [sc in next sc, 5 dc in center dc of next shell] around, ending with sc in last sc. Join. (12 shells)
Tip: Mark the center dc of each shell with a stitch marker in Round 12 to keep your place in the pattern.
Part 3: The Brim
The brim is worked in back loops only (BLO) to create a subtle ridge and encourage the brim to lie flat.
Round 14: Ch 3, dc in each st around working in BLO. Join. (72 dc)
Round 15: Ch 3, dc in same st, dc in next 5 sts, [2 dc in next st, dc in next 5 sts] around. Join. (84 dc)
Round 16: Ch 3, dc in same st, dc in next 6 sts, [2 dc in next st, dc in next 6 sts] around. Join. (96 dc)
Round 17: Ch 3, dc in each st around. Join. (96 dc)
Round 18 (Brim Edge): Ch 1, sc in each st around. Join with sl st. Fasten off.
Assembly & Finishing
- Weave in all ends securely using a yarn needle. Since this hat will be worn and washed, double-knot your ends or weave them in at least 3 inches to prevent unraveling.
- Lightly hand wash the hat in cool water and lay flat to block into shape. You can use blocking pins around the brim edge to encourage it to lie perfectly flat.
- Allow to dry completely before wearing.
No additional assembly is required — this hat is worked in one continuous piece!
Beginner Tips
- Magic ring too loose? Chain 4 and sl st to the first chain to form a ring instead, then work your Round 1 dc stitches into the ring. This is a great beginner-friendly alternative.
- Losing count in the increase rounds? Place a stitch marker at the beginning of each round. Move it up as you complete each round.
- Tension check: Work a small swatch before you begin. For this pattern, your gauge should be approximately 14 dc x 8 rows = 4 inches in double crochet with your chosen yarn and hook.
- Shell stitches not lining up? Count your stitches at the end of Round 11 before starting the shell band. You must have a multiple of 6 stitches (72 divides perfectly into 12 groups of 6).
- Brim curling? This usually means your tension is too tight. Try going up half a hook size for the brim rounds only.
Variations to Try
- Color Block Version: Work the crown in one color, switch to a contrasting yarn for the shell band, and switch back for the brim.
- Kids’ Size: Work only through Round 4 of the crown increases (48 sts) and reduce the wall rounds to 4. Reduce the brim increases proportionally.
- No-Lace Version: Replace the shell stitch rounds with 2 additional plain dc rounds for a cleaner, more structured look.
- Chunky Version: Use bulky (weight 5) yarn with a 6.5mm hook and work up a cozy winter bucket hat in half the time.
- Tie Ribbon Accent: After blocking, weave a satin ribbon through the shell stitch eyelets and tie in a bow at the front for a more feminine, fashion-forward look.
Final Thoughts
This crochet bucket hat pattern is truly one of those makes that feels impressive but doesn’t require advanced skills. The combination of solid structure in the crown and that airy shell stitch lace detail makes it look like something you’d find at a boutique — but you made it yourself, in a weekend, for a fraction of the price.
We’d love to see your finished hats! Share your makes on Pinterest and Instagram using #FoodieRippleCrochet so we can feature your beautiful work.
📌 Save this pattern to Pinterest so you never lose it — just hit the Pin button below! And while you’re at it, follow FoodieRipple for more free crochet patterns, cozy makes, and handmade inspiration. 🧶 #FoodieRippleCrochet


