The Best Fluffy Pancakes recipe you will fall in love with. Full of tips and tricks to help you make the best pancakes.
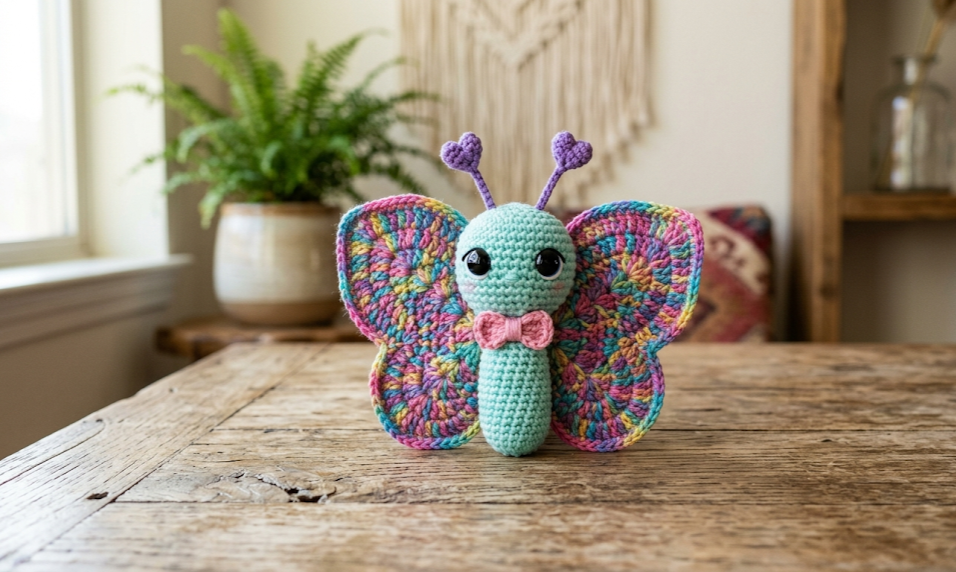
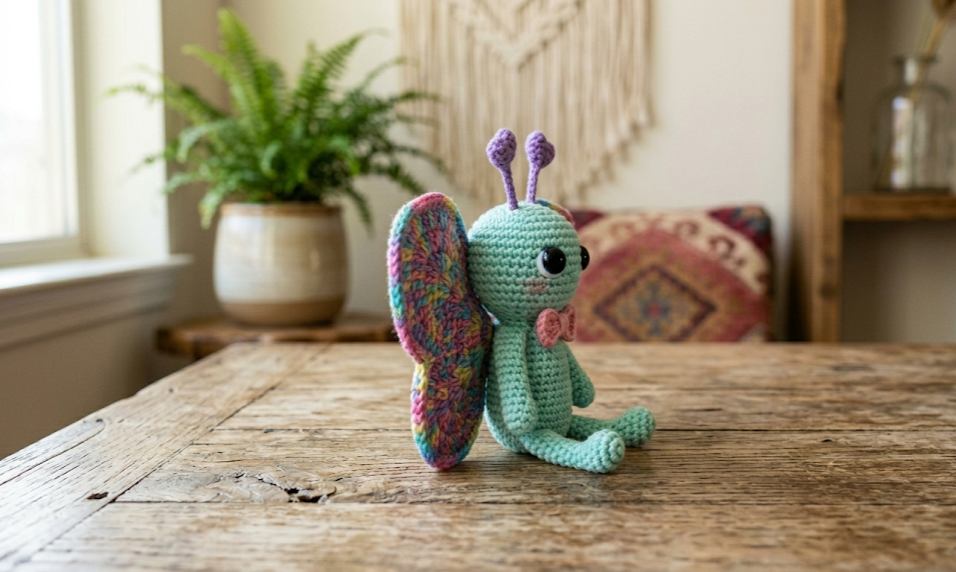
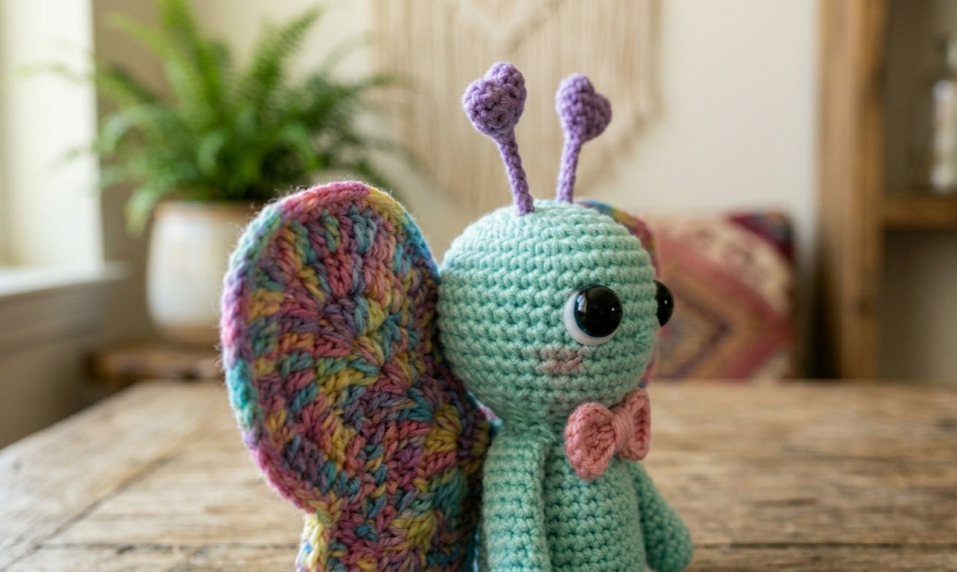
If you’ve been looking for the most adorable crochet butterfly stuffed animal to add to your project list, you’ve just found it. Blue the Butterfly Amigurumi is a free crochet pattern that brings together a chubby mint-teal body, dreamy variegated wings, and the cutest purple heart-shaped antennae you’ve ever seen. Whether you’re making this as a gift for a little one or treating yourself to a fun weekend craft, this pattern is satisfying, beginner-friendly with some practice, and completely irresistible.
This free amigurumi butterfly crochet pattern walks you through every single piece step by step — from the round little tummy to the delicate bowtie at the neck. Let’s get into it!
|
Difficulty
Intermediate
|
Time
6–8 Hours
|
Hook Size
3.5mm (E/4)
|
Yarn Weight
DK / Light Worsted #3
|
Finished Size
~20cm / 8 inches
|
Why You’ll Love This Butterfly Amigurumi Pattern
Blue the Butterfly is more than just a cute stuffed toy. It’s a project that lets you practice fundamental amigurumi techniques like working in the round, invisible decreases, and joining pieces — all while creating something genuinely show-stopping. The finished butterfly stands approximately 8 inches tall and is the perfect size for display or play.
The color combination of mint teal, purple, and variegated boho tones makes this piece feel modern and giftable. Parents, collectors, and crochet lovers across skill levels will adore the finished result.
Materials You’ll Need
- Yarn A (Main): DK or Light Worsted (#3) yarn in mint / teal – approx. 100g
- Yarn B: DK or Light Worsted (#3) yarn in purple – approx. 40g
- Yarn C: DK or Light Worsted (#3) variegated yarn in boho / rainbow tones – approx. 50g
- Yarn D: Small amount of pink yarn for the bow
- Crochet Hook: 3.5mm (US size E/4)
- Safety eyes: 12mm black safety eyes x2
- Polyfill stuffing: approx. 80–100g
- Yarn needle: for sewing pieces together
- Stitch markers: to mark beginning of rounds
- Scissors
Abbreviations
| Abbreviation | Meaning |
|---|---|
| MR | Magic ring |
| ch | Chain |
| sc | Single crochet |
| inc | Increase (2 sc in same stitch) |
| dec | Invisible decrease (insert hook in front loops of next 2 stitches) |
| sl st | Slip stitch |
| BLO | Back loop only |
| st(s) | Stitch(es) |
| rnd | Round |
| rep | Repeat |
| x | Times |
Full Pattern Instructions
Part 1: The Head
Using Yarn A (mint teal):
- Rnd 1: MR, 6 sc (6)
- Rnd 2: inc x6 (12)
- Rnd 3: [sc 1, inc] x6 (18)
- Rnd 4: [sc 2, inc] x6 (24)
- Rnd 5: [sc 3, inc] x6 (30)
- Rnd 6: [sc 4, inc] x6 (36)
- Rnd 7–12: sc around (36) — 6 rounds even
- Rnd 13: [sc 4, dec] x6 (30)
- Rnd 14: [sc 3, dec] x6 (24)
Insert safety eyes between Rnd 8 and 9, approx. 7 stitches apart. Begin stuffing.
- Rnd 15: [sc 2, dec] x6 (18)
- Rnd 16: [sc 1, dec] x6 (12)
- Rnd 17: dec x6 (6)
Fasten off, close hole, weave in end.
Part 2: The Body
Using Yarn A (mint teal):
- Rnd 1: MR, 6 sc (6)
- Rnd 2: inc x6 (12)
- Rnd 3: [sc 1, inc] x6 (18)
- Rnd 4: [sc 2, inc] x6 (24)
- Rnd 5: [sc 3, inc] x6 (30)
- Rnd 6–14: sc around (30) — 9 rounds even
- Rnd 15: [sc 3, dec] x6 (24)
- Rnd 16: [sc 2, dec] x6 (18)
Stuff the body firmly.
- Rnd 17: [sc 1, dec] x6 (12)
- Rnd 18: dec x6 (6)
Fasten off, close hole.
Part 3: The Arms (Make 2)
Using Yarn A (mint teal):
- Rnd 1: MR, 6 sc (6)
- Rnd 2: inc x6 (12)
- Rnd 3–10: sc around (12) — 8 rounds even
Lightly stuff. Flatten and sc across the opening to close (6 sts). Fasten off, leave a long tail for sewing.
Part 4: The Legs (Make 2)
Using Yarn A (mint teal):
- Rnd 1: MR, 6 sc (6)
- Rnd 2: inc x6 (12)
- Rnd 3–4: sc around (12)
- Rnd 5: [sc 2, dec] x3 (9)
- Rnd 6–14: sc around (9) — 9 rounds even
Lightly stuff. Flatten and sc across to close. Fasten off with long tail.
Part 5: The Antennae (Make 2)
Using Yarn B (purple):
Heart tip (make 2):
- Rnd 1: MR, 6 sc (6)
- Rnd 2: inc x6 (12)
- Rnd 3–4: sc around (12)
- Flatten. Do not fasten off.
Antenna stalk: Continue working in rows of 2 sts for approx. 8–10 cm, or chain 15 and sl st back for a simple stem. Fasten off with long tail.
Part 6: The Wings (Make 2 pairs)
Back wings using Yarn C (variegated):
Chain 20.
- Row 1: sc in 2nd ch from hook, sc across (19)
- Row 2: ch 1, turn, inc, sc to last st, inc (21)
- Row 3–5: ch 1, turn, sc across
- Row 6: ch 1, turn, dec, sc to last 2 sts, dec (19)
- Row 7: ch 1, turn, dec, sc to last 2 sts, dec (17)
- Continue decreasing 2 sts per row until 7 sts remain. Fasten off.
Work a border of sc around the entire wing edge using Yarn B (purple) for a neat finish.
Smaller front wings using Yarn B (purple): Repeat same process but begin with ch 14 and work only 10 rows total before decreasing to close.
Part 7: The Bow
Using Yarn D (pink):
Chain 5, join to form ring.
- Rnd 1–3: sc around (10)
- Pinch center and wrap yarn tightly several times to create bow shape. Fasten off and secure.
Make a small center knot piece: ch 6, sl st to join, and wrap around bow center. Sew in place.
Assembly Steps
- Sew the head to the top of the body, aligning the front center.
- Attach the arms to the sides of the body at approximately Rnd 4 from the top.
- Attach the legs to the base of the body, angled slightly forward for that classic amigurumi sit.
- Sew the antennae to the top of the head, approx. 4 stitches apart and slightly angled outward.
- Layer the back wings on top of the front wings, right sides facing out. Sew both pairs together along the center, then sew the joined wings to the back of the body at the center seam.
- Sew the bow just below the chin where the head meets the body.
- Optionally embroider a small smile with pink yarn using a curved backstitch below the eyes.
- Weave in all remaining ends.
Beginner Tips
Use stitch markers. Always mark the first stitch of each round with a removable marker. Amigurumi rounds can spiral confusingly without them.
Stuff as you go. Don’t wait until a piece is almost closed to stuff — it becomes very hard to fill evenly. Add small amounts of polyfill regularly as you decrease.
Invisible decreases are your friend. Insert your hook into the front loops of the next two stitches and complete the decrease as normal. This gives a much smoother surface than standard decreases.
Check safety eye placement before securing. Once you snap those backs on, there’s no going back. Hold the head up and check from multiple angles.
Tension consistency. Try to keep an even tension throughout. Tight tension is actually ideal for amigurumi — it helps prevent stuffing from showing through the stitches.
Variations to Try
- Pastel Rainbow Version: Use a soft pastel self-striping yarn for the body instead of solid mint.
- Autumn Butterfly: Swap the teal for burnt orange and the purple for deep burgundy for a fall-toned version.
- Mini Butterfly: Use fingering weight (#1) yarn with a 2.25mm hook to create a 4-inch mini version perfect for keychains or ornaments.
- No-Sew Wings: Instead of sewing wings on separately, crochet them directly onto the body as you go using pick-up stitches on the back panel.
- Glow in the Dark: Use phosphorescent yarn for the antennae and wing borders for a magical nighttime effect.
Share Your Blue the Butterfly on Pinterest!
Did you make Blue the Butterfly? We absolutely want to see your finished butterfly amigurumi! Save this free crochet pattern to your Pinterest boards so you can find it again, and share your finished photos using #FoodieRippleCrochet — we feature our community makes regularly and would love to show off your work.
Whether your butterfly turned out in classic mint and purple or you took it in a totally new direction, every version of this pattern is worth celebrating. Happy crocheting, and remember: every stitch is a little bit of magic you made with your own hands. 🦋
Free crochet pattern by FoodieRipple | Save & share with #FoodieRippleCrochet


