The Best Fluffy Pancakes recipe you will fall in love with. Full of tips and tricks to help you make the best pancakes.
A Timeless Tree You Can Stitch
Welcome back to FoodieRipple, your cozy corner for crochet inspiration! Today, we are merging the tranquil art of Japanese bonsai with the comforting craft of crochet. We are beyond excited to present our most requested, completely free crochet pattern: The Zen Bonsai Tree Amigurumi.
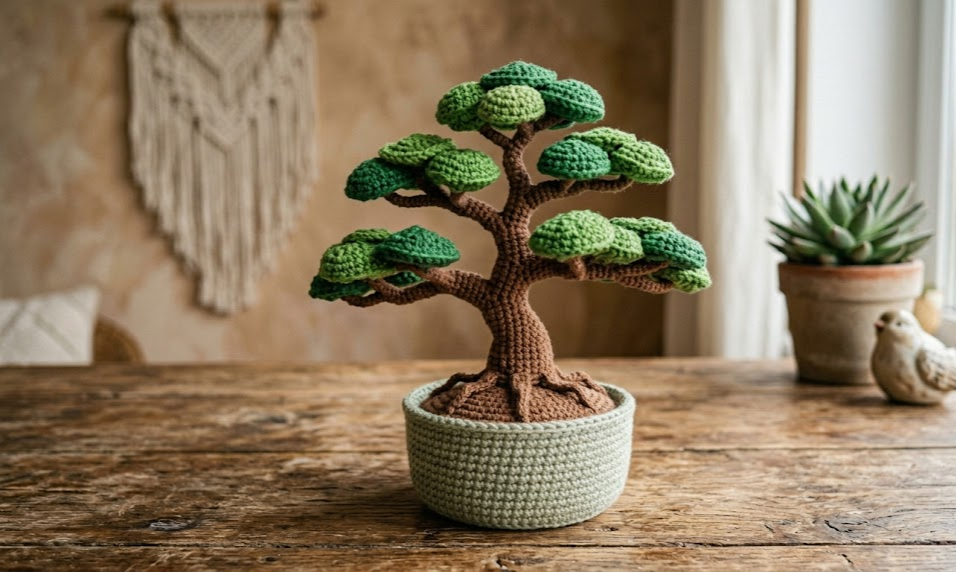
This isn’t just an amigurumi; it’s a tiny, perpetual piece of serene nature. Captured in the beautiful image_0.png, this project features a perfectly gnarled brown trunk, soft tufts of deep green foliage, and a matching sage-green pot complete with ‘soil.’ It’s a statement piece, a perfect gift for gardeners (especially those with a black thumb!), and a rewarding challenge for intermediate crocheters.
Why crochet a bonsai? Because real bonsai trees require decades of meticulous care. This one? It requires yarn, a hook, and a cozy weekend. It will never wilt, never need watering, and always offer a sense of peace.
Is This a Good Amigurumi for Beginners?
This pattern is rated Intermediate. While it uses basic amigurumi stitches (single crochet, increases, decreases), creating the iconic twisted shape of the tree (shown so clearly in image_0.png) requires structured stitching and precise assembly. If you have mastered a basic ball or animal, you can try this. If this is your first amigurumi, we recommend trying a simpler FoodieRipple project first (like our Little Acorn pattern) to build confidence.
Let’s dive in!
The Complete Crochet Bonsai Tree Pattern
Materials and Tools List:
- Yarn: Worsted Weight (Category 4). Small amounts needed of each:
- Dark Brown (Trunk)
- Forest Green (Foliage)
- Light Sage Green (Pot)
- Deep Earth Brown (Pot soil)
- Crochet Hook: 3.5mm (E/4) hook (a slightly smaller hook creates tighter stitches for amigurumi)
- Other Materials:
- Polyester Fiberfill stuffing
- Tapestry needle for sewing and weaving ends
- Stitch markers (very important for spiral rounds)
- Craft wire (16-gauge or similar, approx. 12 inches) (Optional but highly recommended for trunk structure, as seen in image_0.png)
- A small piece of cardboard or plastic (for the base of the pot)
Abbreviations (US Terms):
- ch: chain
- sl st: slip stitch
- sc: single crochet
- inc: increase (2 sc in the same stitch)
- dec: decrease (sc 2 stitches together)
- BLO: Back Loop Only
- FLO: Front Loop Only
- st(s): stitch(es)
- mr: magic ring / magic circle
- ( ): Repeat instructions within parentheses the number of times indicated.
- [ ]: Total number of stitches in that round.
Part 1: The Sage Green Pot & Soil (Base)
This is a single piece made in continuous rounds.
Using Light Sage Green yarn:Rd 1: 6 sc in mr. [6] Rd 2: (inc) 6 times. [12] Rd 3: (sc 1, inc) 6 times. [18] Rd 4: (sc 2, inc) 6 times. [24] Rd 5: (sc 3, inc) 6 times. [30] Rd 6: (sc 4, inc) 6 times. [36] Rd 7: (sc 5, inc) 6 times. [42] Rd 8: (sc 6, inc) 6 times. [48] Rd 9: BLO sc around. [48] (This creates a defined edge for the base.)Rd 10-14: sc around. [48]
We recommend cutting your cardboard/plastic base now to fit the inside bottom of the pot.
Change to Deep Earth Brown yarn (the soil):Rd 15: BLO sc around. [48] (This round defines where the pot ends and soil begins.)Rd 16: (sc 6, dec) 6 times. [42] Rd 17: (sc 5, dec) 6 times. [36] Rd 18: (sc 4, dec) 6 times. [30] Start stuffing the pot firmly and insert your base insert.Rd 19: (sc 3, dec) 6 times. [24] Rd 20: (sc 2, dec) 6 times. [18] Continue stuffing the sides firmly around the top.Rd 21: (sc 1, dec) 6 times. [12] Rd 22: (dec) 6 times. [6] Fasten off, leaving a tail. Use a tapestry needle to weave through the last 6 FLO stitches and pull closed.
Part 2: The Brown Bonsai Trunk
The complex shape shown in image_0.png is achieved by varying increases and decreases to make the trunk bend and ‘reach.’ Working over a piece of craft wire will give you the most stable structure.
Using Dark Brown yarn:If using wire, create a small loop at one end to anchor it within the trunk, and crochet around it.
Rd 1: 8 sc in mr. [8] Rd 2-4: sc around. [8] Rd 5: (inc, sc 1) 4 times. [12] Rd 6-7: sc around. [12] Rd 8: (dec, sc 4) 2 times. [10] Rd 9-10: sc around. [10] Rd 11: sc 3, dec, sc 3, dec. [8] Rd 12-16: sc around. [8] (This creates the long bend.) Rd 17: inc, sc 7. [9] Rd 18: sc 4, inc, sc 4. [10] Rd 19: sc around. [10] Rd 20: (sc 3, dec) 2 times. [8] Rd 21-23: sc around. [8] Rd 24: sc 1, inc, sc 1, inc, sc 4. [10] Rd 25: sc around. [10] Rd 26: (sc 4, inc) 2 times. [12]
Fasten off, leaving a long tail for sewing. (Your wire should extend further for the branches).
Creating Branches: We need multiple branch segments to connect the foliage. To recreate the image (which has 6-7 foliage clusters), we will make two different branch patterns.
Branch Pattern A (Make 4): 6 sc in mr, sc around for 3 rounds. [6] Fasten off with a sewing tail.Branch Pattern B (Make 2): 6 sc in mr, sc around for 6 rounds. [6] Fasten off with a sewing tail.
Part 3: The Forest Green Foliage Pads
To get the lush look in image_0.png, we make multiple small, flat circular ‘pads.’
Using Forest Green yarn:Rd 1: 6 sc in mr. [6] Rd 2: (inc) 6 times. [12] Rd 3: (sc 1, inc) 6 times. [18] Rd 4: (sc 2, inc) 6 times. [24] Optional for edge texture: sl st into next st, ch 1, (sc in next, sl st in next) around. Fasten off with a long tail for assembly. Make 12-14 of these pads.
Full Assembly and Finishing
This is where your artistry really comes in! Reference image_0.png frequently to match the shape and density.
- Prep the Trunk Wire: Insert the trunk wire securely into the top-center of the Earth Brown soil part of the pot. (If you didn’t use wire, you will need to stuff the trunk very firmly.)
- Attach the Trunk: Sew the base of the Brown Trunk (Rd 26) onto the soil center.
- Position and Shape: Gently bend and twist the wire inside the trunk to achieve the distinctive bonsai posture. Make sure the upper branches are bent to hold the foliage horizontally.
- Attach Branches: Position your 6 prepared branch segments (Patterns A and B) along the curves and top of the main trunk. Study the composition of image_0.png to decide where you want branches to emerge. Pin them first, then sew them securely. You may need to insert small bits of wire into the larger branch segments (Pattern B) for stability.
- Assemble Foliage: Take two green pads. Place them wrong sides together (or right sides together, and we will sew them in reverse and turn). Sandwich the tip of a brown branch between them. Using the long tail from one pad, sew around the edge, connecting the two pads and securing them to the branch. This creates the thick, segmented ‘foliage cloud’ look.
- Weave in All Ends: Use your tapestry needle to hide all remaining yarn tails within the work.
Variations: How to Make Your Bonsai Unique
This pattern is a perfect canvas for customization. Try these ideas to put your own FoodieRipple spin on it:
- Autumn Colors: Use shades of gold, copper, orange, and russet for the foliage pads to make a fall bonsai.
- Flowering Bonsai: Using a tiny 2mm hook, crochet tiny five-petal flowers (5 sc in mr, pull tight) using white or pink lace yarn. Sew them onto the green foliage pads for a cherry blossom or azalea effect.
- Miniature Diorama: Before closing Rd 22 of the soil, insert a tiny river rock, some crochet ‘moss’ (using green eyelash yarn), or a miniature garden bridge.
- Scale Up: Use super bulky yarn and a 9mm hook to create a large-scale statement piece (your wire structure must be very thick and stable for this, perhaps using floral foam instead of cardboard in the base).
Thank you for crafting with us! We can’t wait to see your own Zen creation. We would love to see your finished work; it truly inspires us!
Pin It to Win It!
If you loved this free crochet pattern, please share the tranquility! Pin one of our hero images to your favorite crochet board so others can find this Zen project.


