The Best Fluffy Pancakes recipe you will fall in love with. Full of tips and tricks to help you make the best pancakes.
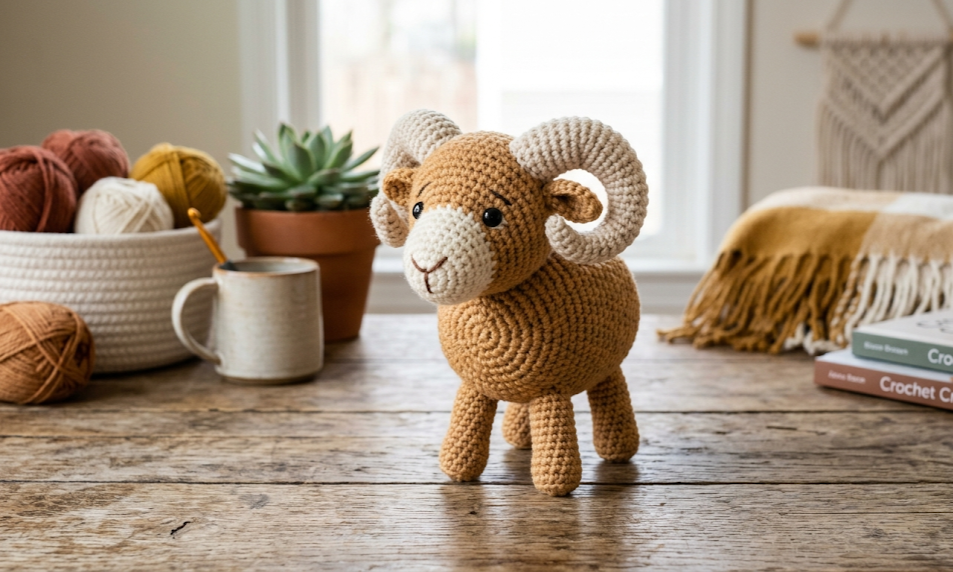
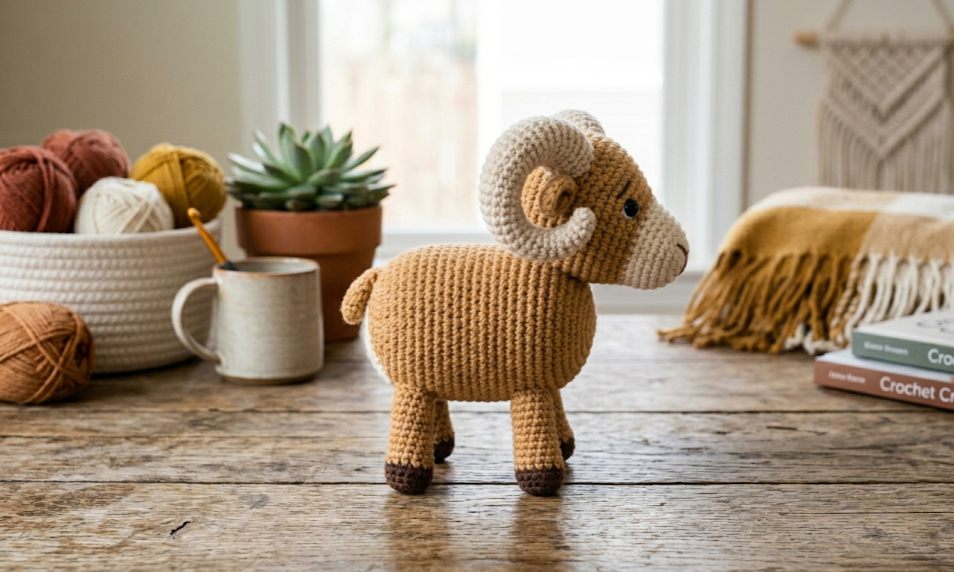
There is something irresistibly charming about a tiny bighorn sheep sitting in the palm of your hand. Bobby the Bighorn Sheep Amigurumi is exactly that — a palm-sized crocheted ram with sweeping spiral horns, a plump caramel-brown body, and the kind of personality that makes everyone in the room stop and say, “Oh my goodness, did you make that?” Standing just about 10 cm (4 inches) tall and stretching roughly 12 cm (4.7 inches) from snout to tail, Bobby is compact enough to perch on a bookshelf, tuck into a gift bag, or sit proudly on a desk as the most distinguished paperweight anyone has ever owned.
This free crochet pattern is written in full for intermediate crocheters — meaning you should be comfortable with crocheting in the round, working magic rings, and executing an invisible decrease before you begin. If you have made a basic amigurumi ball or head before, you have the core skills needed to complete Bobby from start to finish. The spiral horns are the trickiest element, but a detailed technique note below will walk you through them step by step. No external references needed — everything you need is right here.
Whether you are making Bobby as a birthday gift, a nature-lover’s keepsake, a wildlife nursery decoration, or simply for the joy of the craft, this pattern delivers a satisfying, detailed result that looks far more complex than it actually is.
|
Difficulty
Intermediate
|
Time
5–7 Hours
|
Hook Size
3.5 mm (E/4)
|
Yarn Weight
DK / #3
|
Finished Size
10 cm × 12 cm
|
Gauge
18 sc × 20 rows = 10 cm (4 in) square, worked in continuous rounds of single crochet.
Hook used: 3.5 mm (US E/4)
Yarn weight: DK / Light Worsted (#3)
Always work a gauge swatch before beginning. Amigurumi fit and proportion depend heavily on gauge. If your swatch is too large, go down one hook size. If too small, go up one hook size.
Materials List
- Yarn A — Tan / Caramel Brown DK weight yarn, approx. 60 g (body, head, legs, horns)
- Yarn B — Cream / Off-White DK weight yarn, approx. 10 g (muzzle, inner ear)
- Yarn C — Dark Brown DK weight yarn, approx. 5 g (hooves, optional horn tips)
- 3.5 mm (US E/4) crochet hook
- Two 9 mm black safety eyes
- Polyester fiberfill stuffing
- Yarn needle (tapestry needle for assembly)
- Stitch markers (2–3)
- Scissors
- Black embroidery floss and needle (for nose embroidery)
- Optional: pipe cleaners / chenille stems (2 × 15 cm) for leg armature if desired
Abbreviations
| Abbreviation | Meaning |
|---|---|
| MR | Magic Ring — pull a loop tight to form a closed center |
| sc | Single crochet |
| inc | Increase — 2 sc in the same stitch |
| dec | Invisible decrease — insert hook through front loops of next 2 sts, yarn over, pull through, yarn over, pull through 2 loops |
| sl st | Slip stitch |
| ch | Chain |
| BLO | Back Loop Only — insert hook through back loop only of the stitch |
| FLO | Front Loop Only — insert hook through front loop only |
| st(s) | Stitch(es) |
| rnd | Round |
| ( ) | Stitch count at end of round |
Note on the invisible decrease (dec): Rather than inserting through both loops of two stitches, you insert through only the front loops of the next two stitches before completing the decrease. This leaves a flatter, less visible join — essential for clean amigurumi surfaces.
Pattern Instructions
Work in continuous spiral rounds unless otherwise noted. Do not join rounds unless instructed. Place a stitch marker in the first stitch of each round and move it up as you go.
PART A — HEAD
Using Yarn A:
- Rnd 1: MR, 6 sc into ring. (6)
- Rnd 2: inc in each st around. (12)
- Rnd 3: [sc 1, inc] × 6. (18)
- Rnd 4: [sc 2, inc] × 6. (24)
- Rnd 5: [sc 3, inc] × 6. (30)
- Rnd 6: [sc 4, inc] × 6. (36)
- Rnds 7–12: sc in each st around. (36) — 6 rounds even
- Rnd 13: [sc 4, dec] × 6. (30)
- Rnd 14: [sc 3, dec] × 6. (24)
Insert safety eyes between Rnds 8–9, approximately 10 stitches apart.
- Rnd 15: [sc 2, dec] × 6. (18)
Stuff head firmly with fiberfill now.
- Rnd 16: [sc 1, dec] × 6. (12)
- Rnd 17: [dec] × 6. (6)
Close with sl st, fasten off, weave in end.
PART B — MUZZLE
Using Yarn B:
- Rnd 1: MR, 6 sc into ring. (6)
- Rnd 2: inc in each st around. (12)
- Rnd 3: [sc 1, inc] × 6. (18)
- Rnds 4–5: sc in each st around. (18) — 2 rounds even
Do not stuff. Fasten off, leaving a 25 cm tail for sewing.
Embroider nose: Using black embroidery floss, stitch a small inverted V-shape centered on the flat front of the muzzle before attaching it to the head.
PART C — BODY
Using Yarn A:
- Rnd 1: MR, 6 sc into ring. (6)
- Rnd 2: inc in each st around. (12)
- Rnd 3: [sc 1, inc] × 6. (18)
- Rnd 4: [sc 2, inc] × 6. (24)
- Rnd 5: [sc 3, inc] × 6. (30)
- Rnd 6: [sc 4, inc] × 6. (36)
- Rnds 7–16: sc in each st around. (36) — 10 rounds even
- Rnd 17: [sc 4, dec] × 6. (30)
- Rnd 18: [sc 3, dec] × 6. (24)
Stuff body firmly.
- Rnd 19: [sc 2, dec] × 6. (18)
- Rnd 20: [sc 1, dec] × 6. (12)
- Rnd 21: [dec] × 6. (6)
Close, fasten off, weave in end.
PART D — LEGS (Make 4)
Using Yarn A, with Yarn C for hoof section:
Using Yarn C (hoof):
- Rnd 1: MR, 6 sc. (6)
- Rnd 2: inc in each st. (12)
- Rnds 3–4: sc around. (12) — 2 rounds even
Switch to Yarn A:
- Rnds 5–10: sc around. (12) — 6 rounds even
Tip: If you want poseable legs, insert a pipe cleaner (chenille stem) folded in half before closing. Leave 1 cm of pipe cleaner protruding from the top open end to anchor into the body.
Stuff lightly or leave unstuffed for firmer structure. Fasten off, leaving a 25 cm tail for sewing.
PART E — EARS (Make 2)
Using Yarn A:
- Rnd 1: MR, 6 sc. (6)
- Rnd 2: [sc 1, inc] × 3. (9)
- Rnd 3: sc around. (9)
- Rnd 4: [sc 1, dec] × 3. (6)
Do not stuff. Flatten slightly and fasten off, leaving tail for sewing.
Optional: Work Rnd 1 of each ear in Yarn B (cream) and switch to Yarn A at Rnd 2 for a two-tone ear interior.
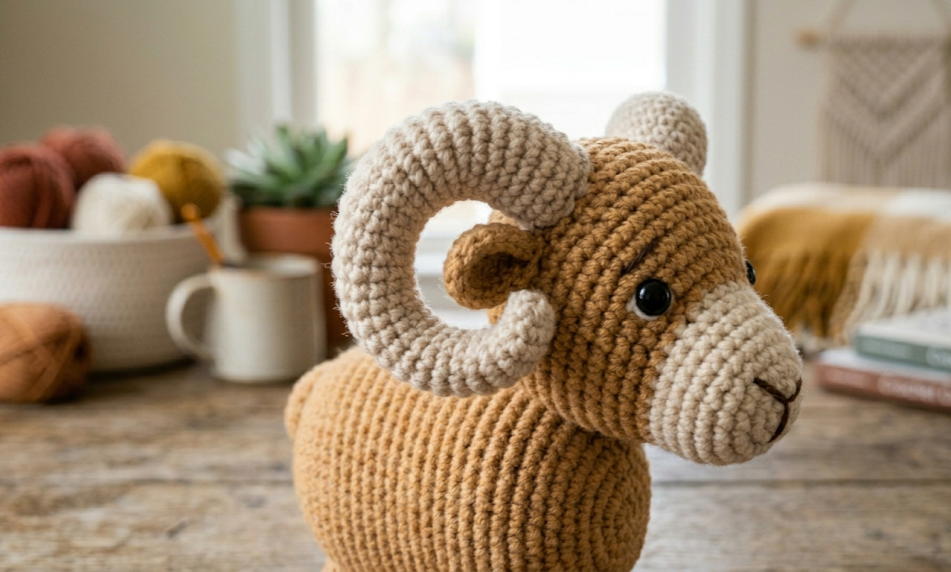
PART F — HORNS (Make 2)
The horns are the signature detail of Bobby and are worked in a tight spiral tube that curves naturally.
Using Yarn A:
- Rnd 1: MR, 4 sc. (4)
- Rnd 2: inc in each st. (8)
- Rnds 3–4: sc around. (8)
- Rnd 5: [sc 2, dec] × 2. (6)
- Rnds 6–9: sc around. (6)
- Rnd 10: [sc 1, dec] × 2. (4)
- Rnds 11–14: sc around. (4)
- Rnd 15: dec × 2. (2)
Fasten off, leaving a 20 cm tail. Stuff the wide base end firmly; leave the tip end lightly stuffed. To achieve the curve: as you stuff, use the yarn needle handle to gently press the horn into a sweeping C-curve before the fiberfill sets. The natural tension of the tight stitches will hold the shape.
Assembly Steps
- Attach head to body: Position the head at the front-top of the body, with approximately 3–4 stitches of overlap at the neck. Pin in place and sew around the full circumference using the yarn tail and a mattress stitch. The neck join should feel solid — Bobby’s head is relatively large and needs a secure connection.
- Attach muzzle: Center the muzzle on the lower front of the head, approximately 2 rounds above the chin. Sew around the outer edge, leaving a small gap to push in a tiny amount of fiberfill before closing completely for a slightly rounded muzzle.
- Attach legs: Position the two front legs approximately 2–3 cm apart on the lower front of the body, and the two back legs 2–3 cm apart on the lower back. All four legs should sit so Bobby stands flat and stable. Sew each leg through the full thickness of the body for 4–5 stitches to anchor firmly.
- Attach ears: Position ears on either side of the top of the head, approximately 2 stitches to the outside of where the horns will sit. Angle them slightly outward. Sew flat against the head.
- Attach horns: Position horns just forward of the ears, sewing the wide base firmly to the head. Curve the tips of the horns backward and slightly inward toward each other — this is the bighorn’s characteristic look. Use a few extra stitches at the tip to tack each horn lightly against the head to keep the curve in place.
- Finishing: Trim all tails, weave in any remaining ends. Give Bobby a gentle squeeze to redistribute stuffing evenly.
Beginner & Intermediate Tips
- Magic ring tension: Pull the magic ring tightly before working your first round — a loose ring leaves a hole at the center of each piece that will show through the yarn.
- Working in spiral: Amigurumi is worked in continuous spiral rounds (no join, no turning chain). This means your rows will naturally stagger — use a stitch marker religiously to know where each round starts.
- Invisible decrease is not optional: A standard sc2tog leaves a visible bump on amigurumi. The invisible decrease (through front loops only) keeps the surface smooth. Practice it on a swatch before starting Bobby’s head.
- Horn shaping secret: Work the horn tubes as tightly as possible — go down one hook size if needed. Tight stitches prevent fiberfill from showing through and help the tube hold its curve without internal wire.
- Stuffing method: Stuff as you go when closing decreases. Adding stuffing after the opening is too small leads to uneven lumps. Stuff each piece before the opening reduces to fewer than 10 stitches.
- Leg stability: For a standing Bobby, ensure the legs are all the same length and stuffed to the same firmness. Set Bobby on a flat surface after attaching two legs before adding the remaining two to check balance.
Variations
- Baby lamb version: Work every piece with one fewer increase round — this produces a miniature version approximately 7 cm tall with a rounder, chubbier silhouette perfect for a baby mobile.
- White Rocky Mountain bighorn: Swap Yarn A for a bright white or light grey yarn to create the white Dall sheep variant — a stunning contrast against the dark safety eyes.
- Herd set: Make three or four Bobbys in slightly different colorways — tan, grey, and cream — and display them together on a driftwood slice for a wildlife-themed shelf arrangement.
- Bobby as a keychain: After completing all pieces, do not stuff the body — attach a keychain ring through the back of the body before closing. The flat unstuffed silhouette works beautifully as a bag charm.
- Seasonal Bobby: Crochet a tiny removable scarf in red or green yarn (chain 50, sl st back) to loop around his neck for a holiday gift version.
If you made Bobby, we would love to see your finished sheep! Save this pattern to your crochet boards so you can find it again, and tag your finished photo with #FoodieRippleCrochet on Pinterest. Every share helps other crafters discover this free pattern — and Bobby deserves all the admirers he can get. 🐏


