The Best Fluffy Pancakes recipe you will fall in love with. Full of tips and tricks to help you make the best pancakes.
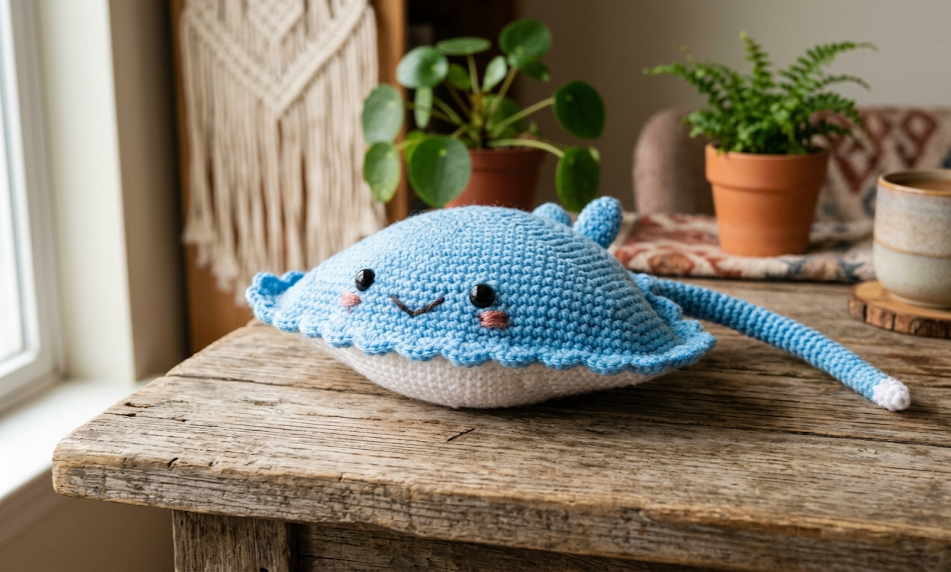
If you have ever wanted to bring the ocean floor to life with just a hook and some yarn, this Cute Little Ray crochet pattern is exactly the project you have been waiting for. This sweet amigurumi stingray features a flat, diamond-shaped body in crisp white with a sky-blue scalloped border, a long slender tail, embroidered rosy cheeks, and tiny black bead eyes that give it an irresistibly cheerful expression. Whether you are crocheting a gift for a child, adding to an ocean-themed amigurumi collection, or simply looking for a satisfying weekend project, this little ray delivers a huge amount of charm in a small, palm-sized package.
Finished at approximately 10 cm wide and 14 cm long including the tail, this stingray is compact enough to clip to a bag, sit on a desk, or nestle inside a gift box. The pattern uses only basic crochet stitches — single crochet, slip stitch, and magic ring — making it accessible to anyone who has moved past their very first project. A gentle introduction to flat amigurumi construction, it is a wonderful bridge between beginner crocheting and more complex amigurumi designs.
|
Difficulty
Easy
|
Time
2–3 Hours
|
Hook Size
3.5 mm
|
Yarn Weight
DK / Light
|
Finished Size
10 × 14 cm
|
Gauge
Work a 10 cm × 10 cm swatch in single crochet using a 3.5 mm hook and DK weight yarn before beginning.
- 17 stitches × 20 rows = 10 cm × 10 cm
- Hook size: 3.5 mm (US E/4)
- Yarn weight: DK / Light Worsted (Weight 3)
Note: Gauge is important for achieving the correct finished size. If your swatch is larger, go down a hook size. If it is smaller, go up a hook size.
Materials List
Yarn:
- Color A — White: approx. 25 g DK weight (main body)
- Color B — Sky Blue: approx. 15 g DK weight (border, tail)
Hook: 3.5 mm (US E/4)
Notions:
- Two 6 mm black safety eyes
- Polyester fiberfill stuffing (small amount)
- Black embroidery floss (for mouth and whisker lines)
- Pink embroidery floss or yarn (for cheek blush circles)
- Yarn needle (tapestry needle)
- Stitch markers
- Scissors
Abbreviations
| Abbreviation | Meaning |
|---|---|
| MR | Magic Ring — pull a loop of yarn into a circle, work stitches into it, then pull tight to close the center hole |
| ch | Chain |
| sl st | Slip stitch — insert hook, yarn over, pull through both loops in one motion; used to join rounds |
| sc | Single crochet |
| inc | Increase — work 2 sc into the same stitch |
| dec | Invisible decrease — insert hook through front loops only of next 2 stitches, yarn over, pull through both, yarn over, pull through remaining 2 loops; creates a nearly invisible decrease |
| BLO | Back Loop Only — insert hook into the back loop only of the stitch; leaves a visible ridge on the fabric |
| FLO | Front Loop Only — insert hook into the front loop only |
| st(s) | Stitch(es) |
| rnd | Round |
| rep | Repeat |
| PM | Place marker |
Pattern Instructions
PART A — Body (worked in continuous rounds, White)
Round 1: MR, 6 sc into ring. Pull ring closed. (6 sts)
Magic ring note: Leave a 15 cm tail for weaving in. Pull the ring tight before beginning Round 2.
Round 2: Inc in each st around. (12 sts)
Round 3: Sc 1, inc rep 6 times. (18 sts)
Round 4: Sc 2, inc rep 6 times. (24 sts)
Round 5: Sc 3, inc rep 6 times. (30 sts)
Round 6: Sc 4, inc rep 6 times. (36 sts)
Round 7: Sc 5, inc rep 6 times. (42 sts)
Round 8: Sc 6, inc rep 6 times. (48 sts)
Rounds 9–11: Sc in each st around. (48 sts)
At this point the piece should look like a flat disc approximately 8 cm in diameter. Do not stuff — the body is flat.
Round 12 — Shape Wings (create the diamond silhouette):
Sc 10, inc, sc 3, inc, sc 10, inc, sc 3, inc, sc 18. (52 sts)
Round 13: Sc in each st around. (52 sts)
Round 14: Sc 11, inc, sc 3, inc, sc 11, inc, sc 3, inc, sc 18. (56 sts)
Round 15: Sc in each st around. (56 sts)
Do not fasten off. Continue to border.
PART B — Scalloped Border (Sky Blue, joined in same round)
Change to Color B (Sky Blue) by pulling the new yarn through the last loop of the final sc on Round 15.
Border Round 1: Sc 1, ch 2, sc 1 in same st (corner made), sc 4 rep around, adjusting corner positions at the 4 wing tips. Join with sl st to first sc. (approx. 56 sts + 4 ch-2 corners)
Border Round 2 — Scallop Edge: In each ch-2 corner space work: (sc, hdc, dc, hdc, sc). Between corners, sc in each st. Join with sl st. Fasten off and weave in end.
Tip: The scallops form naturally when you work the (sc, hdc, dc, hdc, sc) fan into each corner space. Keep tension consistent so all four corners look even.
PART C — Tail (Sky Blue, worked in rounds)
Round 1: MR, 4 sc into ring. Pull tight. (4 sts)
Rounds 2–3: Sc in each st around. (4 sts)
Round 4: Sc 1, inc rep 2 times. (6 sts)
Rounds 5–12: Sc in each st around. (6 sts)
Round 13: Sc 1, inc rep 3 times. (9 sts)
Rounds 14–18: Sc in each st around. (9 sts)
The tail should measure approximately 7–8 cm long at this point.
Fasten off, leaving a 20 cm sewing tail. Do not stuff.
PART D — Face Details (Embroidery)
Before assembling, embroider the face onto the white body center.
- Eyes: Insert safety eyes approximately 1.5 cm apart, centered on the body, about 1 cm above the midpoint of the circle. Lock washers in place from the back.
- Smile: Thread black embroidery floss onto a yarn needle. Starting 0.5 cm below the left eye position, embroider a gentle curved line (3–4 stitches) ending 0.5 cm below the right eye. The curve should arch downward slightly.
- Whisker lines: Embroider 2–3 tiny straight stitches radiating outward from each side of the smile, approximately 0.5 cm long each.
- Blush cheeks: Using pink floss or a strand of pink yarn, embroider a small circular cluster of satin stitches (approximately 1 cm diameter) on each side of the smile, directly below each eye.
Assembly Steps
- Attach tail to body: Position the open end of the tail at the bottom center point of the diamond body. Using the 20 cm sewing tail and a yarn needle, whip stitch around the opening securely, sewing through the back loops of the body edge stitches. Pull firmly to close any gap. The tail should point straight down from the body’s lowest wing tip.
- Close the body back: If the body has any remaining opening from the magic ring, use the starting yarn tail to cinch it fully closed with a few overhand stitches. Weave in the tail on the wrong side.
- Check alignment: Lay the finished ray face-up on a flat surface. The tail should hang down from the center bottom point, and the four wing tips should be roughly equal in size. Adjust stuffing if any small amount was added for dimension.
- Final weave-in: Weave in all yarn ends securely. Trim close to the surface.
- Optional hanging loop: With Color B, attach a 12 cm chain at the top wing tip and join with sl st to create a hanging loop for display or use as a bag charm.
Beginner & Intermediate Tips
- Keeping rounds tidy: Place a stitch marker at the beginning of each round and move it up as you go. The continuous rounds can be tricky to track without one.
- Invisible decrease: Always use the invisible decrease (through front loops only) when decreasing on amigurumi surfaces. The standard sc2tog leaves a visible V that can distort the flat body appearance.
- Tension on the scallop border: Work the scallop stitches loosely. If you crochet tightly, the border will curl inward and the scalloped edge won’t lie flat or flare outward as intended.
- Safety eye placement before closing: Always attach safety eyes before the body is fully assembled or any back layer is obscured — once the washer snaps on, removal is very difficult.
- Joining new yarn cleanly: When switching from White to Sky Blue for the border, leave a 10 cm tail on both ends and weave them in opposing directions for a secure, invisible join.
- Tail curl prevention: Because the tail is worked in the round with very few stitches, it naturally wants to curl. Lightly steam blocking the finished tail with a damp cloth and your fingers can straighten it without flattening the texture.
Variations
- Mini Ocean Set: Make three rays in graduating sizes (reduce rounds by 2, 4, and 6 respectively) and display them as a family. Use the same color palette for cohesion or experiment with coral, teal, and lavender for a fantasy reef look.
- Manta Ray Version: Skip the tail entirely or make it very short. Elongate the wing rounds by 4–6 additional shaping rounds to create broader, more sweeping wings reminiscent of a manta ray.
- Keychain Charm: Attach a metal keychain ring through the top wing tip after fastening off. Use thinner fingering weight yarn and a 2.5 mm hook for a ray that fits on your keys at roughly half the standard size.
- Seasonal Colors: Swap the blue and white for burnt orange and cream for an autumn ray, or use red and white for a Valentine’s heart-ray hybrid (add a small heart embroidered on the white body). Lilac and mint work beautifully for a spring nursery theme.
- Textured Body Center: Work Rounds 5–11 of the body in BLO (back loop only) to create a subtle ribbed texture across the white center, adding dimension that photographs particularly well.
Save This Pattern on Pinterest 📌
Love this Cute Little Ray? Save this free crochet pattern to your ocean amigurumi board so you can come back to it any time! Share your finished ray with us using #FoodieRippleCrochet — we can’t wait to see your version of this adorable little ocean friend.


