The Best Fluffy Pancakes recipe you will fall in love with. Full of tips and tricks to help you make the best pancakes.
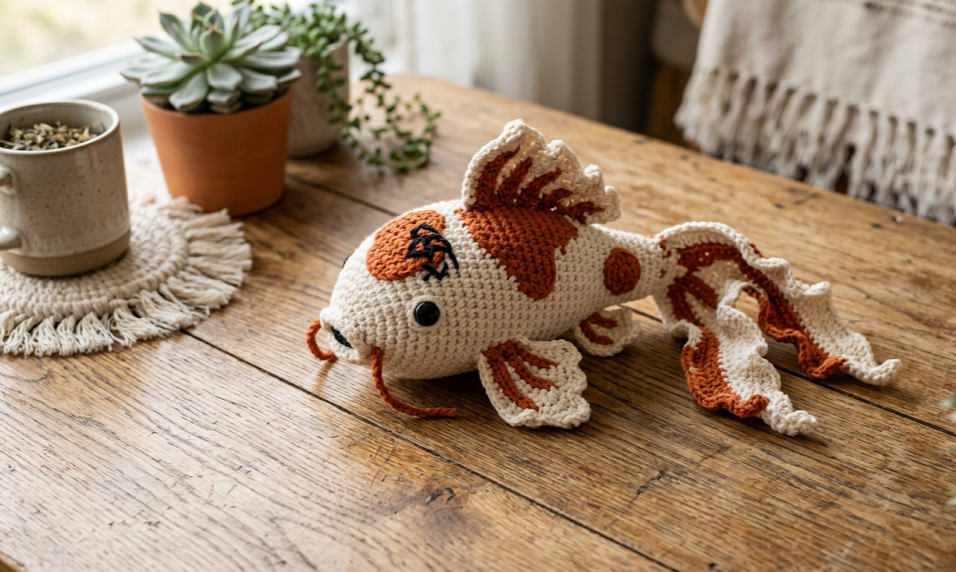
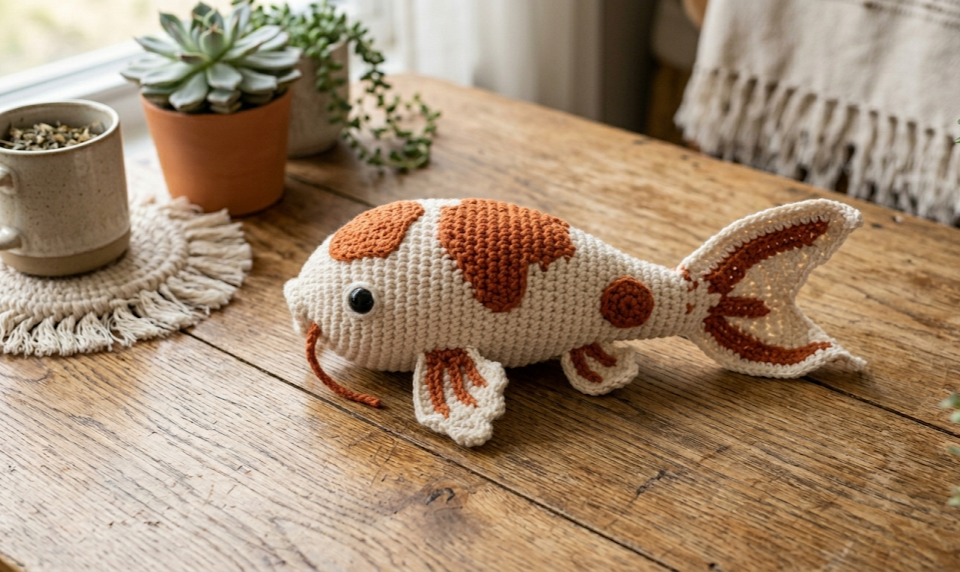
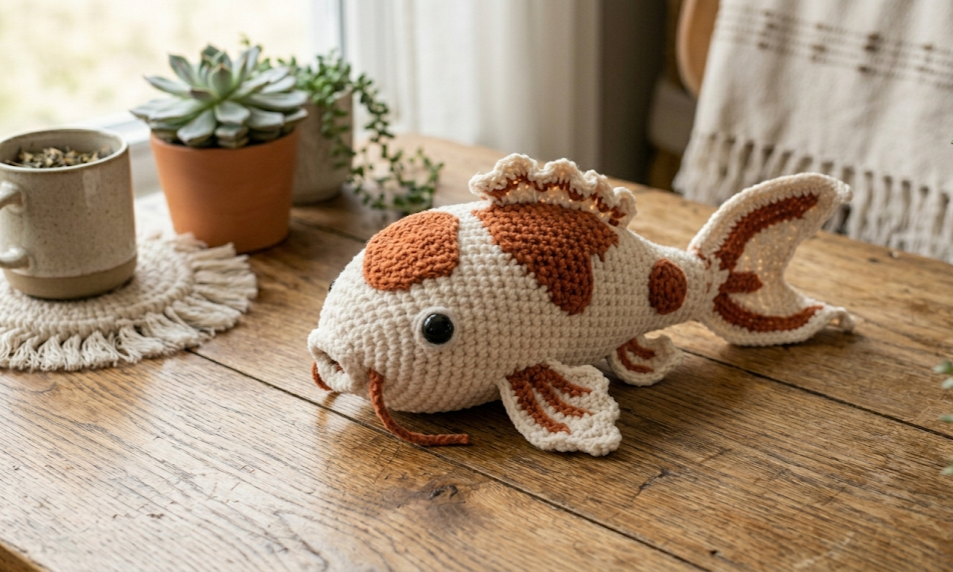
There is something quietly magical about a koi carp. In Japanese garden culture, koi symbolize perseverance, good luck, and abundance — and now you can bring that same energy into your home in the most tactile, huggable way possible. This crochet koi carp amigurumi pattern creates a plump, satisfying fish with bold burnt orange and cream white coloring, delicate ruffled fins, a graceful fan tail, and expressive black safety eyes. Whether you are making it as a gift, a desk companion, or a whimsical addition to a nursery, this pattern produces a finished fish approximately 20–23 cm (8–9 inches) long — perfect for holding in one hand or displaying in a bowl of decorative pebbles.
The pattern is worked in continuous rounds using the magic ring method, with color changes and surface finishing for the patch markings. The yarn used is a chunky velvet or chenille-style yarn, which gives the finished koi that soft, pillowy texture seen in the photos. If you have made simple amigurumi before, this pattern is absolutely within reach. If this is your first amigurumi, take your time with the magic ring and invisible decrease — both are explained in full below.
|
Difficulty
Intermediate
|
Time
4–6 Hours
|
Hook Size
5.0 mm
|
Yarn Weight
Bulky / Chenille
|
Finished Size
20–23 cm (8–9 in)
|
Gauge
Before beginning, work a gauge swatch to ensure your finished koi matches the expected size.
Gauge: 12 sc × 14 rows = 10 cm × 10 cm (4 in × 4 in)
Hook size: 5.0 mm (US H/8)
Yarn weight: Bulky / Chunky (Weight 5), velvet or chenille texture recommended
A tighter gauge will produce a smaller, firmer fish. A looser gauge will produce a larger, softer fish. Both are beautiful — adjust stuffing firmness accordingly.
Materials List
Yarn:
- Color A — Cream White: approximately 120 g (bulky chenille or velvet yarn)
- Color B — Burnt Orange: approximately 60 g (bulky chenille or velvet yarn)
- Color C — Black: small amount (approximately 5 g) for eye patches (optional — can use safety eyes only)
Hook: 5.0 mm crochet hook (US H/8)
Notions:
- 2 × 15 mm black safety eyes
- Polyester fiberfill stuffing
- Stitch markers (at least 2)
- Yarn needle (blunt tip, large eye)
- Scissors
- Pins for assembly
Abbreviations
| Abbreviation | Meaning |
|---|---|
| MR | Magic ring (adjustable ring) |
| sc | Single crochet |
| inc | Increase — work 2 sc into the same stitch |
| dec | Invisible decrease — insert hook through front loops only of next 2 sts, draw up a loop, yarn over and pull through all 3 loops |
| sl st | Slip stitch |
| ch | Chain |
| BLO | Back loop only — insert hook into the back loop of the stitch only |
| FLO | Front loop only — insert hook into the front loop of the stitch only |
| CC | Color change — on the last pull-through of the stitch before the color change, use the new color |
| (x) | Stitch count at the end of the round |
| R | Round |
Magic ring: Make a loop with your yarn tail, insert hook through the loop, draw up working yarn, ch 1 to secure, then work stitches into the center of the loop. Pull the yarn tail to close the ring snugly.
Invisible decrease: Insert your hook into the front loop only of the next stitch, then into the front loop only of the stitch after that. Draw up one loop through both front loops, yarn over, pull through all 3 loops on your hook. This creates a nearly invisible decrease compared to a standard sc2tog.
Pattern Instructions
Part 1: Body (Color A — Cream White)
The body is the largest piece and is worked in continuous rounds. Place a stitch marker at the beginning of each round and move it up as you work.
R1: MR, 6 sc into ring. Pull ring closed. (6)
R2: Inc in each st around. (12)
R3: Sc 1, inc repeat 6 times. (18)
R4: Sc 2, inc repeat 6 times. (24)
R5: Sc 3, inc repeat 6 times. (30)
R6: Sc 4, inc repeat 6 times. (36)
R7: Sc 5, inc repeat 6 times. (42)
R8: Sc 6, inc repeat 6 times. (48)
R9–R18: Sc in each st around. (48) [10 even rounds]
R19: Sc 6, dec repeat 6 times. (42)
R20: Sc in each st around. (42)
R21: Sc 5, dec repeat 6 times. (36)
→ At this point, attach safety eyes between R10 and R11, approximately 8 stitches apart. The larger eye patches in Color B or C can be embroidered or appliquéd around the safety eyes now if desired (see Finishing section).
R22: Sc 4, dec repeat 6 times. (30)
R23: Sc in each st around. (30)
R24: Sc 3, dec repeat 6 times. (24)
→ Begin stuffing the body firmly. Continue stuffing as you close.
R25: Sc 2, dec repeat 6 times. (18)
R26: Sc 1, dec repeat 6 times. (12)
R27: Dec 6 times. (6)
Fasten off, leaving a 15 cm tail. Thread through the remaining 6 sts and pull closed. Weave in end.
Part 2: Orange Patch (Color B — Burnt Orange)
The main orange body patch is worked as a flat oval piece and sewn to the top of the body, or worked in surface slip stitch directly onto the body.
Option A — Sewn Patch:
R1: MR, 6 sc. (6)
R2: Inc in each st. (12)
R3: Sc 1, inc repeat 6 times. (18)
R4: Sc 2, inc repeat 6 times. (24)
R5: Sc in each st around. (24)
Fasten off, leaving a 30 cm sewing tail. Pin the patch to the back-top of the body (R5–R15 area) and sew down with mattress stitch, leaving edges slightly raised for dimension.
Option B — Surface Stitch:
With Color B and a 5.0 mm hook, insert hook into any stitch on the body’s top surface, draw up a loop of Color B, and work surface sl st in a loose oval shape covering approximately R4–R14. Fasten off and weave in.
Part 3: Dorsal Fin (Color A — Cream White)
The dorsal fin is worked flat in rows with a ruffled edge.
Row 1: Ch 14. Sc in 2nd ch from hook and each ch across. (13)
Row 2: Ch 1, turn. Sc 1, inc repeat 6 times, sc 1. (19)
Row 3: Ch 1, turn. Sc in BLO across. (19)
BLO note: Working through the back loop only creates a ridge on the front of the fin that mimics the segmented look of a real fish dorsal fin.
Row 4: Ch 1, turn. Sc 2, inc repeat 6 times, sc 1. (25)
Fasten off, leaving a 25 cm sewing tail.
Part 4: Pectoral Fins — Make 2 (Color A — Cream White)
R1: MR, 6 sc. (6)
R2: Inc in each st. (12)
R3: Sc 1, inc repeat 6 times. (18)
R4: Sc in each st around. (18)
R5: Sc 1, dec repeat 6 times. (12)
Fasten off, leaving a 20 cm sewing tail. Do not stuff. Flatten the piece.
Part 5: Tail Fin (Color A — Cream White, with Color B accent)
The tail is made in two mirrored fan sections joined together.
Fan Section — Make 2:
R1: MR, 5 sc. (5)
R2: Inc in each st. (10)
R3: Sc 1, inc repeat 5 times. (15)
R4: Sc 2, inc repeat 5 times. (20)
R5: Sc in each st around. (20)
R6: Ch 1, turn. Sc 3, inc repeat 5 times. (25)
Fasten off the first fan. Do not fasten off the second fan — hold both fans together (wrong sides facing) and sl st around the outer edge to join. Leave the flat inner edge open for attaching to the body. Fasten off, leaving a 25 cm tail.
Optional: Using Color B, work a row of surface sl st along the outer edge of each fan for the orange accent trim.
Part 6: Ventral Fin / Bottom Fin — Make 1 (Color A)
R1: MR, 4 sc. (4)
R2: Inc in each st. (8)
R3: Sc 1, inc repeat 4 times. (12)
R4: Sc in each st around. (12)
Fasten off, leaving a 20 cm tail. Flatten. Do not stuff.
Assembly Steps
- Tail: Pin the joined tail fan piece to the narrow end of the body (R26–R27 area). The flat open edge of the tail should align with the body’s decrease point. Sew around the full opening with mattress stitch, approx. 3–4 cm of attachment circumference. Pull firmly and weave in the tail.
- Dorsal Fin: Pin the dorsal fin along the top center spine of the body, running from approximately R8 to R16. The ruffled (wider) edge faces upward. Sew down the flat bottom edge using small whipstitches every 2–3 stitches, approximately 8 cm of total sewing length.
- Pectoral Fins: Sew one fin to each side of the body at approximately R11–R13, centered just behind and below the eye position. Each fin should angle slightly forward and downward. Use 4–6 securing stitches around the inner flat edge.
- Ventral Fin: Sew to the underside of the body at approximately R13, centered on the belly. Use 4 stitches to secure.
- Orange Eye Patches: If embroidering, use Color B or C to make 8–10 satin stitches in an oval shape around each safety eye. Alternatively, cut small oval pieces from felt and glue or sew around the eyes.
- Final Check: Ensure all fins are securely attached by gently tugging each one. Weave in all remaining ends. If any stuffing shows through gaps, use your yarn needle to redistribute the fiberfill from the outside.
Beginner and Intermediate Tips
On velvet yarn: Chenille and velvet yarns can be tricky because dropped stitches are nearly invisible. Work slowly and count every round. Use a contrasting stitch marker every 12 stitches until you are confident with your count.
On the magic ring: If the ring feels too loose after pulling it closed, add a small dab of fabric glue to the tail end before weaving it in. This prevents the center from opening up over time, especially in plush toys.
On color changes: When switching between Color A and Color B mid-project, carry the unused color loosely inside the body rather than cutting and reattaching. This reduces the number of ends to weave in and creates a cleaner interior.
On stuffing firmness: The koi looks best when stuffed quite firmly — it should hold its oval shape without any soft dents. Add stuffing in small handfuls, pressing it to all edges with a stuffing tool or the eraser end of a pencil.
On safety eyes: Always attach safety eyes before the opening becomes too small to insert your hand. Once the body is fully closed, you cannot add or adjust safety eyes without cutting the yarn.
Variations
- Classic White Koi: Work the entire body in Color A and skip the orange patch entirely. Add a few pale pink stitches around the fins for a Kohaku-style koi.
- Black and White Koi (Shiro Utsuri): Replace Color B with black yarn. Work the patches in the same positions for a dramatic high-contrast koi.
- Mini Koi Mobile: Make three or four koi in different color combinations and suspend them from a driftwood branch with clear thread for a striking nursery mobile.
- Koi Bookmark: Work only R1–R6 of the body to create a small flat oval, then attach a small tail. Stuff lightly, close, and attach a ribbon loop at the tail. Makes a charming gift.
- Goldfish Variation: Swap the fan tail for a longer, more flowing double tail made by chaining an extra 6 stitches at the base of each fan section before joining.
If you made this Crochet Koi Carp Amigurumi, save it to your Pinterest boards so other crocheters can find it! Tag your finished fish with #FoodieRippleCrochet — we love seeing your colorful pond friends.


