The Best Fluffy Pancakes recipe you will fall in love with. Full of tips and tricks to help you make the best pancakes.
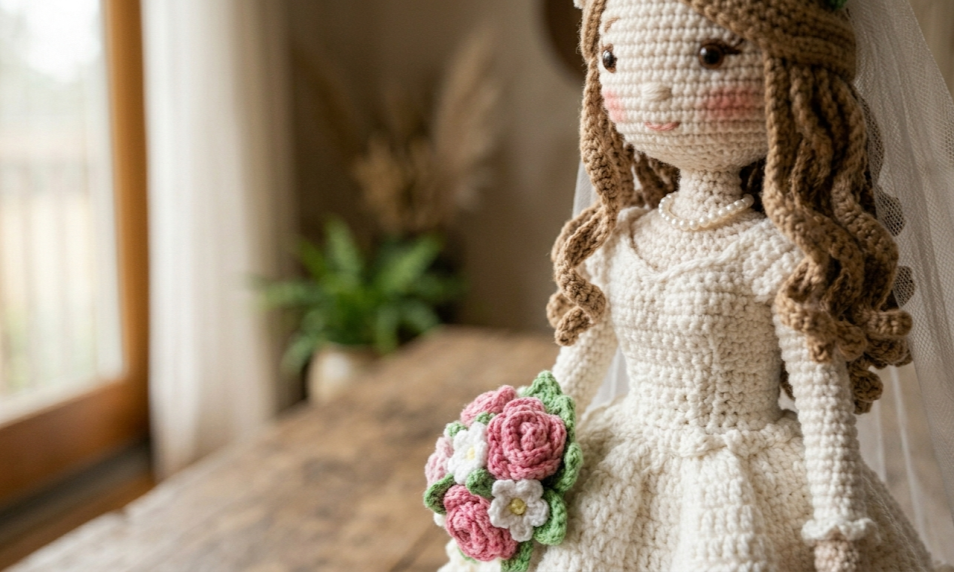
There is something profoundly magical about creating a handmade heirloom, and the Farrah Doll Amigurumi pattern captures that romance flawlessly. Adorned in a breathtaking, multi-tiered white wedding gown, a delicate tulle veil, and carrying an exquisite miniature pink rose bouquet, this crochet bride doll is designed to be cherished for generations. Whether you are looking to craft a unique, personalized wedding gift for a beautiful bride-to-be, celebrating an anniversary, or simply expanding your collection of high-end amigurumi art, Farrah brings timeless elegance right to your crochet hook.
This project is tailored beautifully for intermediate to advanced crocheters who want to challenge themselves with intricate textures, ruffles, and structural wirework. Every detail of this doll has been meticulously considered, from her cascading curly locks and sweet embroidered expression to the sweeping layers of her classic bridal gown. The result is a stunning, durable art piece that radiates the grace and joy of a wedding day. Let’s gather our materials, settle into a comfortable stitching nook, and bring this gorgeous bridal vision to life stitch by stitch.

| Difficulty Intermediate | Time 12-15 Hours | Hook Size 2.5 mm | Yarn Weight Sport (#2) | Finished Size 28 cm Tall |
Gauge
To ensure your doll has a firm fabric that keeps stuffing completely hidden inside, working up a precise gauge swatch is essential.
- Gauge Spec: 26 stitches and 26 rows = 10 cm × 10 cm (4 inches × 4 inches) using single crochet stitches with a 2.5 mm crochet hook.
- Hook Size Used: 2.5 mm (US B-1 or C-2 depending on manufacturer)
- Yarn Weight Used: Sport Weight (Fine #2), preferably a high-quality mercerized cotton for clean stitch definition and stability.
Materials List
- Sport Weight Cotton Yarn:
- Cream/Skin Tone (Head, arms, body base): 50g / 125m
- White (Dress, tiara, shoes, underwear): 100g / 250m
- Medium Brown (Hair pieces and wig cap): 50g / 125m
- Dusty Pink & Light Pink (Bouquet roses): 15g / 37m
- Crochet Hook: 2.5 mm
- Notions & Tools:
- Fiberfill polyester stuffing (high loft)
- 20-gauge aluminum craft wire (for internal armature stability)
- Wire cutters and needle-nosed pliers
- Two 8mm black safety eyes (or black embroidery floss if preferred)
- White tulle fabric (20 cm × 30 cm piece for the bridal veil)
- Miniature faux pearls (for necklace, tiara centerpiece, and bouquet accent)
- Pink cosmetic blush or pastel chalk with a small makeup brush
- Yarn needle, sewing needle, white sewing thread, and stitch markers
Abbreviations Table
| Abbreviation | Stitch / Technique Name |
| ch | Chain stitch |
| st(s) | Stitch(es) |
| sc | Single crochet |
| hdc | Half double crochet |
| dc | Double crochet |
| inc | Single crochet increase (2 sc worked into the same stitch) |
| dec | Invisible single crochet decrease |
| sl st | Slip stitch |
| BLO | Back Loop Only |
| FLO | Front Loop Only |
| MR | Magic Ring |
| Rnd / R | Round / Row |
Pattern Instructions
Head
Note: The Magic Ring (MR) is performed by looping yarn around your fingers to create an adjustable ring, pulling a loop through, and stitching over the double strand to allow the center hole to close completely tight.
Rnd 1: 6 sc in MR. (6)
Rnd 2: [inc] x 6. (12)
Rnd 3: [sc, inc] x 6. (18)
Rnd 4: [2 sc, inc] x 6. (24)
Rnd 5: [3 sc, inc] x 6. (30)
Rnd 6: [4 sc, inc] x 6. (36)
Rnd 7: [5 sc, inc] x 6. (42)
Rnd 8–18: sc in each st around. (42)
Note: Insert 8mm safety eyes between Rnds 13 and 14, leaving 8 stitches open between them. Embroider a small nose between Rnds 12 and 13 centered perfectly between the eyes.
Rnd 19: [5 sc, dec] x 6. (36)
Rnd 20: [4 sc, dec] x 6. (30)
Rnd 21: [3 sc, dec] x 6. (24)
Rnd 22: [2 sc, dec] x 6. (18)
Stuff the head firmly with fiberfill, ensuring a smooth round shape without stretching the stitches.
Rnd 23: [sc, dec] x 6. (12)
Rnd 24: [dec] x 6. (6)
Fasten off, weaving the tail end securely through the final 6 front loops and pulling closed.
Legs & Body
Make two legs using Cream yarn.
Rnd 1: 6 sc in MR. (6)
Rnd 2: [inc] x 6. (12)
Rnd 3–22: sc in each st around. (12)
Stuff the legs firmly as you progress every few rounds.
Fasten off on the first leg. Do not fasten off on the second leg; ch 3 to join them.
Rnd 23: Join to the first leg with a sc, work 11 remaining sc around first leg, work 3 sc along one side of ch-3, work 12 sc around second leg, work 3 sc along opposite side of ch-3. (30)
Rnd 24–30: sc in each st around. (30)
Switch to White yarn to begin the upper base body and undergarment layer.
Rnd 31: sc in each st around. (30)
Rnd 32: Working in BLO (Back Loop Only: insert your hook only under the rear loop farthest from you to leave a visible front ridge), [3 sc, dec] x 6. (24)
Rnd 33–36: sc in each st around. (24)
Rnd 37: [2 sc, dec] x 6. (18)
Rnd 38–40: sc in each st around. (18)
Switch to Cream yarn for the neck.
Rnd 41: Working in BLO, [sc, dec] x 6. (12)
Rnd 42–45: sc in each st around. (12)
Fasten off, leaving a very long tail for secure assembly.

Arm Armature & Arms
Make two arms using Cream yarn.
Rnd 1: 5 sc in MR. (5)
Rnd 2: [inc] x 5. (10)
Rnd 3–20: sc in each st around. (10)
Fasten off, leaving a tail for sewing.
Wire Armature Instructions: Cut a length of 20-gauge aluminum craft wire measuring 30 cm long. Using needle-nosed pliers, fold both raw wire tips over by 1 cm and wrap them securely with athletic or masking tape to prevent sharp edges from poking out through the stitches. Insert this prepared wire piece directly through the upper chest of the body doll frame between Rnd 38 and 39, centering it so an equal length of wire extends out each side. Slide each completed hollow crochet arm tube over the exposed wire ends. The wire should insert exactly to the tips of the hands. Slide the upper edge of the arms flush against the body torso and sew securely around the opening using the yarn needle.
Wedding Dress Gown Base & Ruffles
Join White yarn to the unworked front loop ridge left over from Rnd 32 of the body.
Rnd 1: [4 sc, inc] x 6. (36)
Rnd 2: [5 sc, inc] x 6. (42)
Rnd 3: Working in BLO, sc in each st around. (42)
Rnd 4–6: sc in each st around. (42)
Rnd 7: Working in BLO, [6 sc, inc] x 6. (48)
Rnd 8–11: sc in each st around. (48)
Rnd 12: Working in BLO, [7 sc, inc] x 6. (54)
Rnd 13–17: sc in each st around. (54)
Rnd 18: Working in BLO, [8 sc, inc] x 6. (60)
Rnd 19–24: sc in each st around. (60)
Rnd 25: Working in FLO (Front Loop Only: insert your hook only under the front loop closest to you), [ch 3, sl st into next st] around to create a delicate scalloped hem edge. Fasten off and weave in ends.
Skirt Ruffle Layers
To create the sweeping bridal tiers, attach White yarn to the open FLO loops of Rnd 3, Rnd 7, and Rnd 12 individually. Follow this uniform ruffle sequence for each layer:
Rnd 1: ch 2, work 3 dc into every single front loop across the entire row. Join with sl st to first dc.
Rnd 2: ch 2, *dc in next st, 2 dc in the following st; repeat from * around. Join with sl st.
Rnd 3: [ch 3, sl st into next st] repeat sequentially across the edge to produce the fluffy, structured bridal tiers. Fasten off and weave in all loose yarn ends seamlessly.
Bodice & Collar Ruffle
Join White yarn to the open FLO loop ridge of Rnd 41 at the base of the neck.
Row 1: Working downward toward the waist, sc 18 evenly around the chest surface to form a clean top edge.
Row 2: ch 1, turn, sc in each st across. (18)
Row 3 (Collar Ruffle): ch 3, work 4 dc into each stitch across to create an elegant, dramatically ruffled portrait neckline. Fasten off and weave in ends neatly.
Hair Cap & Ringlet Curls
Using Medium Brown yarn.
Rnd 1: 6 sc in MR. (6)
Rnd 2: [inc] x 6. (12)
Rnd 3: [sc, inc] x 6. (18)
Rnd 4: [2 sc, inc] x 6. (24)
Rnd 5: [3 sc, inc] x 6. (30)
Rnd 6: [4 sc, inc] x 6. (36)
Rnd 7–12: sc in each st around. (36)
Do not fasten off. We will now generate the long cascading bridal ringlets directly from the edge of the hair cap.
Strands 1–15 (Back & Sides): ch 45, starting in second ch from hook, work 2 hdc into every chain stitch back down to the hair cap base, sl st into next loop of hair cap. (This creates dense, bouncing curls).
Strands 16–20 (Bangs/Front Fringe): ch 12, hdc in each ch back to base, sl st into next loop.
Fasten off, leaving a very long tail for positioning and attaching to the head.
Bridal Tiara
Using White yarn.
Row 1: ch 15, sc in second ch from hook and in each remaining chain across, ch 1, turn. (14)
Row 2: sl st 4, hdc, [dc, ch 2, sl st into the front loop of the dc just made to form a decorative picot peak, dc] all into the next stitch to create the crown apex, hdc, sl st 6. (16)
Fasten off, leaving a tail for assembly.
Pink Rose Bouquet
Using Dusty Pink or Light Pink yarn.
Row 1: ch 21, work 2 dc into the 4th ch from hook, and work 3 dc into every single remaining chain stitch across to the end. (54)
Fasten off. Roll the ruffled strip tightly onto itself to form a rosebud configuration and secure the base stitches with a sewing needle.
Assembly Steps
- Head and Neck Support Assembly: Take a 15 cm piece of 20-gauge aluminum wire, fold it in half, and wrap it with tape. Insert this stabilizing rod 7 cm deep straight down into the center throat of the stuffed body cavity. Leave 8 cm extending upward. Carefully push the pre-stuffed head down over this structural support wire until Rnd 24 of the head meets Rnd 45 of the neck flush. Use the long cream yarn tail to sew the head securely to the neck with double-reinforced stitches.
- Hair Positioning: Place the hair cap onto the doll’s head, positioning the shorter bangs (Strands 16–20) neatly across her forehead, skimming just above her embroidered eyebrows. Arrange the long curly ringlets beautifully so they drape down over her shoulders and back. Pin securely, then sew down the main perimeter of the hair cap using the brown yarn tail. Let the curls hang loosely.
- Tiara and Veil Placement: Center the small crochet tiara on top of the doll’s head, roughly 3 cm back from the front hairline. Sew it down securely. Take your white tulle fabric, gather it tightly at the center top using a sewing needle and white thread, and sew it directly behind the tiara base so it flows gracefully down her back.
- Embellishments: Thread a fine sewing needle with white thread and string a tiny row of faux pearls around Farrah’s neck to fashion a permanent bridal necklace. Stitch a single matching pearl into the middle apex of her tiara.
- Bouquet Attachment: Gather the small crochet rosebud. Position it precisely at the midline of Farrah’s waist, and sew it directly into both hands, making it look as though she is holding her bridal bouquet down the aisle.
- Blush Application: Dip a dry makeup brush lightly into cosmetic pink blush. Gently apply it to her cheeks in a circular motion directly beneath her eyes to create a beautiful, glowing blushing bride effect.
Beginner/Intermediate Tips
- Perfecting the Invisible Decrease: When executing decreases on the face or body, always use the invisible decrease method. To do this, insert your hook into the front loops only of the next two stitches, yarn over, pull through both front loops, yarn over, and pull through the remaining two loops. This prevents unsightly gaps and ensures your fiberfill stuffing stays perfectly inside.
- Managing High-Volume Ruffles: The dress layers involve placing multiple double crochets into a single loop. This can make the stitches tight and difficult to see. Use plastic locking stitch markers to mark the absolute first stitch of every ruffle round so you don’t accidentally overcount or lose your place.
- Controlling the Curl Tension: For perfect cascading ringlets that don’t kink up, keep your tension uniform and moderately loose while working the 2 hdc into each chain stitch. If you pull too tightly, the curls will bunch up into small knots rather than flowing smoothly over the dress.
Variations
- Ombré Bridal Gown: Substitute standard white yarn on the skirt tiers for a soft gradient or ombré yarn that transitions elegantly from crisp white at the waist down to a pale blush pink or soft blue at the bottom hemline.
- Custom Hair Styling: Adjust the hair color to match a specific real-life bride! Switch out the medium brown yarn for brilliant golden yellow, deep espresso black, or vibrant ginger. You can even gather the curly strands and pin them up into a gorgeous, sophisticated bridal updo.
- Glitz & Glamour: Crochet the tiara or the final round of the dress ruffles using a metallic silver or gold embroidery filament held together with your white yarn to give the entire doll an enchanting, luminous sparkle under display lights.
- Mini Keepsake Ornament: Use a 1.25 mm crochet hook paired with fine lace-weight cotton thread (Size 10) to scale the pattern down to a precious, pocket-sized 10 cm miniature doll perfect for a wedding cake topper or Christmas tree ornament.


