The Best Fluffy Pancakes recipe you will fall in love with. Full of tips and tricks to help you make the best pancakes.
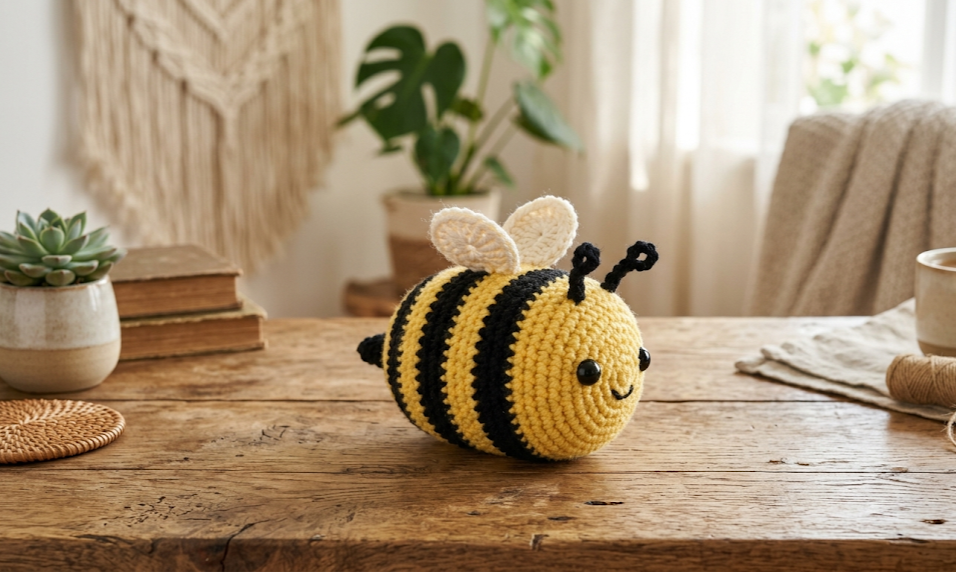
There is something undeniably charming about a tiny, round, yarn bumblebee sitting in the palm of your hand. With its plump striped body, delicate cream wings, and little black bead eyes, this crochet bumblebee amigurumi captures everything lovable about the garden’s most beloved pollinator — without a single sting. Whether you are making it as a spring decoration, a keychain charm, a gift topper, or simply a fun weekend project, this little bee is guaranteed to bring smiles. Measuring just about 4–5 cm (roughly 2 inches) tall, it is the perfect quick make for intermediate crocheters who want a satisfying finish in just a few hours.
This pattern uses basic amigurumi techniques — magic rings, increases, decreases, and working in continuous rounds — to build a compact, well-stuffed body and two flat wings. The finished bee is sturdy enough for gentle play and small enough to perch on a plant pot, hang from a bag, or cluster in a little swarm as seasonal décor. Read all the way through before you begin, gather your materials, and get ready to make something wonderfully buzzy.
|
Difficulty
Intermediate
|
Time
2–3 Hours
|
Hook Size
2.5 mm
|
Yarn Weight
DK Weight
|
Finished Size
~4–5 cm Tall
|
Gauge
7 sc × 8 rows = 5 cm (2 in) square using 2.5 mm hook and DK weight yarn, worked in the round.
Always work a gauge swatch before beginning. Tight gauge produces a denser fabric that hides stuffing better, which is ideal for amigurumi. If your swatch is larger than specified, go down a hook size; if smaller, go up a hook size.
Materials
- Black DK weight yarn — approximately 10 g
- Yellow DK weight yarn — approximately 8 g
- Cream or off-white DK weight yarn — approximately 4 g (for wings)
- 2.5 mm crochet hook
- Two 6 mm black safety eyes
- Polyester fiberfill stuffing — small amount
- Yarn needle for weaving in ends and sewing on wings
- Scissors
- Stitch markers (2, for tracking round starts)
Abbreviations
| Abbreviation | Meaning |
|---|---|
| ch | chain |
| sc | single crochet |
| inc | increase — work 2 sc into the same stitch |
| dec | invisible decrease — insert hook into front loop of next st, then front loop of st after, yarn over and pull through both loops, yarn over and pull through 2 loops on hook |
| sl st | slip stitch |
| MR | magic ring — adjustable loop used to start rounds worked in the center; pull the tail to close the hole tightly |
| BLO | back loop only — insert hook into the back loop only of the indicated stitch |
| FO | fasten off |
| st(s) | stitch(es) |
| rnd | round |
| rep | repeat |
Pattern Instructions
PART 1: BODY
The body is worked in a continuous spiral from the top down. Do not join rounds unless instructed. Place a stitch marker at the first stitch of each round and move it up as you go.
Rnd 1 (Yellow): Start with MR (magic ring — form an adjustable loop, work sc stitches into the center of the loop, then pull the tail to close the hole). Work 6 sc into MR. (6)
Rnd 2: Inc in each st around. (12)
Rnd 3: Sc 1, inc rep around. (18)
Rnd 4: Sc 2, inc rep around. (24)
Rnd 5: Sc 3, inc rep around. (30)
Rnd 6 (Black): Change to black yarn. Sc in each st around. (30)
Color change: to switch colors, complete the last yarn over of the final stitch of the previous color using the new color yarn, then continue with the new color.
Rnd 7 (Black): Sc in each st around. (30)
Rnd 8 (Yellow): Change to yellow. Sc in each st around. (30)
Rnd 9 (Yellow): Sc in each st around. (30)
Rnd 10 (Black): Change to black. Sc in each st around. (30)
Rnd 11 (Black): Sc in each st around. (30)
At this point, insert the safety eyes between Rnds 3 and 4, approximately 6 stitches apart. Secure the washers on the inside before continuing. Safety eyes cannot be adjusted once the piece is stuffed and closed.
Rnd 12 (Yellow): Change to yellow. Sc 3, dec rep around. (24)
Rnd 13: Sc 2, dec rep around. (18)
Begin stuffing firmly with fiberfill. The body should feel solid but not stretched. Add small amounts as you go rather than all at once.
Rnd 14: Sc 1, dec rep around. (12)
Rnd 15: Dec around. (6)
FO, leaving a 15 cm (6 in) tail. Thread tail onto yarn needle and weave through the front loops of all 6 remaining stitches, pull tight to close. Weave in end securely on the inside.
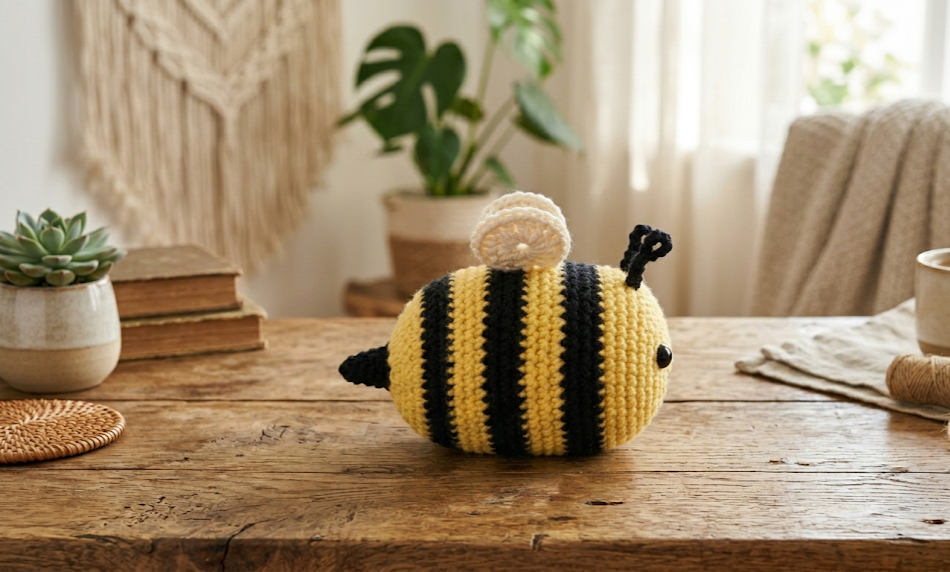
PART 2: WINGS (Make 2)
Wings are worked flat (back and forth in rows) in cream yarn.
Foundation chain: Ch 7.
Row 1: Starting in the 2nd ch from hook, sc 6 across. (6)
Row 2: Ch 1, turn. Sc 2, inc, inc, sc 2. (8)
Row 3: Ch 1, turn. Sc in each st across. (8)
Row 4: Ch 1, turn. Sc 2, dec, dec, sc 2. (6)
Row 5: Ch 1, turn. Sc 1, dec rep across. (4)
FO, leaving a 20 cm (8 in) tail for sewing. Do not weave in this tail — it will be used to attach the wing to the body.
The finished wing is an elongated oval shape. Make two identical wings.
Assembly Steps
- Position the wings: Hold the finished body with the magic ring (top) facing upward and the closed bottom facing down. Identify the center of Rnd 6 (the first black stripe) on the left and right sides of the body — this is where each wing will attach.
- Attach first wing: Using the long tail from Wing 1 and a yarn needle, stitch the base of the wing (the straight foundation chain edge) securely to the body at the identified point on Rnd 6. The wing should angle slightly upward and outward, with the pointed tip facing toward the back of the bee. Work 4–6 anchoring stitches through the wing base and body for stability.
- Attach second wing: Repeat on the opposite side, mirroring the first wing’s angle exactly. The two wings should sit symmetrically at approximately 3 o’clock and 9 o’clock positions when viewed from above.
- Check wing spacing: The base of each wing should be approximately 1.5–2 cm apart at their closest points on the body. Adjust before finishing the stitching if needed.
- Weave in all remaining tails securely on the inside of the body through the fiberfill. Trim all ends close.
- Optional — hanging loop: Using 20 cm (8 in) of black yarn, thread through the top of the body (magic ring point) and tie a secure knot to form a loop for hanging. Trim to desired length.
Beginner and Intermediate Tips
Magic ring tension: If your magic ring leaves a visible hole at the top of the body, close it more firmly by pulling the tail very snug before fastening off. You can also weave the tail through the stitches of Rnd 1 a second time for extra security.
Invisible decrease: Standard sc decreases create a noticeable bar on the outside of amigurumi. The invisible decrease (worked through front loops only) creates a nearly invisible join that keeps the surface of the bee smooth and professional-looking.
Color changes without gaps: When alternating between black and yellow stripes, carry the unused color loosely up the inside of the work rather than cutting and rejoining every two rounds. This saves time on weaving in ends and keeps the inside of the bee tidy.
Stuffing density: Amigurumi hold their shape best when stuffed firmly. A loosely stuffed bee will flatten and lose its round silhouette over time. However, avoid overstuffing to the point where stitches gap or stretch — you should not be able to see the stuffing through the yarn.
Wing stiffness: If you want the wings to hold a specific angle or have more structure, work them in a slightly thinner yarn weight than the body, or leave a very small amount of the wing un-washed so the starching effect of the cotton fibers adds rigidity. Alternatively, lightly stiffen finished wings with a diluted fabric stiffener spray.
Keeping rounds even: Amigurumi rounds can easily twist or lose count. Use two colors of stitch markers — one to mark the beginning of the round and a second to mark the midpoint. This helps you count increases and decreases accurately without recounting the entire round.
Variations
- Queen bee version: Work the body two rounds larger (adding Rnd 6: sc 4, inc rep for 36 sts, and Rnd 7 even before beginning stripes) for a noticeably larger queen. Add a tiny crochet crown made with yellow yarn and a 2 mm hook.
- Honey pot charm cluster: Make three mini bees in slightly different yellow tones — pale yellow, golden yellow, and mustard — and hang them together from a single keyring with varying lengths of yarn tails as a charm cluster.
- Lavender bee: Replace the yellow yarn with lavender purple for a whimsical fantasy bee. Pair with cream wings and tiny white bead eyes for a softer, dreamier look.
- Striped wing variation: Instead of solid cream wings, work the wings in alternating rows of cream and very pale yellow to suggest translucent, veined bee wings.
- Garden stake bee: Insert a 20 cm floral wire stem through the body from bottom to top before closing the final round, leaving 12 cm of wire extending below the bee. Wrap the wire in green floral tape and push it into a plant pot as a decorative garden stake. Ensure wire ends are folded and taped to prevent sharp points.
- Giant pillow bee: Scale the pattern up using super bulky yarn and a 10 mm hook to create a 25 cm decorative pillow bee — work the same pattern with the same round structure, simply in a much larger yarn weight.
If this tiny bumblebee made your day a little brighter, save this pattern to your crochet board on Pinterest and share your finished bee with the tag #FoodieRippleCrochet — a whole hive is waiting to see yours! 🐝


