The Best Fluffy Pancakes recipe you will fall in love with. Full of tips and tricks to help you make the best pancakes.
Intro
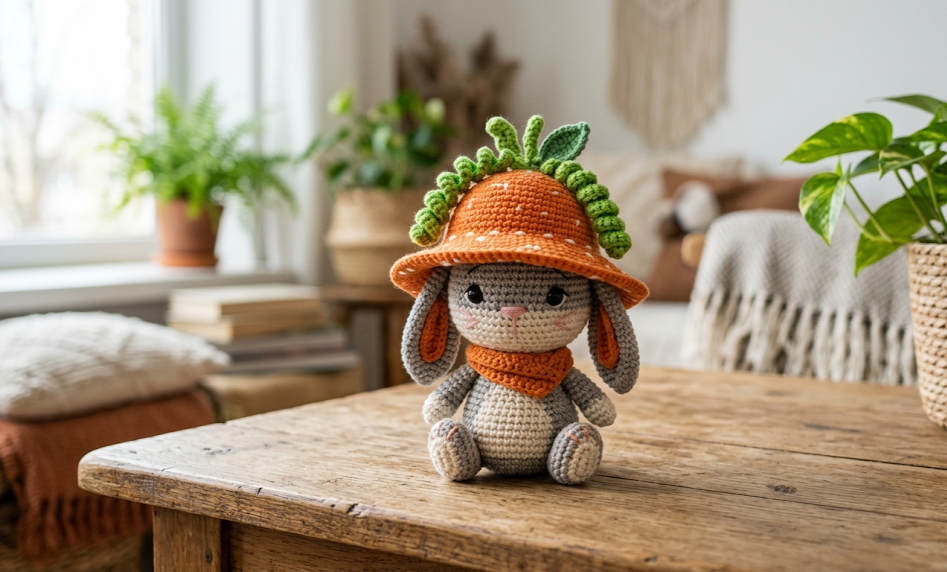
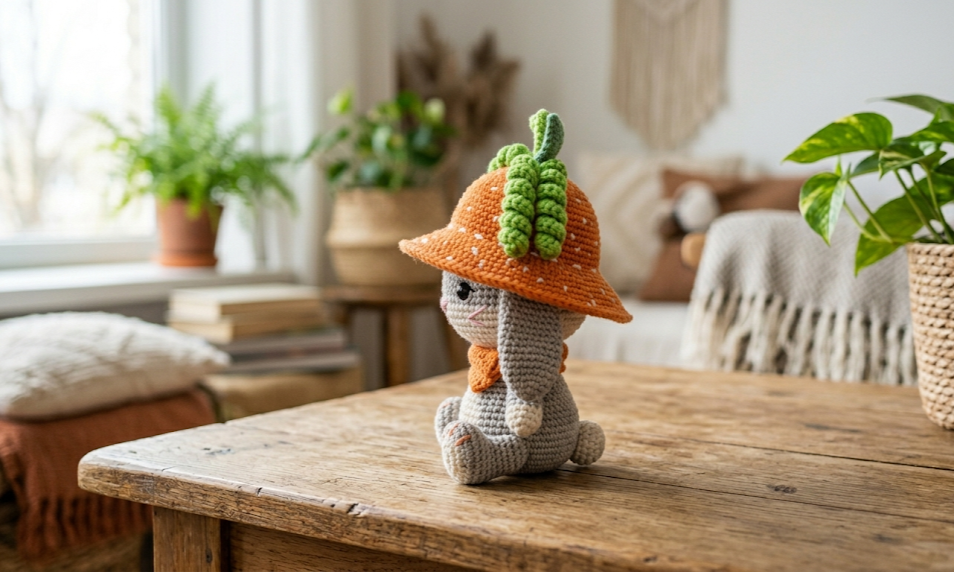
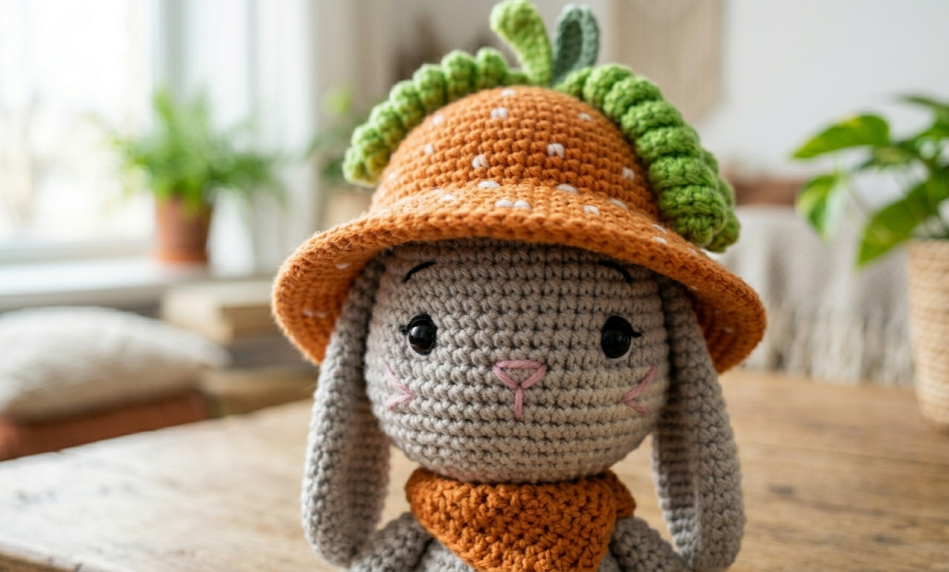
There is nothing quite as magical as watching a ball of yarn transform into an adorable, character-rich creature through the art of amigurumi. If you are looking for a whimsical handmade companion that brings a touch of garden-fresh playfulness to your shelf, the Bunny-Carrot Amigurumi is your next perfect project. This delightful design features a tiny, sweet grey rabbit completely nestled beneath an oversized, wide-brimmed carrot hat, complete with springy, coiled green sprouts. It is an enchanting toy for children, a striking piece of spring decor, or a heartwarming gift for an amigurumi enthusiast.
Crafting this piece allows you to explore various structural elements, combining traditional round-based toy making with playful textures like ribbed brims and tightly spiraled vines. The compact size makes it an ideal afternoon project that uses up small amounts of scrap yarn while building your shaping skills. By following this complete, step-by-step blueprint, you will be able to construct a durable, beautifully proportioned toy with professional finishes directly from your home workshop.
|
Difficulty
Intermediate
|
Time
4-6 Hours
|
Hook Size
2.5 mm
|
Yarn Weight
Sport (Fine)
|
Finished Size
12 cm Tall
|
Gauge
Achieving the correct gauge is crucial in amigurumi to ensure that the stuffing does not peak through your stitches and that the hat fits snugly onto the head of the rabbit body.
- Gauge Swatch Specification: 26 single crochet stitches and 28 rows = 10cm x 10cm (4” x 4”) square using a 2.5 mm crochet hook.
- Hook Size Used: 2.5 mm (US B-1 or C-2 equivalent depending on brand markings).
- Yarn Weight Used: Sport weight (Fine, Category 2) cotton or cotton-blend yarn.
If your stitches look loose or gaps form when you pull on the fabric, scale down to a 2.0 mm hook. If your fabric is stiff and difficult to work into, scale up to a 2.75 mm or 3.0 mm hook.
Materials List
To create a professional-grade Bunny-Carrot Amigurumi, gather the following supplies:
- Yarn: Sport weight cotton yarn (approximately 50g / 125m per skein) in the following colors:
- Color A: Soft Grey (approx. 25 grams)
- Color B: Vibrant Orange (approx. 20 grams)
- Color C: Light Olive Green (approx. 10 grams)
- Color D: Soft Baby Pink (approx. 5 grams)
- Crochet Hook: 2.5 mm aluminum or ergonomic crochet hook.
- Notions & Tools:
- 10 mm black plastic safety eyes with secure backings.
- Premium polyester fiberfill stuffing.
- Darning needle (tapestry needle) with a blunt tip.
- Fine embroidery needle and black embroidery floss (for mouth and eye details).
- Stitch markers (locking plastic style recommended).
- Fabric pins for positioning parts before final sewing.
- Sharp embroidery scissors.
Abbreviations Table
| Abbreviation | Stitch / Technique Name |
| ch | Chain |
| st(s) | Stitch(es) |
| sc | Single Crochet |
| inc | Single Crochet Increase (2 sc in one stitch) |
| dec | Invisible Single Crochet Decrease |
| hdc | Half Double Crochet |
| sl st | Slip Stitch |
| MR | Magic Ring |
| BLO | Back Loop Only |
| FLO | Front Loop Only |
| Rnd(s) | Round(s) |
| Row(s) | Row(s) |
Pattern Instructions
Main Body and Head (Worked as one piece)
Worked in continuous spiral rounds using Color A (Soft Grey). Do not join rounds unless specified.
Rnd 1: Begin by making a Magic Ring, then work 6 sc into the center of the ring. (A magic ring is formed by looping yarn around your fingers, inserting the hook under the first strand to pull up a loop, and chaining one to secure before working your initial stitches into the adjustable circle). (6)
Rnd 2: Work 1 inc in every stitch around. (12)
Rnd 3: [1 sc, 1 inc] repeat 6 times around. (18)
Rnd 4: [2 sc, 1 inc] repeat 6 times around. (24)
Rnd 5: [3 sc, 1 inc] repeat 6 times around. (30)
Rnd 6: [4 sc, 1 inc] repeat 6 times around. (36)
Rnd 7: [5 sc, 1 inc] repeat 6 times around. (42)
Rnd 8 – Rnd 17: Work 1 sc in each stitch around. (42)
Note: Insert the 10 mm safety eyes between Rnds 12 and 13, leaving a space of 8 stitches between them. Secure the washers tightly inside.
Rnd 18: [5 sc, 1 dec] repeat 6 times around. (An invisible decrease is made by inserting your hook into the front loops only of the next two stitches, wrapping the yarn over, pulling through both front loops, wrapping yarn over again, and pulling through the remaining two loops on your hook). (36)
Rnd 19: [4 sc, 1 dec] repeat 6 times around. (30)
Rnd 20: [3 sc, 1 dec] repeat 6 times around. (24)
This forms the neck indentation. We will now expand directly into the body.
Rnd 21: [3 sc, 1 inc] repeat 6 times around. (30)
Rnd 22: [4 sc, 1 inc] repeat 6 times around. (36)
Rnd 23 – Rnd 30: Work 1 sc in each stitch around. (36)
Begin stuffing the head firmly with polyester fiberfill, ensuring the area around the eyes remains smooth and un-distorted.
Rnd 31: [4 sc, 1 dec] repeat 6 times around. (30)
Rnd 32: [3 sc, 1 dec] repeat 6 times around. (24)
Rnd 33: [2 sc, 1 dec] repeat 6 times around. (18)
Stuff the body firmly, pushing fiberfill up into the neck area to prevent the finished bunny head from wobbling.
Rnd 34: [1 sc, 1 dec] repeat 6 times around. (12)
Rnd 35: Work 1 dec in every stitch around. (6)
Fasten off, leaving a 15 cm tail. Thread the tail onto a darning needle, weave through the front loops of the remaining 6 stitches, pull tight to close the bottom of the body cleanly, and hide the yarn tail inside.
Belly Patch
Worked in continuous rounds using Color D (Soft Baby Pink).
Rnd 1: Work 6 sc into a MR. (6)
Rnd 2: Work 1 inc in every stitch around. (12)
Rnd 3: [1 sc, 1 inc] repeat 6 times around. (18)
Fasten off, leaving a 20 cm yarn tail for sewing.
Arms (Make 2)
Worked in continuous rounds using Color A (Soft Grey).
Rnd 1: Work 6 sc into a MR. (6)
Rnd 2: [2 sc, 1 inc] repeat 2 times around. (8)
Rnd 3 – Rnd 4: Work 1 sc in each stitch around. (8)
Rnd 5: [2 sc, 1 dec] repeat 2 times around. (6)
Fasten off, leaving a 15 cm tail for assembly. Do not stuff the arms. Press the opening flat.
Legs (Make 2)
Worked in continuous rounds using Color A (Soft Grey).
Rnd 1: Work 6 sc into a MR. (6)
Rnd 2: Work 1 inc in every stitch around. (12)
Rnd 3 – Rnd 4: Work 1 sc in each stitch around. (12)
Rnd 5: [2 sc, 1 dec] repeat 3 times around. (9)
Rnd 6: Work 1 sc in each stitch around. (9)
Fasten off, leaving a 20 cm tail for sewing. Stuff the lower half of the feet lightly.
Ears (Make 2)
Worked in continuous rounds using Color A (Soft Grey).
Rnd 1: Work 6 sc into a MR. (6)
Rnd 2: [1 sc, 1 inc] repeat 3 times around. (9)
Rnd 3: [2 sc, 1 inc] repeat 3 times around. (12)
Rnd 4: [3 sc, 1 inc] repeat 3 times around. (15)
Rnd 5: [4 sc, 1 inc] repeat 3 times around. (18)
Rnd 6 – Rnd 17: Work 1 sc in each stitch around. (18)
Rnd 18: [4 sc, 1 dec] repeat 3 times around. (15)
Rnd 19: Work 1 sc in each stitch around. (15)
Rnd 20: [3 sc, 1 dec] repeat 3 times around. (12)
Fasten off, leaving a 25 cm tail for assembly. Do not stuff the ears. Flatten them out smoothly.
Carrot Hat
Worked in continuous rounds using Color B (Vibrant Orange).
Rnd 1: Work 6 sc into a MR. (6)
Rnd 2: Work 1 inc in every stitch around. (12)
Rnd 3: [1 sc, 1 inc] repeat 6 times around. (18)
Rnd 4: [2 sc, 1 inc] repeat 6 times around. (24)
Rnd 5: [3 sc, 1 inc] repeat 6 times around. (30)
Rnd 6: [4 sc, 1 inc] repeat 6 times around. (36)
Rnd 7: [5 sc, 1 inc] repeat 6 times around. (42)
Rnd 8: [6 sc, 1 inc] repeat 6 times around. (48)
Rnd 9 – Rnd 14: Work 1 sc in each stitch around. (48)
Rnd 15: We will now build the wide floppy brim. Work this round in FLO. (Working in the front loop only means you insert your hook under only the loop closest to you, leaving the back loop untouched to create an interior ridge). Work [7 sc, 1 inc] repeat 6 times around. (54)
Rnd 16: Work this round in normal loops. [8 sc, 1 inc] repeat 6 times around. (60)
Rnd 17: [9 sc, 1 inc] repeat 6 times around. (66)
Rnd 18: [10 sc, 1 inc] repeat 6 times around. (72)
Rnd 19: Work 1 sc in each stitch around to settle the edge. (72)
Rnd 20: Sl st in each stitch completely around the brim to create a stabilized, clean border. (72)
Fasten off and neatly weave in all loose orange ends.
Curly Green Sprouts (Make 3)
Worked in rows using Color C (Light Olive Green).
Row 1: Ch 26. Turning your work, start in the second chain from your hook, work into the back bump of the chain loop. (Working into the second side or back bump of a foundation chain leaves a clean, braid-like edge at the base of your row). Work 3 sc into each chain stitch across to the very end. The dense collection of multiple stitches in each chain causes the piece to automatically coil tightly into a spring configuration. (75)
Fasten off, leaving a 15 cm tail on each of the three sprouts to secure them to the carrot top.
Assembly Steps
- Attach the Belly Patch: Position the pink circular patch onto the center of the lower body between Rnds 22 and 30. Use pins to hold it symmetrical. Sew securely around the edge using your darning needle and the pink yarn tail, then pull the thread inside the body to lock it.
- Attach the Arms: Place the flattened arms on either side of the body, exactly one row below the neck line (Rnd 22). The placement should align evenly with the sides of the safety eyes. Sew the flat upper edge to the body using a straight stitch line spanning 3 stitches across.
- Attach the Legs: Position the two legs at the base of the body, angled slightly outward so the amigurumi stands or sits stably. The back edges should sit roughly around Rnd 32. Sew securely around the top openings of the legs where they meet the body wall.
- Facial Details: Using your fine embroidery needle and black floss, stitch a small “Y” shape directly between the safety eyes to form a little bunny mouth. Next, take Color D (Soft Baby Pink) yarn and stitch two small, horizontal lines right beneath the lower outside edges of each eye to form subtle blushing cheeks.
- Assemble the Carrot Hat Sprouts: Gather the three green curly sprouts by their base strings. Thread the tails down into the very center ring (Rnd 1) of the orange carrot hat. Tie the tails together securely on the inside of the hat with a double knot, ensuring the sprouts stand upright. Weave in the green yarn ends cleanly into the inner orange fabric.
- Position the Ears and Hat: The long ears are sewn onto the top of the head at Rnd 4, spaced about 4 stitches apart. Once secure, drape the floppy carrot hat over the head. The hat is designed to fit over the head with the ears sweeping downward out from under the wide orange brim, mimicking a cozy garden hat. To ensure the hat stays perfectly in place during play, use a few hidden anchor stitches of orange yarn running through the interior ridge of Rnd 15 directly into the sides of the bunny’s head.
Beginner/Intermediate Tips
- Master the Invisible Decrease: Standard decreases can leave small bumps or gaps that allow white stuffing to show through. When working the head and body pieces, make sure you use the invisible decrease technique (using front loops only) to maintain a perfectly smooth surface.
- The Power of Pins: Never sew amigurumi pieces together without pinning them first. Place your legs, belly patch, and arms using long quilting pins, then step back and check the symmetry from the front, side, and top. It is much easier to move a pin than to rip out stitched yarn.
- Stuffing to Shape: When filling the head and body, add small handfuls of fiberfill at a time rather than one large clump. Work the fluff into the edges using your fingers or the back of a crochet hook to ensure a perfectly round head profile without lumps.
- Tension Control: Amigurumi requires a tighter tension than normal garments. If you naturally crochet loosely, try pulling down slightly on your working yarn after finishing each single crochet to compress the loop sizes.
Variations
- The Pastel Patch Rabbit: Swap out the vibrant orange hat yarn for a dusty lavender or soft pastel pink colorway, transforming the garden carrot theme into an enchanting fairytale mushroom hat.
- Micro-Amigurumi Version: Work this exact pattern using a 1.25 mm hook and fine embroidery thread or lace-weight cotton yarn to create a pocket-sized miniature bunny that can be turned into a keychain or bag charm.
- Fluffy Blanket Texture: Use a 4.5 mm hook paired with a plush chenille or velvet blanket yarn. This keeps the proportions identical but yields an incredibly oversized, squishy, ultra-huggable plush toy perfect for toddler nursery gifts.
- Blossoming Brim: Instead of a plain slip-stitch edge on the carrot brim, work an extra final decorative round: [ch 3, sl st into the next stitch] across the entire border to frame the bunny’s face in a delicate, ruffled blossom trim.


