The Best Fluffy Pancakes recipe you will fall in love with. Full of tips and tricks to help you make the best pancakes.
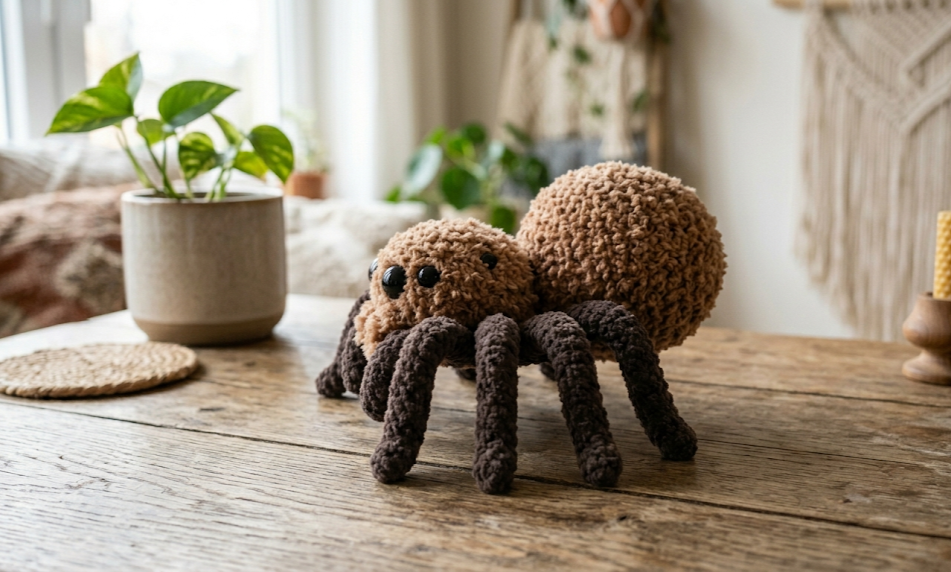
There is something undeniably charming about a spider that makes you want to cuddle it rather than run from it. This Fluffy Crochet Spider Amigurumi achieves exactly that. With its round, squishy body made from chunky bouclé yarn and its eight stubby legs crafted from smooth dark yarn, this little critter sits somewhere between adorable and wonderfully spooky — perfect for Halloween décor, amigurumi collectors, and anyone who loves fiber arts with a touch of personality.
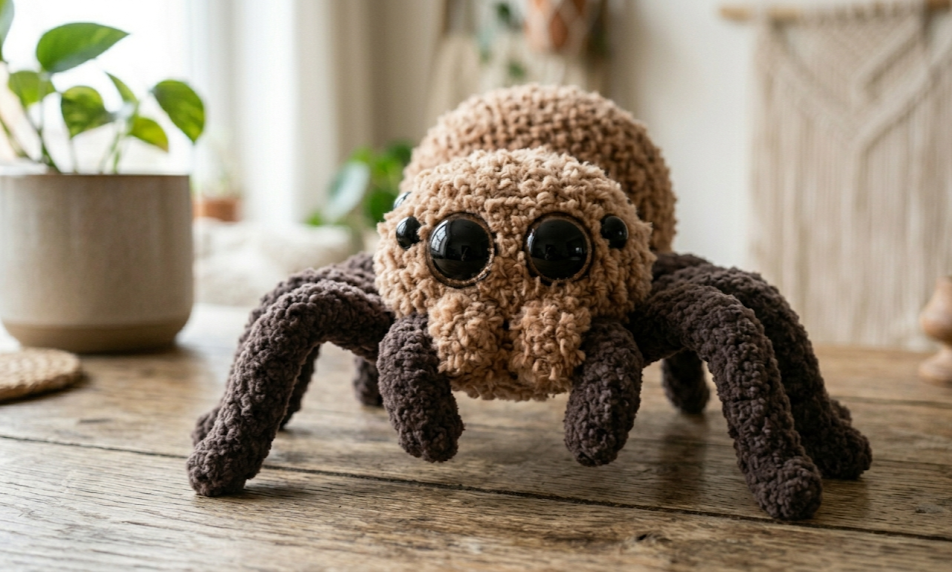
The finished spider sits comfortably in the palm of your hand, measuring approximately 10 cm (4 inches) wide and 6 cm (2.5 inches) tall. Its body is made from two identical pieces — a top and a bottom — worked in continuous rounds of single crochet, then stuffed and joined. The legs are worked as simple tubes and attached in pairs along the lower sides. Two large black safety eyes give it an endearing wide-eyed expression that makes even the most arachnophobic crafter warm up to it.
This is a beginner-friendly amigurumi pattern that requires only basic crochet skills: magic ring, single crochet, increasing, decreasing, and slip stitch joining. It is a wonderful second or third amigurumi project, and an excellent stash-buster for small amounts of textured or novelty yarn sitting in your collection.

|
Difficulty
Beginner
|
Time
2–3 Hours
|
Hook Size
3.5 mm
|
Yarn Weight
DK / Bouclé
|
Finished Size
10 cm Wide
|
Gauge
Work a gauge swatch before starting to ensure correct sizing.
Gauge: 14 sc × 16 rows = 10 cm (4 inches) square
Hook size used for gauge: 3.5 mm (E/4)
Yarn weight used for gauge: DK / Light Worsted (for body sections; see Materials)
Note: Bouclé and fluffy novelty yarns are naturally inconsistent in gauge. If your body is coming out larger or smaller than expected, adjust your hook size by 0.5 mm up or down. A slightly tight tension is preferable in amigurumi so the stuffing does not show through gaps in the stitches.
Materials
Yarn:
- Color A — Cream/White Bouclé or Fluffy Yarn: approx. 40 g / 80 m (DK weight; substitute: any eyelash, loop, or faux-fur yarn in desired color)
- Color B — Brown/Chocolate Bouclé or Fluffy Yarn: approx. 40 g / 80 m (same weight as Color A, in a contrasting shade)
- Color C — Dark Brown or Black Smooth Yarn: approx. 15 g / 30 m (DK or light worsted; used for legs)
Hook: 3.5 mm (E/4) crochet hook
Notions:
- Two 12 mm black safety eyes
- Polyester fiberfill stuffing
- Yarn needle (for weaving in ends and closing openings)
- Stitch markers
- Scissors
Abbreviations
| Abbreviation | Meaning |
|---|---|
| MR | Magic ring |
| ch | Chain |
| sc | Single crochet |
| inc | Increase: work 2 sc into the same stitch |
| dec | Invisible decrease: insert hook under front loop only of first stitch, then front loop only of next stitch, yarn over and pull through both loops, yarn over and pull through 2 loops on hook |
| sl st | Slip stitch |
| BLO | Back loop only: insert hook into the back loop (the loop furthest from you) of the stitch only |
| st(s) | Stitch(es) |
| rnd | Round |
| rep | Repeat |
| ( ) | Stitch count at end of round |
Technique note — Magic Ring (MR): Make a loop with the yarn, insert your hook through the loop, pull up a loop of working yarn, chain 1, then work the required number of sc into the ring before pulling the tail to close.
Technique note — Invisible Decrease (dec): This decrease method, used instead of a standard sc2tog, creates a nearly invisible join. Insert the hook under the front loop only of the first stitch, then under the front loop only of the second stitch (two loops on hook), yarn over and draw through both loops, then yarn over and draw through the remaining two loops.
Pattern Instructions
Work all pieces in continuous rounds unless otherwise noted. Do not join rounds unless instructed. Use a stitch marker to track the beginning of each round.
PART 1: BODY (Make 2 — one in Color A, one in Color B)
The body is worked from the center outward in a flat circle, then the two halves are joined around the edge with stuffing inside.
Rnd 1: MR, 6 sc into ring, pull ring closed. (6)
Rnd 2: Inc in each st around. (12)
Rnd 3: [Sc 1, inc] × 6. (18)
Rnd 4: [Sc 2, inc] × 6. (24)
Rnd 5: [Sc 3, inc] × 6. (30)
Rnd 6: [Sc 4, inc] × 6. (36)
Rnd 7: [Sc 5, inc] × 6. (42)
Rnd 8: [Sc 6, inc] × 6. (48)
Rnds 9–10: Sc in each st around. (48)
Fasten off Color A (top piece) with a long tail for sewing. Do not fasten off Color B (bottom piece) — this piece will be used to join the two halves together.
PART 2: LEGS (Make 8 in Color C)
Each leg is a small stuffed tube attached to the body. The legs are slightly curved by how they are attached.
Rnd 1: MR, 6 sc into ring, pull ring closed. (6)
Rnds 2–8: Sc in each st around. (6) [7 rounds total]
Lightly stuff each leg with a small pinch of fiberfill. Fasten off, leaving a 15 cm (6 inch) tail for attaching.
Assembly Steps
- Attach safety eyes to Color A (top) body piece. Before joining the two body halves, insert and secure both 12 mm black safety eyes on the top body piece (Color A). Position them approximately 3–4 stitches in from the outer edge and 6–8 stitches apart, centered toward what will be the front of the spider. Lock the washers on the inside of the piece firmly. Once the body is stuffed and closed, the eyes cannot be repositioned.
- Fill the bottom body piece with stuffing. Place a generous amount of polyester fiberfill into the Color B (bottom) piece, shaping it into a round dome about 3–4 cm tall. Do not overstuff — the piece should be firm but not so tightly packed that it distorts the shape.
- Join the two body halves. Place the Color A piece (eyes facing outward) on top of the Color B piece (stuffing inside), wrong sides together and outer edges aligned. Using the working yarn still attached to the Color B piece and your hook, work a sl st join through both layers of corresponding stitches around the entire outer edge. This closes the body. Add a little more stuffing through the last few centimeters of the opening before fully closing. Fasten off and weave in the end securely.
- Attach the legs. The spider has 8 legs, attached in two groups of 4 on each side of the body. Using the yarn tails on each leg, attach them with a yarn needle by sewing through the side of the body at the seam line (where the two halves meet), spacing them evenly.
- On each side, attach 4 legs with approximately 1–1.5 cm between each attachment point.
- The two middle legs on each side should point directly outward (90 degrees to the body).
- The front and back legs on each side should angle slightly forward and backward respectively.
- Each leg extends approximately 4–5 cm from the body when attached.
- Sew through the body 3–4 times per leg for a secure attachment, then knot and bury the end inside the body.
- Finish and check. Weave in all remaining yarn ends. Give the spider a gentle squeeze to distribute the stuffing evenly. Check that all safety eye washers are firmly locked. The spider should sit flat on its underside with legs fanning evenly outward.
Beginner and Intermediate Tips
Working with bouclé and eyelash yarn: Novelty textured yarns can make it difficult to see individual stitches. Before beginning, count your stitches after every round and mark with a stitch marker. If needed, run your finger along the stitches to find the loops. Working in good lighting makes a significant difference.
Hiding yarn ends inside fluffy yarn bodies: When weaving in ends on bouclé yarn, the texture naturally hides the tail. Thread the yarn needle with your tail, run it through several stitches in different directions, and clip close to the surface. The loops of the bouclé yarn will conceal everything.
Keeping legs consistent: Work all 8 legs in a single session so they remain uniform in length and tightness. Count rounds carefully — one extra round on a single leg will create a noticeable difference.
Stuffing the legs: Use a pencil or chopstick to push small bits of fiberfill to the tip of each leg tube. Too much stuffing will make the legs stiff; too little and they will droop. A firm but flexible result is the goal.
Tension on the body: Keep tension snug throughout the body pieces. Loose tension in amigurumi allows stuffing to show through gaps between stitches, which is particularly visible in the smooth Color B section.
Creative Variations
- Halloween Spider: Work both body halves in classic black smooth yarn instead of bouclé for a more traditional spooky look. Add a tiny orange bow using scrap yarn between the eyes for a festive touch.
- Tarantula Color Duo: Use dark brown for the body top (Color A) and black for the body bottom (Color B), with legs in matching dark brown. This closely mirrors the appearance of a rose-haired tarantula and makes a striking display piece.
- Mini Spider Brooch: Reduce the pattern by working only to Round 5 on each body piece (30 stitches), make legs only 4 rounds long, and sew a brooch pin to the underside. Attach as a Halloween accessory pin or gift tag decoration.
- Spider Family Set: Make one large version at the standard size in Color B, and two smaller siblings using a 2.5 mm hook and fingering weight yarn scaled down accordingly. Arrange them together as a shelf display, hung from thin black thread to appear as though they are suspended from a web.
Save This Pattern on Pinterest!
Love how this fluffy spider turned out? Save this free pattern to your crochet board so you can make it anytime — or share it with a fellow crafter who might need a little Halloween magic in their life. Tag your finished spiders with #FoodieRippleCrochet — we would love to see your version!


