The Best Fluffy Pancakes recipe you will fall in love with. Full of tips and tricks to help you make the best pancakes.
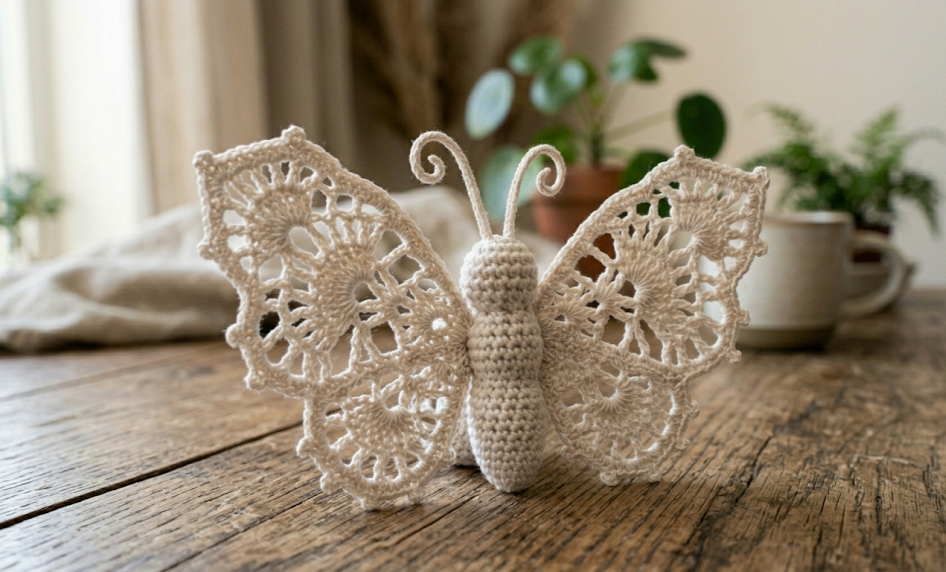
Delicate, timeless, and breathtakingly beautiful, the art of lacework brings an undeniable touch of vintage elegance to modern handmade crafts. This gorgeous crochet vintage lace butterfly features an intricate interplay of lightweight lace stitches, tiny decorative picots, and a three-dimensional segmented body that makes it look as though it might take flight at any moment. Perfectly sized to rest in the palms of your hands, this beautiful piece can be used as a standalone structural accent, framed wall art, a whimsical applique for garments, or even as part of a gorgeous heirloom mobile.
Designed for those looking to expand their skills with fine crochet thread and delicate detailing, this pattern blends amigurumi techniques with traditional Irish and filet lace methods. The finished object strikes a harmonious balance between structural durability and airy grace. Whether you want to add a romantic, bohemian accent to your home decor or create a deeply meaningful handmade gift for someone who treasures vintage styles, this butterfly pattern provides a fulfilling, creative escape into the world of fine needlecraft.
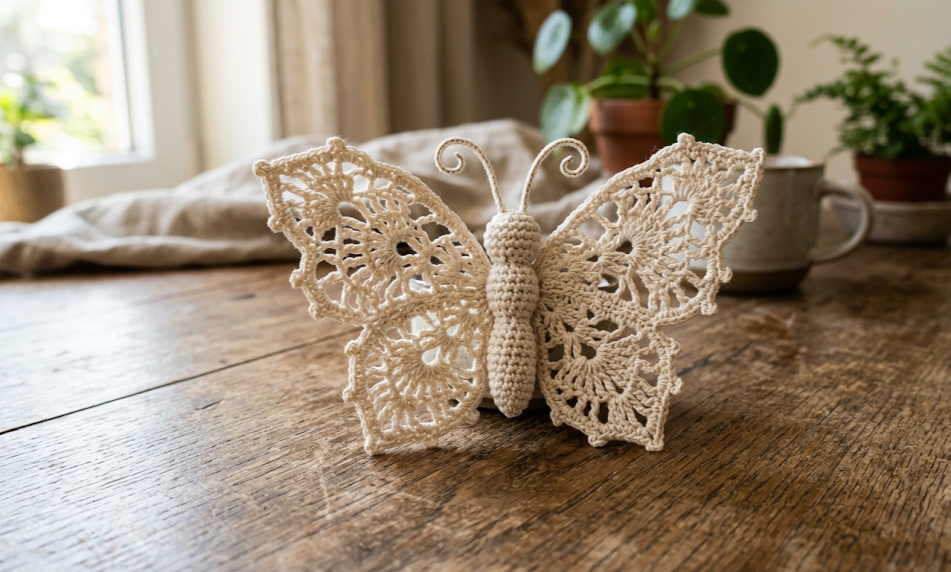
| Difficulty Intermediate | Time 6-8 Hours | Hook Size 1.5 mm | Yarn Weight Size 10 Thread | Finished Size 15cm x 12cm |
Gauge and Swatch Information
To ensure your butterfly achieves its perfectly balanced proportion and crisp stitch definition, working a gauge swatch is highly recommended.
Using a 1.5 mm steel crochet hook and Size 10 crochet thread, work a swatch in solid single crochet:
- Gauge: 36 stitches and 40 rows = 10 cm x 10 cm (4 inches x 4 inches) square.If your swatch is too large, try switching to a smaller hook (such as 1.25 mm). If it is too small, try a larger hook (such as 1.75 mm). Maintaining tight, uniform tension is key to preventing the fiberfill from showing through the body segments.
Materials List
- Yarn: 1 ball of Size 10 Cotton Crochet Thread (approx. 150 yards) in Ecru, Cream, or Off-White.
- Crochet Hook: 1.5 mm steel crochet hook.
- Notions & Extras:
- Premium polyester fiberfill stuffing (a small handful).
- 30 cm (approx. 12 inches) of 24-gauge white jewelry wire or cloth-wrapped floral wire.
- Fine tapestry needle (capable of threading size 10 thread).
- Sharp embroidery scissors.
- Fabric stiffening spray or a liquid starch/water mixture (optional, for blocking the wings).
- Rust-proof blocking pins and a foam blocking mat.
Abbreviations Table
| Abbreviation | Meaning |
| ch | Chain stitch |
| sl st | Slip stitch |
| sc | Single crochet |
| hdc | Half double crochet |
| dc | Double crochet |
| tr | Treble crochet |
| inc | Increase (2 stitches worked into the same stitch) |
| dec | Invisible decrease (sc 2 stitches together using front loops only) |
| MR | Magic Ring |
| BLO | Back Loop Only |
| FLO | Front Loop Only |
| sp | Space |
| st(s) | Stitch(es) |
| picot | Ch 3, sl st into the first chain made |
Pattern Instructions
Part 1: The Segmented Body
The body is worked in one continuous piece from the bottom of the abdomen up to the head using amigurumi styling. Do not join rounds unless specified; use a stitch marker to keep track of your place.
Abdomen (Lower Section)
- Round 1: Start by forming a Magic Ring (MR). A magic ring is an adjustable loop of thread that can be pulled tightly shut to eliminate any central hole. Work 6 sc into the ring. Pull the tail tightly to close the loop. (6)
- Round 2: [Sc 1, inc] 3 times. (9)
- Round 3: Sc in each st around. (9)
- Round 4: [Sc 2, inc] 3 times. (12)
- Round 5–14: Sc in each st around. (12)
- Round 15: [Sc 2, dec] 3 times. An invisible decrease (dec) is worked by inserting the hook into the front loops only of the next two stitches, yarning over, and pulling through both loops before completing the single crochet. (9)
- Stop here and stuff the abdomen firmly with a small amount of polyester fiberfill. Use the back of a crochet hook to push the stuffing down.
- Round 16: [Sc 1, dec] 3 times. (6)
Thorax (Middle Section)
- Round 17: Working into the FLO of the remaining 6 stitches, work 2 sc into each st around to expand into the middle segment. (12)
- Round 18: [Sc 1, inc] 6 times. (18)
- Round 19–22: Sc in each st around. (18)
- Round 23: [Sc 1, dec] 6 times. (12)
- Stuff the thorax firmly with fiberfill.
- Round 24: [Dec] 6 times. (6)
Head (Top Section)
- Round 25: Work 2 sc into each st around to expand into the final round head segment. (12)
- Round 26: [Sc 1, inc] 6 times. (18)
- Round 27–29: Sc in each st around. (18)
- Round 30: [Sc 1, dec] 6 times. (12)
- Stuff the head firmly with fiberfill.
- Round 31: [Dec] 6 times. (6)
- Fasten off, leaving a 15 cm tail. Thread the tail onto a tapestry needle, weave through the front loops of the remaining 6 stitches, and pull tightly to close the head. Secure the thread and weave in the end inside the body.
Part 2: The Large Upper Wings (Make 2)
The wings are worked in flat rows, starting where they attach to the body and expanding outwards into an elegant mesh pattern bordered by delicate decorative picots.
- Row 1: Ch 10. Working into the second chain from the hook, sc across. Turn. (9)
- Row 2: Ch 1, sc across in BLO. Working in the Back Loop Only means inserting your hook only into the loop furthest away from you to create a ridge line texture. Turn. (9)
- Row 3: Ch 4 (counts as dc + ch 1), skip first st, dc in next st, [ch 1, skip next st, dc in next st] 3 times to form a filet mesh row. Turn. (5 dc, 4 ch-spaces)
- Row 4: Ch 1, 2 sc in each ch-1 space across, sc in the 3rd chain of the turning ch-4 loop. Turn. (9)
- Row 5: Ch 1, inc in first st, sc in each st across until 1 st remains, inc in last st. Turn. (11)
- Row 6: Ch 4, skip first st, dc in next st, [ch 1, skip next st, dc in next st] across to the end of the row. Turn. (6 dc, 5 ch-spaces)
- Row 7: Ch 1, 2 sc in each ch-1 space across, sc in turning chain loop. Turn. (11)
- Row 8–15: Repeat Rows 5 through 7 sequentially, allowing the wing to broaden organically. Your stitch counts will grow by 2 sc on every solid row. Row 15 should conclude with a flat count of 17 single crochets. Turn.
- Row 16 (Fan and Lace Expansion): Ch 3, dc in same first st, [ch 2, skip 2 sts, 3 dc in next st] 5 times, ch 2, skip 2 sts, 2 dc in final st. Turn. (19 dc)
- Row 17: Ch 1, sc in each dc and work 2 sc in each ch-2 space across the entire row. Turn. (31)
- Row 18 (Picot Border Edging): Ch 1, sc in next 3 sts, work a picot stitch. A picot is made by chaining 3, then working a slip stitch directly back into the very first chain loop you just created. Repeat from * all the way across to the wingtip edge. Fasten off, leaving a long 25 cm tail for sewing the wing onto the thorax.
Part 3: The Lower Wings (Make 2)
The lower wings feature a circular motif design mimicking the distinct “eyespots” found on natural butterfly wings.
- Round 1: Start with a Magic Ring. Ch 3 (counts as first dc), work 15 dc into the loop. Join with a sl st to top of starting ch-3. (16 dc)
- Round 2: Ch 4 (counts as dc + ch 1), dc in next st, [ch 1, dc in next st] 14 times, ch 1, join with sl st to 3rd chain of starting loop. (16 dc, 16 ch-spaces)
- Round 3: Ch 1, work 2 sc in every ch-1 space completely around. Join with a sl st to first sc. (32)
- Round 4: Ch 1, sc in next 4 sts, work 2 sc in the next st to increase. Repeat from * around. Join with a sl st to first sc. (38)
- Round 5 (Scalloped Edging): Skip first st, work 5 dc into the next st to create a beautiful fan shell, skip next st, sl st into the following st. Repeat from * around to form a scalloped perimeter. Fasten off, leaving a long tail for assembly.
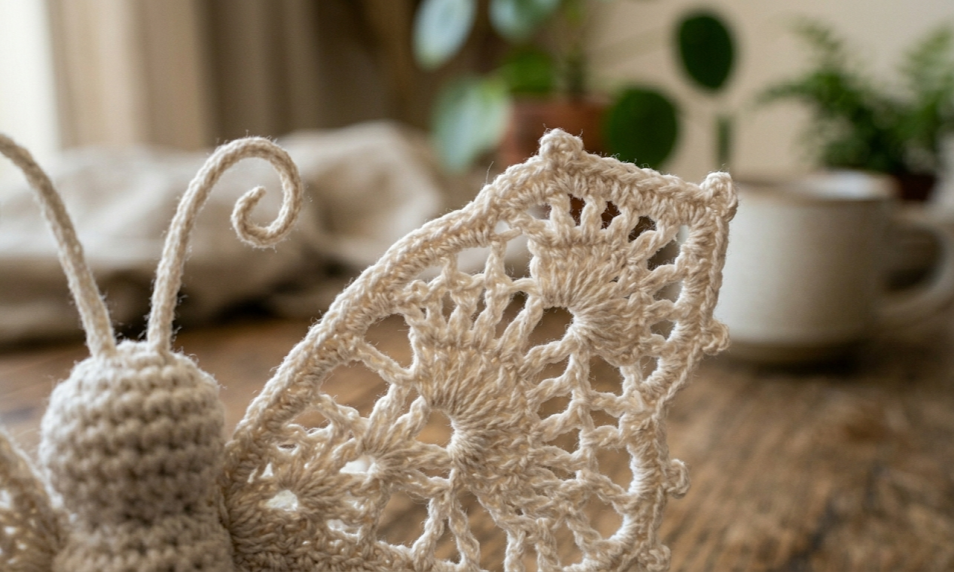
Part 4: Antennae and Wire Armature Instructions
The antennae are constructed by wrapping crochet thread over a structural wire core to allow them to be elegantly curled and positioned without drooping.
- Take your 30 cm piece of 24-gauge wire and cut it into two equal 15 cm pieces.
- To safely insert wire into the body, bend the bottom 1 cm of each wire piece completely flat against itself using needle-nose pliers. This creates a blunt, safe end that will not pierce through your stitches or fiberfill over time.
- Insert the blunt end of the first wire piece directly into the top of the butterfly’s head at Round 26, pushing it downward through the head and deep into the thorax segment (at least 3 cm deep into the base structure) to anchor it completely. Repeat for the second wire.
- Join your ecru crochet thread with a slip stitch directly to the base of the exposed wire where it exits the head.
- To close the tube structure over the armature, work tight, dense sc stitches directly around the wire core, sliding them down tightly against one another so no metal shows through. Work up the wire for roughly 4.5 cm.
- At the very tip of the wire, work 3 sc into the final turn space, then carefully wrap the remaining thread around the wire tip before working slip stitches back down the opposite side of the antenna base.
- Fasten off securely at the base of the head, tying the ends down and hiding them deep within the skull cavities. Use your fingers or pliers to gently bend the tips of the completed wire antennae into elegant, vintage spiral hooks.
Assembly Steps
- Wing Placement Layout: Lay your finished, stuffed butterfly body flat on a clean surface. Place the two large upper wings symmetrically on either side of the thorax (middle segment). The straight foundational attachment edges of the upper wings should align perfectly along the length of the thorax, roughly 0.5 cm below the head joint.
- Attaching Upper Wings: Using the long thread tails left on the upper wings and your tapestry needle, securely whip-stitch the foundational row of each wing directly into the side stitches of the thorax. Pass through both the wing loops and the body loops twice at the top and bottom corners of the attachment zone to ensure they stay firmly upright.
- Attaching Lower Wings: Position the circular lower wings directly beneath the upper wings. They should overlap the bottom edges of the upper wings by roughly 0.8 cm to create a seamless look. Stitch the inner edges of these lower wings directly into the lower portion of the thorax and the top 1 cm of the abdomen segment.
- Symmetrical Security: Flip the butterfly over to ensure both sets of wings are completely uniform from the back. Weave all remaining yarn tails through the thick center of the stuffed body several times before trimming cleanly to eliminate loose threads.
Beginner / Intermediate Tips
- Tension Control: When working with fine size 10 thread, it is incredibly easy to let your tension drift. Focus on wrapping the thread consistently around your tension finger. Keep your amigurumi body stitches extra tight so the white polyester stuffing doesn’t peek out from between the stitches.
- Mastering the Picot: If your picot loops look loose or sloppy, pull tightly on your working thread right before executing the slip stitch back into the third chain from your hook. This pinches the base of the picot loop together, creating a beautiful, sharp decorative point.
- Using the Right Needle: Traditional blunt yarn needles will split thin crochet thread and struggle to pass through tight stitches. Invest in a set of sharp-pointed steel embroidery or tapestry needles (Sizes 18–22 work beautifully with size 10 thread).
Variations
- The Hand-Dyed Watercolor Effect: Crochet the entire butterfly pattern using pure white size 10 cotton thread. Once fully assembled, use a small paintbrush and diluted liquid fabric dyes or watercolor inks to gently paint soft pastel gradients onto the lace wingtips for a stunning, custom bohemian look.
- Gothic Statement Piece: Swap out the soft ecru thread for a deep matte black crochet thread. Pair it with a metallic silver or antique gold thread for the final picot border edging to create an elegant, vintage Victorian gothic style.
- Whimsical Shadow Box Display: Block the wings completely flat and mount the finished 3D butterfly inside a deep wooden shadow box frame lined with vintage linen fabric or sheet music. This keeps the delicate lace dust-free and transforms your crochet project into beautiful gallery wall art.
- Giant Statement Pillow Applique: Scale up the entire pattern by substituting the thin lace thread with a standard worsted weight cotton yarn and a 4.0 mm crochet hook. The resulting large structured butterfly makes a gorgeous decorative accent patch to sew onto the front of a boho throw pillow.


