The Best Fluffy Pancakes recipe you will fall in love with. Full of tips and tricks to help you make the best pancakes.
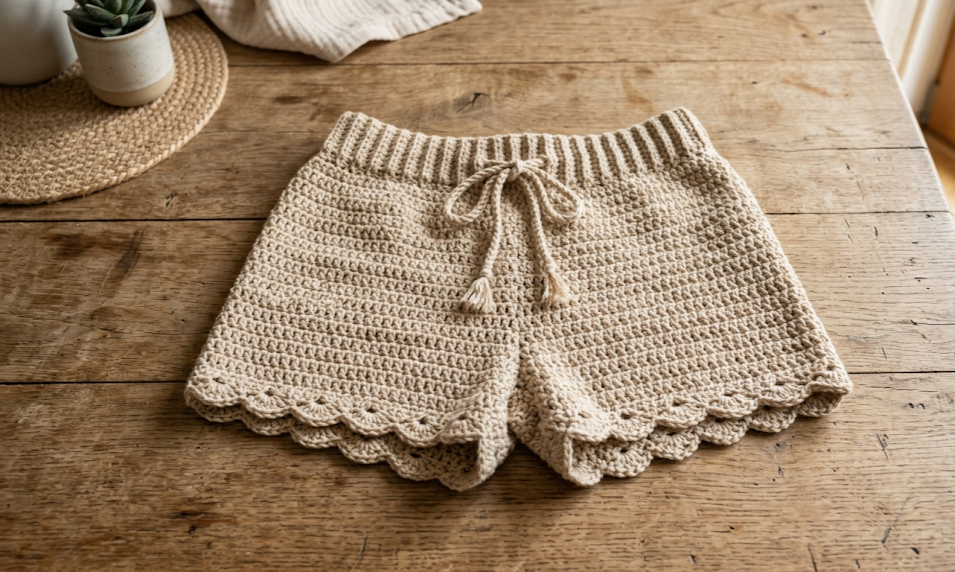
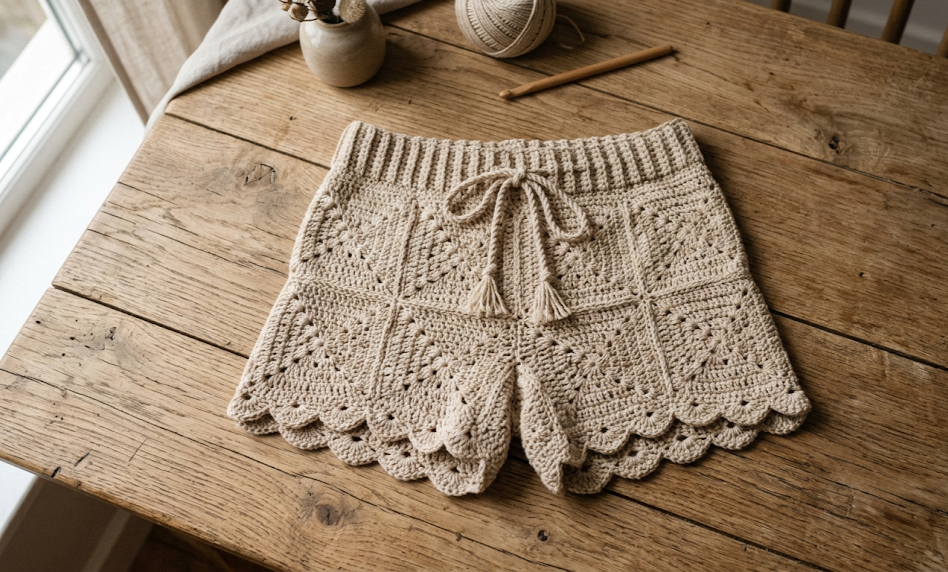
Summer calls for something breezy, handmade, and utterly charming — and the Crochet Zoa Shorts deliver on every count. These beginner-friendly shorts feature a ribbed waistband with an optional drawstring, a smooth half double crochet body worked in flat panels, and a delicate scalloped edging along the leg openings that gives them a polished, boutique finish. The warm beige oatmeal colorway shown here is timeless, but these shorts look equally stunning in dusty rose, sage green, or cream white.
Whether worn as a beach cover-up, lounge shorts, or paired with a linen blouse for a boho summer look, the Zoa Shorts strike that perfect balance between casual and curated. The construction is panel-based, meaning the front and back are worked flat and seamed, which makes them accessible even if you’ve never crocheted garments before. No complex shaping techniques, no confusing colorwork — just clean, satisfying rows of half double crochet with a few clever increases at the hips and a finishing scallop that makes them look far more complicated than they are.
This free crochet pattern is written for adult size Small/Medium, with clear notes on how to adjust for a larger or smaller fit. Grab your hook and your favorite cotton yarn, and let’s make something you’ll be living in all summer long.
|
Difficulty
Beginner
|
Time
8–12 Hours
|
Hook Size
5.0 mm (H/8)
|
Yarn Weight
DK Weight
|
Finished Size
Adult S/M
|
Gauge
14 hdc × 10 rows = 10 cm (4 inches) square
Hook: 5.0 mm (H/8)
Yarn: DK weight cotton or cotton blend
Always work a gauge swatch before beginning. Crochet a foundation chain of 20 stitches, then work hdc back and forth for 14 rows. Block lightly and measure the center 10 cm. Adjust your hook size up if your swatch is too small, or down if it’s too large. Accurate gauge ensures the shorts fit correctly at the waist and hip.
Materials List
- Yarn: 350–450 g DK weight cotton or cotton blend yarn in warm beige/oatmeal (shown) or color of choice. Recommended: any 100% cotton or cotton-acrylic blend labeled DK or light worsted.
- Crochet Hook: 5.0 mm (H/8) for body; 4.5 mm (G/6) for ribbed waistband
- Stitch Markers: 4–6 locking stitch markers
- Tapestry Needle: for seaming and weaving ends
- Scissors
- Measuring Tape
- Optional: 1 m of 1 cm wide satin ribbon or twisted yarn cord for drawstring
Abbreviations
| Abbreviation | Meaning |
|---|---|
| ch | chain |
| sc | single crochet |
| hdc | half double crochet |
| dc | double crochet |
| sl st | slip stitch |
| st / sts | stitch / stitches |
| BLO | back loop only |
| rep | repeat |
| sp | space |
| sk | skip |
| RS | right side |
| WS | wrong side |
| pm | place marker |
Technique Notes:
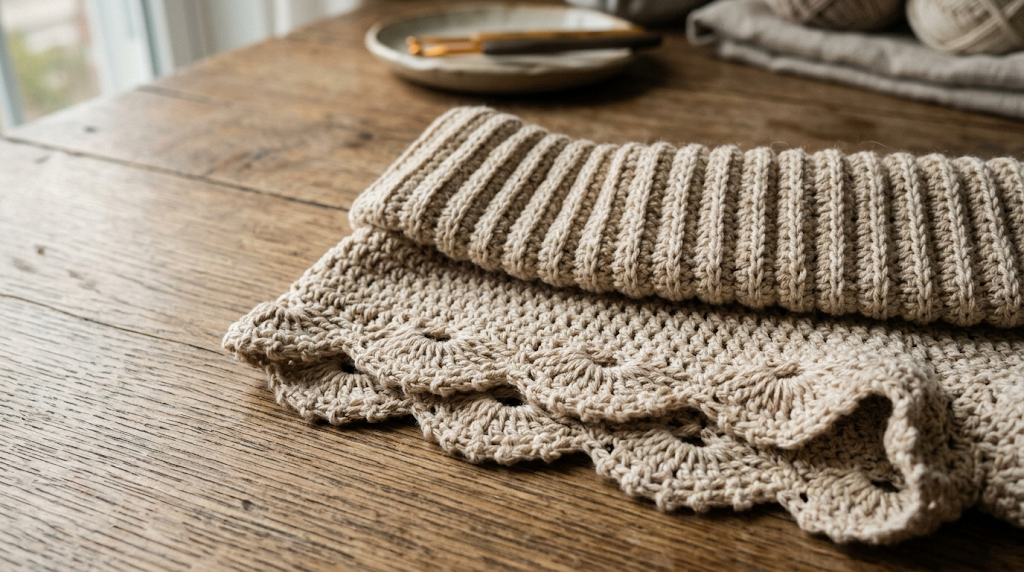
- BLO (Back Loop Only): Insert hook into the back loop only of the stitch (the loop farthest from you) to create a ribbed, stretchy texture. Used throughout the waistband.
- Working in rows: The body panels are worked flat, turning at the end of each row. Chain 2 at the start of each hdc row does not count as a stitch.
Pattern Instructions
Part 1: Waistband Ribbing (Make 2 — one for front panel, one for back panel)
The waistband is worked lengthwise in BLO rows to create a vertical rib effect, then attached to the top of each body panel.
Switch to 4.5 mm hook.
Foundation Chain: Ch 10.
Row 1: Sc in 2nd ch from hook and in each ch across. (9 sc)
Row 2: Ch 1, turn. Sc BLO in each st across. (9 sc)
Rep Row 2 until the waistband measures:
- Front panel: 38 cm (for size S/M waist). Adjust length for your waist measurement — the waistband should stretch slightly to fit.
- Back panel: 40 cm (slight extra length for ease at the back).
Fasten off, leaving a long tail for seaming. Set aside.
Part 2: Front Body Panel
Switch to 5.0 mm hook.
Foundation Chain: Ch 57. (This creates approx. 36 cm width for hip ease in size S/M.)
Row 1 (RS): Hdc in 3rd ch from hook and in each ch across. (55 hdc)
Row 2: Ch 2, turn. Hdc in each st across. (55 hdc)
Rows 3–6: Rep Row 2. (55 hdc)
Hip Increase Section (Rows 7–10):
Row 7: Ch 2, turn. 2 hdc in first st, hdc in each st to last st, 2 hdc in last st. (57 hdc)
Row 8: Ch 2, turn. Hdc in each st across. (57 hdc)
Row 9: Ch 2, turn. 2 hdc in first st, hdc in each st to last st, 2 hdc in last st. (59 hdc)
Row 10: Ch 2, turn. Hdc in each st across. (59 hdc)
Body Rows 11–28: Ch 2, turn. Hdc in each st across. (59 hdc)
Place stitch markers at each end of Row 28 to mark the top edge of the hip. Total panel height from foundation chain to Row 28: approximately 20 cm.
Fasten off, leaving a 50 cm tail for seaming.
Part 3: Back Body Panel
Rep exactly as Front Body Panel instructions.
Additional Back Rise Rows (optional for comfort):
After Row 28, work 4 additional rows even.
Rows 29–32: Ch 2, turn. Hdc in each st across. (59 hdc)
This adds approximately 3 cm of extra rise at the back for a more comfortable, flattering fit.
Fasten off, leaving a 50 cm tail for seaming.
Part 4: Leg Shaping
The leg opening is created during assembly by joining panels partway at the lower edge, leaving the center open. No additional shaping rows are needed within the panels. Stitch markers placed at Row 28 will guide leg opening placement (see Assembly).
Part 5: Scalloped Leg Edging
Work this border after assembly along each finished leg opening.
With RS facing and 5.0 mm hook, join yarn with a sl st at any point along the leg opening edge.
Round 1: Ch 1. Sc evenly around the entire leg opening, placing sc sts into the ends of rows or into existing sts. Work approx. 1 sc per row-end. Sl st to first sc to join. Count sts — adjust by inc or dec 1 st so total is divisible by 6. (approx. 54–66 sc depending on leg size)
Round 2 (Scallop Round): Ch 1. *Sk 2 sts, 5 dc in next st, sk 2 sts, sl st in next st. Rep from * around. Sl st to first sl st to join.
Scallop Explanation: Skipping 2 stitches on each side of a 5-dc shell creates the curved scallop shell shape. Make sure each scallop grouping begins and ends with sl st to keep the edging flat and even.
Fasten off and weave in end.
Rep for second leg opening.
Part 6: Waistband Attachment
Hold one waistband strip (RS facing) against the top edge of one body panel. Using a tapestry needle and the long tail, whip stitch the long edge of the waistband strip to the top edge of the body panel. Match the length of the waistband to the width of the panel top, easing slightly as needed. Secure firmly at each end. Rep for second waistband and body panel.
Assembly Steps
- Block panels: Before seaming, lightly wet block both body panels. Pin to measurements (approx. 30 cm wide × 20–23 cm tall) on a flat surface and allow to dry completely. This ensures even seams.
- Align panels: Place front and back panels with wrong sides together (RS facing outward).
- Seam the sides: Using tapestry needle and yarn, whip stitch or mattress stitch each side seam from the top waistband edge downward approximately 12–13 cm. Leave the bottom 8–10 cm of each side open to create the leg openings. (Alternatively, sl st seam on the inside with RS held together for a flatter seam.)
- Create the leg openings: The lower center opening of each panel becomes the crotch area. After seaming both side seams 12–13 cm down, seam the inner crotch seam: fold the shorts so front and back panel lower edges meet at center. Seam along the curved inner crotch for approximately 6–8 cm on each side, shaping a U-curve. This creates two separate leg holes.
- Attach waistband panels: Join the two waistband ends (front and back) at each side seam with 3–4 whip stitches to close the waistband into a continuous band.
- Add drawstring (optional): Using a tapestry needle, weave a length of satin ribbon or twisted yarn cord through the front row of the waistband, spacing entry/exit points every 2–3 stitches. Begin and end at the center front. Knot or add small pom-poms at each cord end.
- Finish leg edging: Work the scallop border along each leg opening as described in Part 5.
- Weave in all ends. Block finished shorts one more time, shaping the leg scallops as they dry.
Beginner & Intermediate Tips
- Use stitch markers religiously. Place markers at your increase rows and at the side seam points before assembly — the panels look very similar and it’s easy to accidentally seam the wrong edges together.
- Gauge is non-negotiable for garments. Unlike amigurumi where a tighter or looser gauge only affects size slightly, shorts that are even 1 cm off gauge can result in a waistband that doesn’t fit. Swatch, block the swatch, and measure before you commit to the full panels.
- BLO creates stretch in the waistband. Don’t skip working into the back loop only on every waistband row — it’s what gives the ribbing its elasticity. If the waistband feels stiff, check that you’re consistently working BLO.
- Block before seaming, not after. Blocking the flat panels before joining them is far easier and produces neater seams than trying to block the finished garment.
- Cotton yarn has no memory. Unlike acrylic or wool, cotton doesn’t bounce back. Count your stitches carefully after each hip increase row to ensure you haven’t accidentally added or dropped stitches.
Variations
- Color Block Zoa Shorts: Work the waistband in a contrasting color — deep terracotta against cream, or mustard against sage — for a bold boho statement. Switch yarn after Row 6 of each body panel to add a contrasting color band at the hip.
- Mini Zoa Shorts: Reduce the foundation chain by 10 stitches and omit the hip increase section for a narrower, shorter cut suited to younger wearers or as a doll/stuffy costume piece.
- Lace-Up Zoa Shorts: Instead of a woven drawstring, add 5–6 evenly spaced ch-2 eyelets along each side seam during the last side seam row. Thread ribbon through for a lace-up look along both sides.
- Winter Zoa Loungewear: Swap the cotton yarn for a soft DK-weight merino or wool blend in charcoal, burgundy, or mustard. The half double crochet stitch in wool creates a much denser, warmer fabric perfect for lounging indoors.
- Extended Zoa Wide-Leg Shorts: Add 6–8 additional rows to each body panel below Row 28 before beginning leg edging, and widen the foundation chain to 67 stitches for a relaxed, wide-leg silhouette.
These Crochet Zoa Shorts are the kind of make that gets better every time — once you’ve made your first pair, you’ll want one in every color. Save this pattern to your Pinterest boards so you can find it whenever inspiration strikes, and share your finished pair with the hashtag #FoodieRippleCrochet — we’d love to see your Zoa Shorts!


