The Best Fluffy Pancakes recipe you will fall in love with. Full of tips and tricks to help you make the best pancakes.
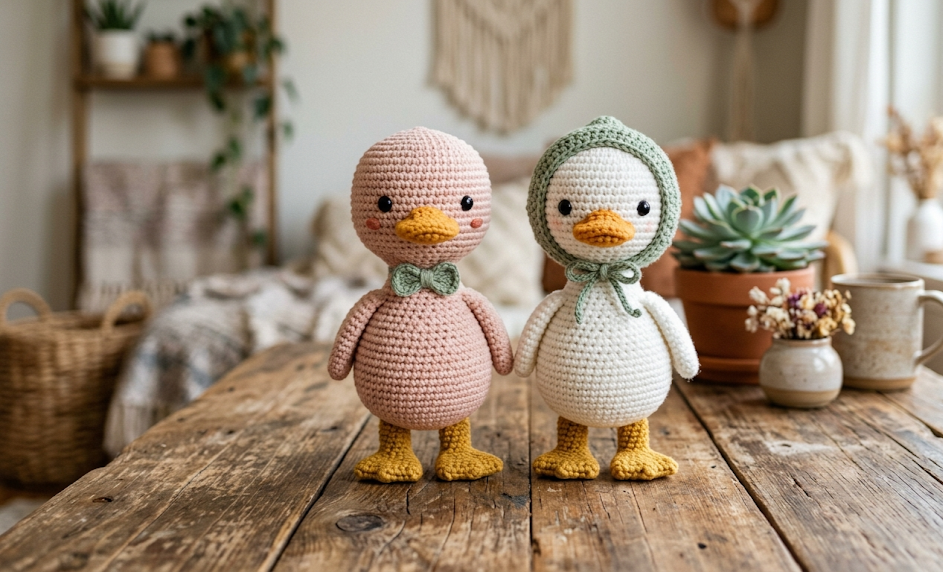
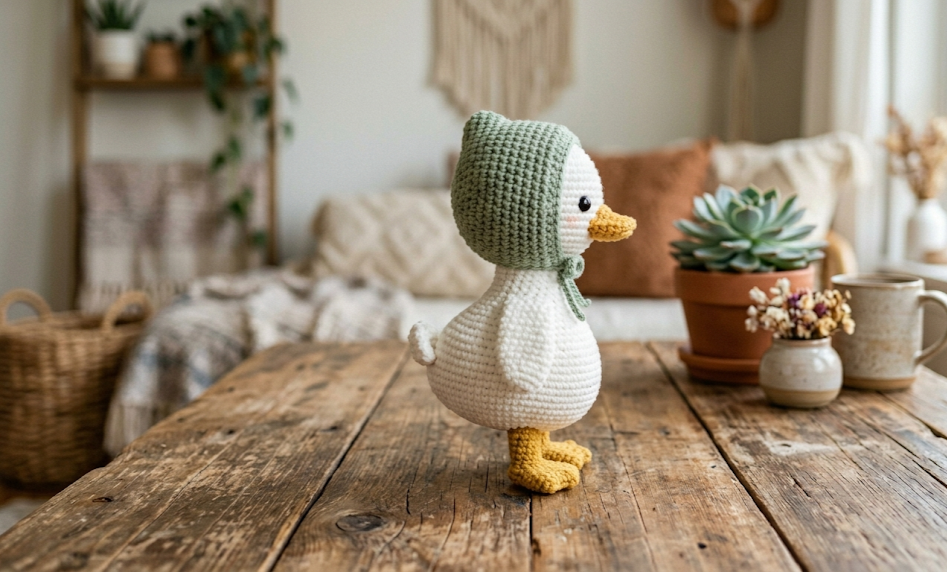
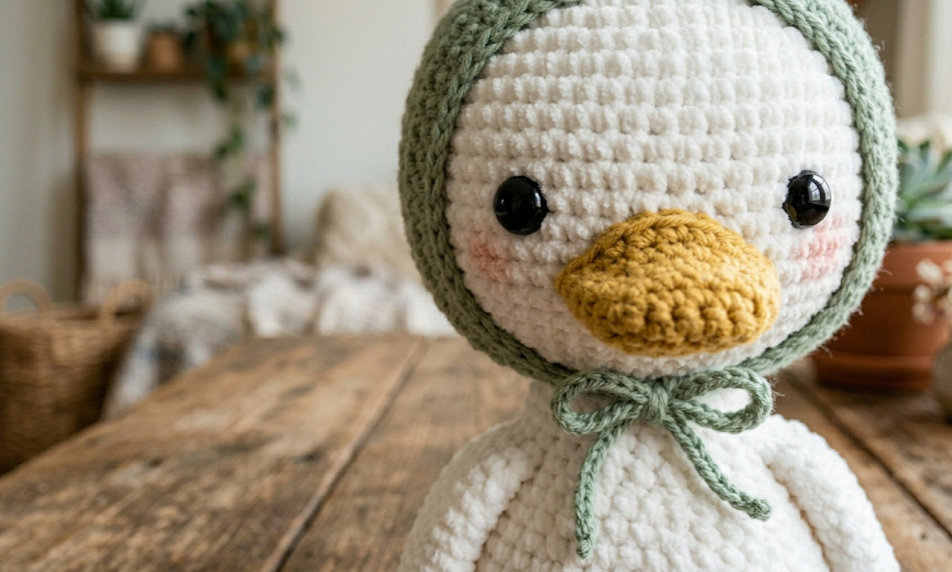
There is something undeniably heartwarming about a tiny crocheted duck sitting on a shelf, its little bonnet tied neatly under its chin. This free crochet amigurumi duck pattern gives you not one but two adorable birds: a soft blush pink goose with dusty rose feet, and a snowy white duck wearing a delicate sage green bonnet with mustard yellow accents. Made from plush chenille yarn, these ducks have the most irresistible velvety texture — the kind that makes people reach out and squeeze them the moment they spot them.
Whether you are making these as nursery décor, baby shower gifts, Easter basket fillers, or simply because you cannot resist a duck in a bonnet (completely valid), this pattern is designed to walk you through every step. Both ducks share the same base body construction, with the bonnet and color variations being the key difference between them. If you can crochet a magic ring and work in the round, you can absolutely make these.
These ducks sit at roughly 18cm tall and are worked primarily in single crochet using a 3.5mm hook. The chenille yarn gives them that plush, almost flocked texture you see on the most satisfying amigurumi these days. Read through the full pattern before starting — the body, head, beak, feet, and wings are all worked separately and assembled at the end.
|
Difficulty
Intermediate
|
Time
5–7 Hours
|
Hook Size
3.5mm
|
Yarn Weight
Bulky Chenille
|
Finished Size
~18cm Tall
|
Gauge
14 sc × 16 rows = 10cm × 10cm worked in single crochet (sc) with a 3.5mm hook using chunky chenille/velvet yarn.
Gauge is especially important with chenille yarn because the plush fibers compress differently than standard acrylic. Work a swatch and adjust your hook size up if your stitches feel tight and stiff, or down if the fabric is too loose and the stuffing shows through.
Materials
For the White Duck with Bonnet:
- White chenille/velvet yarn — approx. 80g
- Sage green chenille yarn — approx. 20g (bonnet and bonnet ties)
- Mustard yellow chenille yarn — approx. 15g (beak, feet)
- Black safety eyes, 10mm — 2 pieces
- White safety eye highlight stickers or white felt circles (optional, for realism)
- Polyfill stuffing — approx. 40g
- 3.5mm crochet hook
- Yarn needle
- Scissors
- Stitch markers
For the Blush Pink Goose:
- Blush pink chenille/velvet yarn — approx. 90g
- Dusty rose chenille yarn — approx. 20g (feet, beak accent)
- Peach or salmon chenille yarn — approx. 10g (beak)
- Black safety eyes, 10mm — 2 pieces
- Polyfill stuffing — approx. 40g
- 3.5mm crochet hook
- Yarn needle
- Scissors
- Stitch markers
Abbreviations
| Abbreviation | Meaning |
|---|---|
| sc | single crochet |
| inc | increase (2 sc in same stitch) |
| dec | invisible decrease (insert hook in front loops of next 2 sts, pull up loop, yarn over, pull through all 3 loops) |
| sl st | slip stitch |
| ch | chain |
| BLO | back loop only (work through the back loop of each stitch only) |
| FLO | front loop only (work through the front loop of each stitch only) |
| MR | magic ring (adjustable loop) |
| st(s) | stitch(es) |
| rnd | round |
| ( ) | stitch count at end of round |
Technique notes:
- Magic Ring (MR): Make a loop with the yarn, insert hook through the loop, pull up a working loop, ch 1, then work the required number of stitches into the ring. Pull the tail to close the hole tightly before continuing.
- Invisible Decrease (dec): Insert the hook through the front loop only of the next stitch, then through the front loop only of the stitch after that, pull up one loop, yarn over and pull through all three loops. This creates a flatter, less visible decrease than a standard sc2tog — essential for neat amigurumi shaping.
- BLO: Insert hook only under the back loop (the loop furthest from you) of the stitch. This creates a visible ridge on the right side, useful for brim and texture details.
Pattern Instructions
PART 1: BODY (same for both ducks)
Begin with main color yarn (white or blush pink).
- Rnd 1: MR, 6 sc into ring, pull closed. (6)
- Rnd 2: Inc in each st around. (12)
- Rnd 3: [Sc 1, inc] × 6. (18)
- Rnd 4: [Sc 2, inc] × 6. (24)
- Rnd 5: [Sc 3, inc] × 6. (30)
- Rnd 6: [Sc 4, inc] × 6. (36)
- Rnd 7: [Sc 5, inc] × 6. (42)
- Rnds 8–15: Sc in each st around. (42) — 8 rounds even
- Rnd 16: [Sc 5, dec] × 6. (36)
- Rnd 17: [Sc 4, dec] × 6. (30)
- Rnd 18: [Sc 3, dec] × 6. (24)
Insert safety eyes between Rnds 8–9, spaced approximately 8 stitches apart. Stuff the body firmly before closing.
- Rnd 19: [Sc 2, dec] × 6. (18)
- Rnd 20: [Sc 1, dec] × 6. (12)
- Rnd 21: [Dec] × 6. (6)
Fasten off, leaving a long tail. Close the remaining hole by weaving the tail through the front loops of the 6 remaining stitches and pulling tight. This is the bottom of the body.
PART 2: HEAD (same for both ducks)
- Rnd 1: MR, 6 sc. (6)
- Rnd 2: Inc in each st. (12)
- Rnd 3: [Sc 1, inc] × 6. (18)
- Rnd 4: [Sc 2, inc] × 6. (24)
- Rnd 5: [Sc 3, inc] × 6. (30)
- Rnd 6: [Sc 4, inc] × 6. (36)
- Rnds 7–13: Sc around. (36) — 7 rounds even
- Rnd 14: [Sc 4, dec] × 6. (30)
- Rnd 15: [Sc 3, dec] × 6. (24)
Insert safety eyes between Rnds 9–10, approximately 7 stitches apart. Stuff head firmly.
- Rnd 16: [Sc 2, dec] × 6. (18)
- Rnd 17: [Sc 1, dec] × 6. (12)
- Rnd 18: [Dec] × 6. (6)
Fasten off, leaving a 25cm tail for sewing. Close hole as before.
PART 3: BEAK
For the white duck: work in mustard yellow.
For the blush pink goose: work in peach/salmon.
- Rnd 1: MR, 4 sc. (4)
- Rnd 2: Inc in each st. (8)
- Rnd 3: [Sc 1, inc] × 4. (12)
- Rnds 4–5: Sc around. (12)
Do not stuff. Flatten the beak. Fasten off with a 20cm tail for sewing.
PART 4: FEET (make 2 per duck)
For the white duck: work in mustard yellow.
For the blush pink goose: work in dusty rose.
Each foot is made of three toe lobes joined together.
Toe Lobe (make 3 per foot, so 6 total per duck):
- Rnd 1: MR, 5 sc. (5)
- Rnd 2: Inc in each st. (10)
- Rnds 3–4: Sc around. (10)
Do not fasten off after the third lobe. Instead, join all three lobes:
Joining Round: Place the three lobes side by side. Working with the yarn still attached to the last lobe, sc across the top 4 sts of lobe 3, sc 4 sts across lobe 2, sc 4 sts across lobe 1. (12) — this creates the top of the foot base
- Row 1 (flat): Ch 1, turn, sc across all 12 sts. (12)
- Row 2: Ch 1, turn, [sc 2, dec] × 3. (9)
- Row 3: Ch 1, turn, [sc 1, dec] × 3. (6)
Fasten off with a 20cm tail. Do not stuff feet. Flatten and sew directly to the bottom of the body.
PART 5: WINGS (make 2 per duck)
- Rnd 1: MR, 5 sc. (5)
- Rnd 2: [Sc 1, inc] × 2, sc 1. (7)
- Rnd 3: Sc around. (7)
- Rnd 4: [Sc 1, inc] × 3, sc 1. (10)
- Rnds 5–6: Sc around. (10)
- Rnd 7: [Sc 3, dec] × 2. (8)
Fasten off with a 20cm tail. Do not stuff. Pinch flat.
PART 6: BONNET (white duck only — work in sage green)
Bonnet Cap:
- Rnd 1: MR, 6 sc. (6)
- Rnd 2: Inc in each st. (12)
- Rnd 3: [Sc 1, inc] × 6. (18)
- Rnd 4: [Sc 2, inc] × 6. (24)
- Rnd 5: [Sc 3, inc] × 6. (30)
- Rnds 6–10: Sc around. (30) — 5 rounds even
Bonnet Brim (worked in BLO of Rnd 10 to create ridge):
BLO: Insert hook only into the back loop of each stitch — this creates a raised fold line that defines the brim edge.
- Rnd 11 (BLO): [Sc 2, inc] × 10. (40)
- Rnd 12: Sc around. (40)
- Rnd 13: [Sc 3, inc] × 10. (50)
- Rnd 14: Sc around. (50)
Sl st to close. Fasten off, leaving a 25cm tail.
Bonnet Ties (make 2):
Ch 30 in sage green. Sl st back along the chain for a tighter cord effect. Fasten off with a 15cm tail. Sew one tie to each side of the bonnet brim at the bottom corners.
Assembly Steps
- Attach head to body: Position the head centered on top of the body. The bottom of the head should sit flush with the top of the body. Using the long tail from the head, sew through both layers around the full circumference of the neck — approximately 12–14 stitches around. Pull firmly to create a secure join. The neck join should sit approximately 4–5cm from the top of the body.
- Attach beak: Place the flattened beak against the face, centered horizontally, between Rnds 10–12 of the head. Sew around all edges of the beak opening for a secure, flat attach. The beak should protrude approximately 1–1.5cm from the face.
- Attach wings: Place one wing on each side of the body, with the top of the wing aligned with the neck join line, approximately 3–4cm below the head. Sew the flat inner edge of each wing to the body using the long tail.
- Attach feet: Position both feet at the bottom of the body, spaced approximately 2cm apart (center to center). Sew the flat back edge of each foot firmly to the base. Make sure both feet point forward and the duck can sit upright and level. Adjust foot angle before finishing all stitches.
- Place bonnet (white duck only): Fit the bonnet cap over the head, positioning the brim at approximately Rnd 9–10 of the head to frame the face. The front brim should sit about 1cm above the safety eyes. Pin in place with a stitch marker, then sew around the inside of the bonnet cap edge to the head. Tie the bonnet ties in a bow under the chin at approximately 1–2cm below the beak.
- Weave in all ends and trim.
Beginner & Intermediate Tips
Working with chenille/velvet yarn: Chenille has a directional pile and does not easily allow you to frog (undo) rows without damaging the fibers. Work slowly and count your stitches at the end of every round. Use a stitch marker in the first stitch of each round so you never lose your place.
Closing the magic ring tightly: After pulling the tail to close your MR, tug it once more from the inside after working a few rounds — the hole can loosen as you work. A secure MR is especially important for small parts like the beak and toe lobes.
Invisible decrease on chenille: Because chenille has thick pile, the front loops can be harder to identify. Pinch the stitch flat between your fingers before inserting the hook — you will feel both front loops more easily. This prevents accidentally working into the back loops, which results in a visible bump.
Safety eyes in chenille: When inserting safety eyes, make a small pilot hole with a blunt tapestry needle to separate the fibers before pushing the eye post through. This prevents tearing the chenille pile.
Stuffing technique: Stuff the body and head in small portions as you decrease, not all at once at the end. The head in particular benefits from being stuffed incrementally so the sphere stays perfectly round rather than collapsing on one side.
Keeping feet level: Before sewing the feet on permanently, sit the duck on a flat surface and hold the feet in position to check that it sits without tipping. Even a few millimeters of difference in foot placement can cause the duck to lean. Adjust before stitching down.
Variations
1. Duckling Family Set: Make three ducks in graduated sizes — 18cm, 13cm, and 9cm — by working fewer increase rounds on the body and head for each smaller version. Line them up in a row for the sweetest nursery display.
2. Seasonal Ducks: Swap the sage bonnet for a tiny Santa hat (red with white trim) for Christmas, or a mini witch hat for Halloween. The duck base is versatile enough to wear any tiny accessory you crochet.
3. Monochrome Flock: Make a set of ducks all in different shades of the same color family — cream, vanilla, pale butter yellow — for a sophisticated, tonal display rather than a multicolored one.
4. Weighted Duck: Instead of polyfill alone, add a small handful of plastic pellets inside a tied organza bag before stuffing the rest with polyfill. This gives the base a satisfying weight and helps the duck sit upright without toppling.
5. Goose-Only Version: Skip the bonnet entirely and work the blush pink version in pure white for a classic Mother Goose look. Add a tiny crocheted book or basket accessory for extra character.
If this free crochet amigurumi duck pattern made your day, save it to your Pinterest boards so you can find it again! Tag your finished ducks with #FoodieRippleCrochet — there is nothing better than seeing your versions of these little bonneted friends. 🦆


