The Best Fluffy Pancakes recipe you will fall in love with. Full of tips and tricks to help you make the best pancakes.
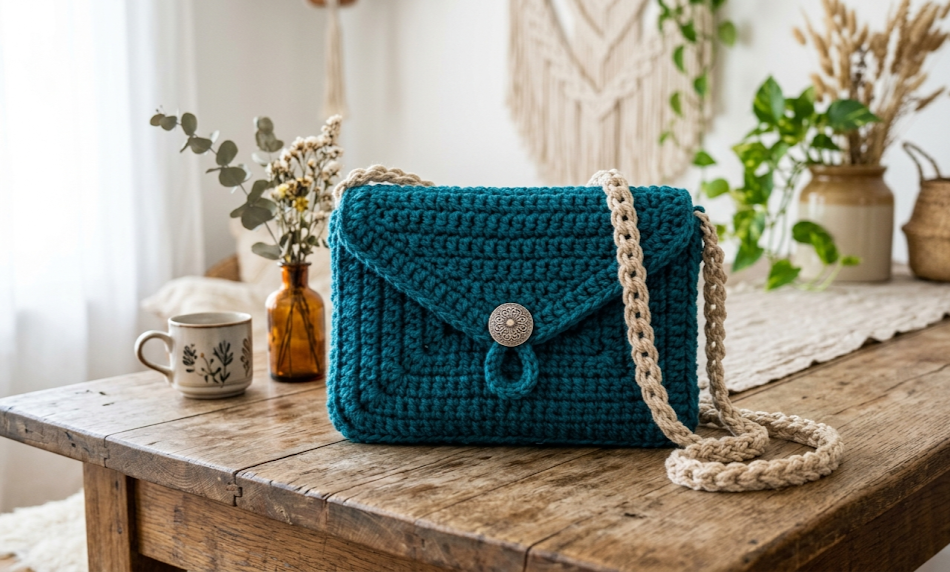
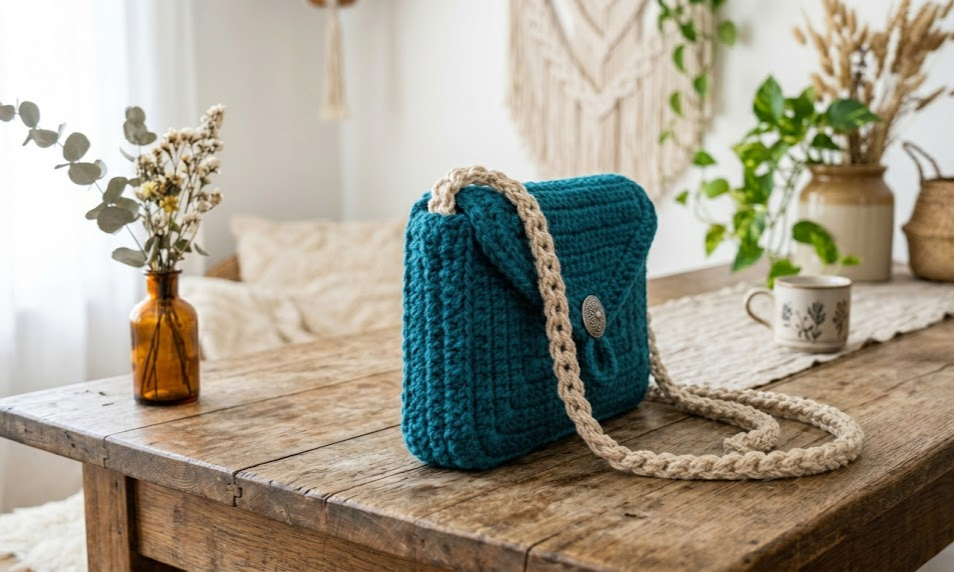
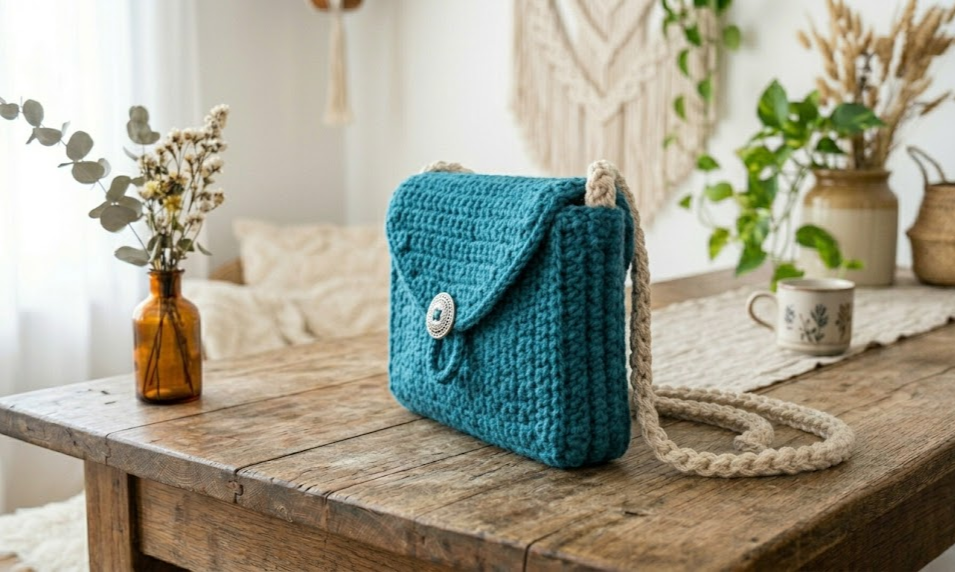
There is something effortlessly chic about a handmade bag that looks like it belongs on a boutique shelf. This crochet chain-strap clutch delivers exactly that — a structured teal envelope bag with a dramatic oversized crocheted chain shoulder strap and a polished metal button closure. Whether you are heading to a farmers market, a dinner out, or just want to elevate your everyday carry, this bag turns heads without requiring anything more than yarn, a hook, and a free afternoon. The colour combination of deep peacock teal and warm sandy beige is a timeless boho pairing, but as you will find in the variations section, this design adapts beautifully to any palette you love. Intermediate crocheters will find this pattern straightforward and highly satisfying — the main body works up quickly in a dense moss stitch that gives the bag structure and texture, and the crocheted chain strap is one of those techniques that looks far more impressive than it actually is. Let’s make your new favourite bag.
|
Difficulty
Intermediate
|
Time
6–9 Hours
|
Hook Size
4.0mm
|
Yarn Weight
DK Weight
|
Finished Size
24cm × 16cm
|
Gauge
Working in Moss Stitch (alternating sc and ch-1) with 4.0mm hook and DK weight yarn:
18 stitches × 20 rows = 10cm × 10cm square
Always work a gauge swatch before beginning. Bag dimensions depend on accurate gauge. If your swatch is larger, go down a hook size. If smaller, go up a hook size.
Materials List
Yarn:
- Colour A (Teal/Peacock Blue): DK weight, approximately 250g / 580 yards — suggested brands: Paintbox Simply DK, Drops Safran, Lion Brand 24/7 Cotton DK
- Colour B (Beige/Tan): DK weight, approximately 80g / 185 yards (for chain strap only)
Hook: 4.0mm crochet hook (US size G/6)
Notions:
- 1 decorative button or magnetic snap closure (approx. 2–2.5cm diameter)
- Stitch markers × 4
- Yarn needle for weaving ends
- Scissors
- Optional: 24cm × 16cm bag insert or piece of plastic canvas for structure
- Optional: lining fabric and sewing needle/thread
Abbreviations
| Abbreviation | Meaning |
|---|---|
| ch | chain |
| sc | single crochet |
| hdc | half double crochet |
| sl st | slip stitch |
| sp | space |
| ch-sp | chain space |
| RS | right side |
| WS | wrong side |
| rep | repeat |
| sk | skip |
| st(s) | stitch(es) |
| MS | Moss Stitch (sc in ch-sp, ch 1, skip 1 st) |
| t-ch | turning chain |
| beg | beginning |
| cont | continue |
Moss Stitch (MS) explained: Work (sc into next ch-1 space, ch 1, skip next sc) across. On each row, the sc sits into the ch-1 space of the row below, and ch 1 creates the new space for the next row. This creates an even mesh-like texture with excellent stitch definition.
Pattern Instructions
PART 1: BAG BODY (worked flat, then seamed)
The bag body is worked as one long rectangle: the back panel, base, and front panel are all one continuous piece, then the sides are seamed.
Foundation Chain: Using Colour A and 4.0mm hook, ch 89.
(This gives you a working width of 44 moss stitch units — each unit = 1 sc + 1 ch-1 sp.)
Row 1 (RS): Sc in 2nd ch from hook, *ch 1, skip 1 ch, sc in next ch; rep from * to end. Turn. (44 sc, 43 ch-1 sps = 87 stitches worked)
Row 2: Ch 1, sc in first ch-1 sp, *ch 1, skip sc, sc in next ch-1 sp; rep from * to last sc, ch 1, sc in last sc. Turn. (44 sc, 44 ch-1 sps)
Rows 3–76: Rep Row 2. (44 sc, 44 ch-1 sps per row)
You should now have a rectangle measuring approximately 80cm long × 24cm wide. This is your full body panel.
Place stitch markers at the following row numbers to identify sections:
- Rows 1–32: Back panel (approx 16cm)
- Rows 33–43: Base (approx 5.5cm)
- Rows 44–76: Front panel (approx 16.5cm, taller to allow for flap overlap)
Fasten off, weave in ends.
PART 2: ENVELOPE FLAP
The flap is worked separately and creates the diagonal envelope point characteristic of this bag style.
Foundation: Using Colour A, ch 89 (same as body width).
Row 1 (RS): Sc in 2nd ch from hook, *ch 1, skip 1, sc in next ch; rep from * to end. Turn. (44 sc, 43 ch-sp)
Rows 2–8: Rep body Row 2. (44 sc, 44 ch-sp)
Begin decreasing for envelope point:
Row 9: Ch 1, sl st across first 2 sts, sc in next ch-1 sp, cont in MS pattern to last 3 sts, leave last 3 sts unworked. Turn. (42 sc, 42 ch-sp)
Row 10: Ch 1, sl st across first 2 sts, sc in next ch-1 sp, cont in MS to last 3 sts, leave unworked. Turn. (40 sc, 40 ch-sp)
Rows 11–24: Continue decreasing 2 units each side every row until 16 sc remain. (16 sc, 16 ch-sp)
Row 25: Work across in MS with no decrease. Turn. (16 sc, 16 ch-sp)
Rows 26–28: Dec 2 units each side every row. (10 sc, 10 ch-sp after Row 28)
Row 29: Dec 2 units each side. (8 sc, 8 ch-sp)
Row 30: Dec 1 unit each side. (6 sc, 6 ch-sp)
Row 31: Dec 1 unit each side. (4 sc, 4 ch-sp)
Row 32: Sc across 4 sts, no ch-sp. (4 sc)
Row 33: Sc2tog twice. (2 sc)
Row 34: Sc2tog. (1 sc) Fasten off.
PART 3: SIDE PANELS (make 2)
Foundation: Using Colour A, ch 13.
Row 1: Sc in 2nd ch from hook, *ch 1, skip 1, sc in next ch; rep from * to end. Turn. (6 sc, 5 ch-sp)
Rows 2–32: Rep body Row 2. (6 sc, 6 ch-sp per row)
You should have a rectangle approximately 5.5cm wide × 16cm tall. Fasten off, leaving a 40cm tail for seaming.
PART 4: CHUNKY CROCHETED CHAIN STRAP
This is the showstopper element of the bag. Each chain link is crocheted as a separate oval tube and looped through the previous one before closing, creating an interlocking chain.
Note on chain links: Each link is worked in the round as a small tube/oval.
Make 24 links total (adjust length as needed for your desired strap drop).
Each link:
Using Colour B and 4.0mm hook, ch 16.
Rnd 1: Working in the round from the chain — join to first ch with sl st, being careful not to twist. (Magic ring alternative: if preferred, start each link with a 16-ch oval foundation.)
Sc around entire oval: sc in each of the 14 ch across one side, 3 sc in last ch (corner), sc back across 14 ch on the other side of the foundation chain, 3 sc in first ch (corner). Join with sl st to first sc. (34 sc)
Rnd 2: Ch 1, sc in each st around. Join with sl st. (34 sc)
Rnd 3: Ch 1, sc in each st around. Join with sl st. (34 sc)
Before closing the 3rd round of the current link, thread it through the previous completed link. This is how the chain interlocks — each new link passes through the last before being finished.
Rnd 4: Ch 1, sc in each st around. Join with sl st, leaving 20cm tail. (34 sc)
Using yarn needle, weave tail through the stitches of Rnd 4 to cinch the tube closed at both narrow ends, reinforcing the oval shape. Fasten off.
Each completed link measures approximately 4cm × 2cm. 24 links = approximately 60cm finished strap. Add or subtract links to adjust length.
Assembly Steps
- Fold and seam body panel: Lay the body panel flat (WS up). Fold Row 1 edge up to Row 43 marker (this forms the front panel and base). Pin or clip in place.
- Attach side panels: Position one side panel on each open side of the folded body. Using yarn needle and Colour A, whipstitch or mattress stitch along both vertical side seams. Each seam runs approximately 16cm from base fold to top edge of front panel. Ensure corners sit square at the base.
- Attach flap: With RS of flap facing RS of bag back (right sides together), align the flat straight edge of the flap (Row 1) with the top edge of the back panel. Whipstitch across the full 24cm width. When turned to RS, the flap will fold down over the front.
- Mark and attach button: Fold flap down over front panel. The envelope point should reach approximately 4cm down from the centre top edge of the front panel. Mark where the button point sits naturally. Sew the decorative button through both flap and front panel at this point, or install a magnetic snap on the flap lining and a corresponding snap on the front panel centre, 4cm down from top edge.
- Attach chain strap: Hold the chain at the link that will sit at the top of each side seam (link 1 and link 24). Using a short length of Colour B, anchor the end link securely to the top corner seam on each side of the bag, stitching through 3–4 times and knotting firmly. The strap should hang freely and sit approximately 25–28cm above the bag when worn crossbody.
- Optional lining: Cut lining fabric to 24cm × 36cm for body, plus two 5.5cm × 16cm strips for sides. Sew into a small box, fold top edges under 1.5cm, and slip stitch to the inside top edge of the bag all the way around.
- Weave in all remaining ends. Block gently if needed by misting with water and pressing flat under a damp cloth.
Beginner/Intermediate Tips
Maintaining moss stitch tension: The most common issue with moss stitch bags is inconsistent tension at row ends. Always work your turning chain loosely, and ensure you are inserting your hook into the ch-1 space (not the chain itself) on every row — this is what keeps the grid even.
Making the chain strap links uniform: The secret to a polished chain strap is consistent foundation chains. Count your starting chains carefully for every link. Working all your foundation chains in one sitting before crocheting the links ensures you stay consistent.
Keeping the bag structured: DK yarn at 4.0mm produces a relatively firm fabric for this stitch, but if your bag feels floppy, go down to a 3.5mm hook for the body panels only. The tighter fabric will hold its shape without needing an insert.
Envelope point precision: When working the flap decreases, use a stitch marker at each decrease point to keep the angle symmetrical. Uneven decreases on either side will skew the envelope point off-centre.
Button placement: Always test your button position with the bag fully stuffed (fill with a small pillow or folded towel) before sewing. The flap angle changes slightly with contents, so fitting it loaded gives you a more accurate closure position.
Variations
- Classic Black and Gold: Work the body in black DK yarn and the chain strap in gold or mustard yellow. Swap the silver button for a gold toggle closure for a sophisticated evening bag.
- Mini Clutch Version: Use fingering weight yarn and a 2.5mm hook to create a wallet-sized version approximately 14cm × 9cm. Perfect as a card holder or night-out clutch. Omit the side panels and work the chain strap with just 12 links.
- Colour-Block Body: Work the back panel in one colour and the front panel in a contrasting shade. For example, dusty rose back panel with terracotta front — divide the foundation rectangle at the base and switch colours cleanly.
- Market Tote Conversion: Use bulky weight yarn and a 6.5mm hook to scale the body up to approximately 35cm × 28cm. Replace the crocheted chain strap with a pair of thick twisted cord handles in the same bulky yarn for a roomy everyday tote.
- Floral Embellishment: Once assembled, add small crochet flowers in contrasting colours along the front panel or flap edge. A cluster of three flowers near the button closure gives a cottage-core garden party feel.
Love this bag? Save this free pattern to your Pinterest crochet boards so you can find it whenever you are ready to make it — and tag your finished make with #FoodieRippleCrochet so we can admire your creation!


