The Best Fluffy Pancakes recipe you will fall in love with. Full of tips and tricks to help you make the best pancakes.
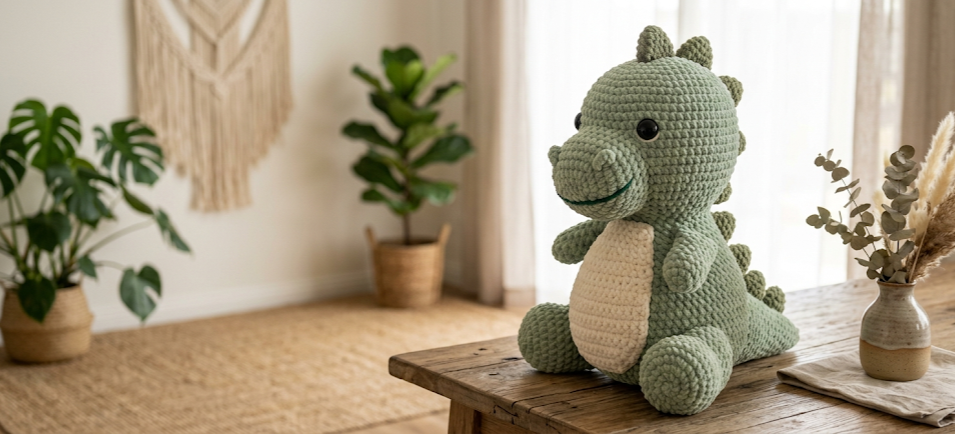
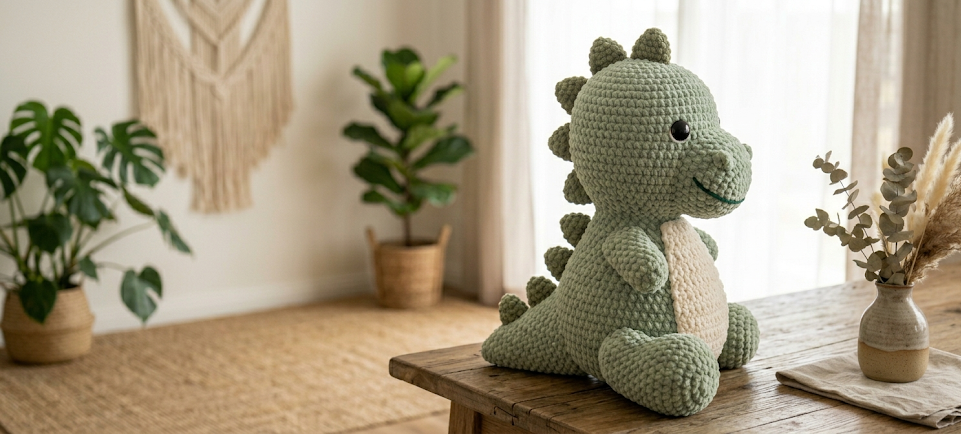
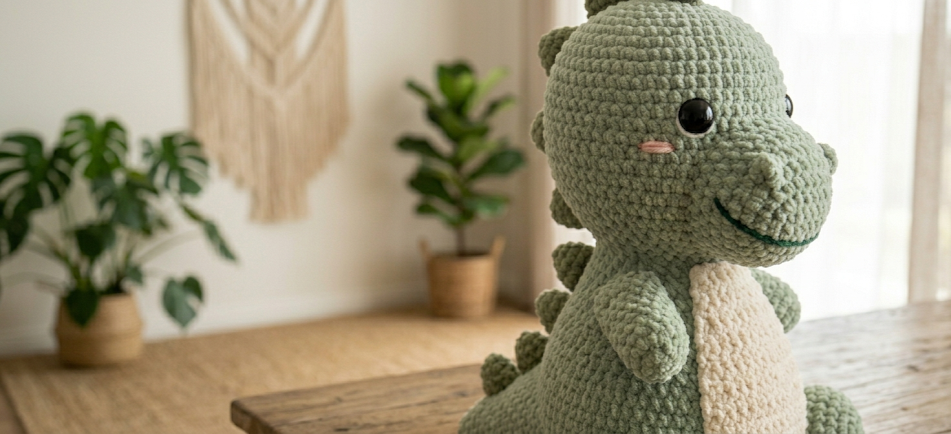
If you have been searching for an amigurumi project that is as impressive as it is adorable, this Jumbo Dino crochet pattern is exactly what you need. Standing approximately 18 inches (45 cm) tall when stuffed, this oversized dinosaur is soft, cuddly, and built for hugs. Whether it ends up as a toddler’s favorite companion, a nursery room statement piece, or a handmade gift for a dinosaur-obsessed friend, this jumbo amigurumi delivers on every level. Made primarily with chenille blanket yarn for that irresistibly plush texture, this pattern is rated beginner to easy — which means even newer crocheters can tackle it with confidence. The finished dinosaur features a rounded body, tiny arms, sturdy legs, a contrasting cream belly panel, a row of dorsal spikes, and sweet safety eyes with an optional pink blush detail that brings the whole face to life.
|
Difficulty
Beginner
|
Time
6–10 Hours
|
Hook Size
8.0 mm
|
Yarn Weight
Bulky (6)
|
Finished Size
18 in (45 cm)
|
Gauge
Working in single crochet with an 8.0 mm hook and bulky chenille yarn:
10 stitches x 10 rows = approximately 10 cm x 10 cm (4 in x 4 in)
Gauge swatch: Chain 12, work sc in rows for 12 rows. Your swatch should measure roughly 10 cm wide and 10 cm tall. Because this is a stuffed amigurumi, gauge affects finished size rather than structural fit. A slightly looser or tighter gauge will produce a slightly larger or smaller dinosaur but will not affect construction. Use the hook size that gives you a fabric tight enough that stuffing does not show through the stitches.
Materials
Yarn:
- Blanket yarn / chenille yarn (bulky weight, Category 6), Main Color (sage/olive green): 3–4 skeins
- Blanket yarn / chenille yarn, Belly Color (cream or off-white): 1 skein
- Blanket yarn / chenille yarn, Spike Color (same green or contrast): scraps (makes 7–9 spikes)
Hook:
- 8.0 mm (L/11) crochet hook
Notions:
- 14 mm safety eyes x 2
- Polyester fiberfill stuffing (generous amount — this dino is jumbo!)
- Yarn needle (blunt tip, large eye)
- Scissors
- Stitch markers (at least 2)
Optional:
- Pink yarn or felt scrap for blush circles under the eyes
Abbreviations
| Abbreviation | Meaning |
|---|---|
| MR | Magic Ring — pull a loop of yarn into a ring, work stitches into the ring, then pull the tail tight to close |
| sc | Single crochet |
| inc | Increase — work 2 single crochets into the same stitch |
| dec | Invisible decrease — insert hook under the front loop only of the next 2 stitches simultaneously, yarn over and pull through both front loops, yarn over and pull through 2 loops on hook; this creates a neater, less visible decrease than a standard sc2tog |
| sl st | Slip stitch |
| ch | Chain |
| st(s) | Stitch(es) |
| rnd | Round |
| rep | Repeat |
| x [number] | Repeat the bracketed instruction that many times |
Pattern Instructions
All pieces are worked in continuous rounds (no slip stitch to join, no turning chain) unless otherwise stated. Place a stitch marker in the first stitch of each round and move it up as you go.
HEAD
Using main color.
Rnd 1: 6 sc in MR. (6)
Rnd 2: inc around. (12)
Rnd 3: [sc, inc] x 6. (18)
Rnd 4: [2 sc, inc] x 6. (24)
Rnd 5: [3 sc, inc] x 6. (30)
Rnd 6: [4 sc, inc] x 6. (36)
Rnd 7: [5 sc, inc] x 6. (42)
Rnd 8–13: sc around. (42) — 6 rounds even
Insert safety eyes between rnds 9–10, spaced approximately 8 stitches apart. If adding blush, position pink yarn circles or felt just below and to the outside of each eye before closing.
Rnd 14: [5 sc, dec] x 6. (36)
Rnd 15: [4 sc, dec] x 6. (30)
Rnd 16: [3 sc, dec] x 6. (24)
Rnd 17: [2 sc, dec] x 6. (18)
Begin stuffing the head firmly at this point. Continue adding stuffing as you close.
Rnd 18: [sc, dec] x 6. (12)
Rnd 19: dec around. (6)
Fasten off, leaving a long tail. Use yarn needle to weave tail through the front loops of remaining 6 stitches and pull tight to close. Weave in end.
BODY
Using main color.
Rnd 1: 6 sc in MR. (6)
Rnd 2: inc around. (12)
Rnd 3: [sc, inc] x 6. (18)
Rnd 4: [2 sc, inc] x 6. (24)
Rnd 5: [3 sc, inc] x 6. (30)
Rnd 6: [4 sc, inc] x 6. (36)
Rnd 7: [5 sc, inc] x 6. (42)
Rnd 8–16: sc around. (42) — 9 rounds even
Rnd 17: [5 sc, dec] x 6. (36)
Rnd 18: [4 sc, dec] x 6. (30)
Rnd 19: [3 sc, dec] x 6. (24)
Rnd 20: [2 sc, dec] x 6. (18)
Rnd 21: [sc, dec] x 6. (12)
Stuff body firmly before closing.
Rnd 22: dec around. (6)
Fasten off, leaving a long sewing tail. Close as with head and leave tail for attaching to head.
BELLY (worked as a separate flat panel)
Using belly color (cream).
Foundation: Ch 10. Work sc in 2nd ch from hook, sc in next 7 chs, sc 3 in last ch (corner turn). Working back along the other side of the foundation chain: sc in next 7 sts, inc in last st. (22) — Note: Working the second side of a foundation chain means flipping your work and crocheting into the unused bottom loops of the starting chain; this creates a flat oval piece.
Rnd 2: inc, 7 sc, inc, 3 sc, 7 sc, inc x 2. (24) — Note: inc x 2 means work 2 separate inc stitches at the end.
Rnd 3: [3 sc, inc] x 8. (30) — Adjust as needed to keep piece flat; if it begins to ruffle, drop one increase.
Rnd 4–6: sc around. (30)
Fasten off, leaving a long tail for sewing.
ARMS (make 2)
Using main color.
Rnd 1: 6 sc in MR. (6)
Rnd 2–4: sc around. (6) — 3 rounds even
Stuff lightly — arms can be slightly floppy for a cute effect.
Flatten the open end of the arm and crochet through both layers to close: 3 sc across. (3 closing sts)
Fasten off, leaving a long tail for sewing.
LEGS (make 2)
Using main color.
Rnd 1: 6 sc in MR. (6)
Rnd 2: inc around. (12)
Rnd 3: [sc, inc] x 6. (18)
Rnd 4–6: sc around. (18) — 3 rounds even
Stuff firmly so legs hold their shape and support the body’s weight.
Flatten and crochet: 9 sc across to close. (9 closing sts)
Fasten off, leaving a long tail for sewing.
SPIKES (make 7–9, in spike color)
Using spike color. Ch 4.
Rnd 1: sc in 2nd ch from hook, sc in next ch, 3 sc in last ch. Working back along the other side of the chain: sc in next ch. (6)
Fasten off, leaving a long tail for sewing. No stuffing needed — spikes are flat.
Assembly
- Belly panel: Position the belly oval on the front of the body so that it sits centered and covers roughly the lower two-thirds of the front surface. Pin in place with stitch markers and sew down using the cream yarn tail and a yarn needle, working whipstitch or mattress stitch around the full perimeter. Weave in ends.
- Head to body: Position the head on top of the body, centering it so the face points forward. The bottom of the head should overlap the top of the body by approximately 2–3 cm (about 1 inch). Add any remaining stuffing to both pieces through the opening before fully closing the seam. Sew using mattress stitch all the way around.
- Spikes: Lay the spikes out along the top centerline of the dinosaur from the top of the head down to approximately the mid-back. Space them roughly 3–4 cm (1.5 in) apart. Sew each spike flat against the seam line, stitching through the base of each spike and catching the body fabric securely. For a cleaner look, hide the knot inside the body seam.
- Arms: Position the arms on either side of the body at approximately the level of the neck join, roughly 3–4 cm below where the head meets the body. Sew each arm using the long tail, stitching through the flat closed end and into the body fabric in a circular motion for security.
- Legs: Attach the legs to the bottom front of the body, spaced approximately 6–8 cm apart (about 2.5–3 in). The flat closed edges of the legs should face inward toward each other. Sew firmly — legs need to bear some of the body’s weight when the dino is set upright.
- Blush detail (optional): Cut two small circles of pink felt approximately 1.5 cm (0.5 in) in diameter, or embroider a few small horizontal stitches in pink yarn. Position one below and slightly outside each safety eye. Sew or glue with fabric glue.
- Final check: Stand the dinosaur upright and adjust the leg position if needed before the yarn sets. Weave in all remaining ends thoroughly — chenille yarn can unravel if ends are not secured with a double knot before weaving.
Tips for Beginners and Intermediate Crocheters
Chenille yarn and stitch visibility: Chenille is one of the trickiest yarns to count stitches in because the velvet texture obscures the V-shapes of each stitch. Use a contrasting-color stitch marker every 6 stitches around large rounds (like rnd 7 of the head at 42 sts) to keep your count accurate without having to stop and recount from zero.
Magic ring tension: Pull the magic ring tail snug before your first increase round but not so tight that the center puckers inward. A small, flat center is the goal. If you find magic rings difficult, substitute with ch 2 and work 6 sc into the second chain from the hook.
Stuffing the body firmly enough: The dino needs to be stuffed quite firmly — especially the legs — to hold the 18-inch structure upright. Add stuffing in small handfuls and press it to the edges of each piece rather than piling it in the center. A pencil or chopstick is useful for pushing stuffing into small areas like the leg tips.
Invisible decrease in chenille: The invisible decrease (dec) is particularly important in chenille because standard sc2tog creates a visible gap in the fabric. The invisible decrease closes cleanly into the dense texture of chenille yarn and is worth the small extra effort on every decrease round.
Safety eye placement: Insert safety eyes before the decreasing rounds close too much to give you room to position them precisely. Always press the washer fully onto the post from inside — chenille is thick and the washer needs extra pressure to seat completely.
Variations
- Pink Dino: Swap the main color for dusty rose or bubblegum pink chenille and use white for the belly. A soft pink dinosaur with cream spikes reads more whimsical and is wildly popular for baby showers and nursery decor.
- Mini Version: Use worsted weight yarn (Category 4) and a 5.0 mm hook to make a palm-sized dino approximately 9–10 inches tall. All rounds remain the same; the finished size simply scales down proportionally.
- T-Rex Silhouette: Shorten the arms dramatically to just 2 rounds of Rnd 2 (4 rounds total) for the famously tiny T-Rex arms, and make the legs slightly taller by adding 2 extra even rounds before the closing row.
- Color-Blocked Spikes: Make each spike in a different color — mustard, rust, teal, and cream — for a retro, boho color story that photographs beautifully and is very popular on Pinterest.
- Dino Family Set: Use the same pattern at three different yarn weights — bulky (as written), worsted, and fingering weight with a 2.5 mm hook — to make a mama, baby, and micro dino that nest together as a gift set.
Loved making this jumbo cuddly dinosaur? Save this pattern to your crochet board so you can find it again — and share your finished dino with the tag #FoodieRippleCrochet to be featured!


