The Best Fluffy Pancakes recipe you will fall in love with. Full of tips and tricks to help you make the best pancakes.
Introduction
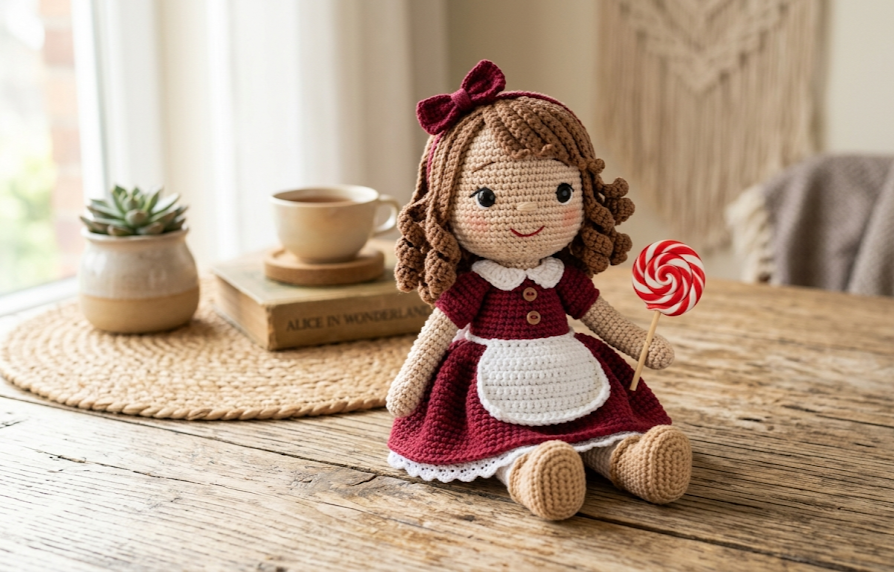
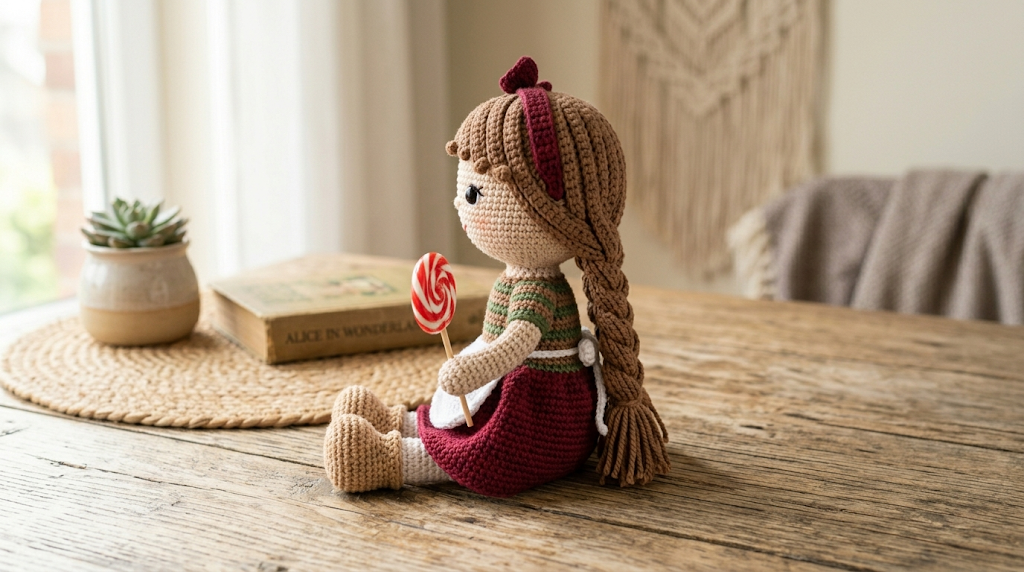
Welcome to your next favorite crafting project! If you love the charm of vintage-inspired handmade toys, this comprehensive, free amigurumi doll pattern is designed just for you. Meet Alice, a beautiful heirloom-quality crochet doll packed with incredible details, from her whimsical red-and-white striped lollipop to her tiny overalls, rustic boots, and striped socks. Alice the Doll brings a warm, cozy storybook aesthetic into any room, making her the perfect heartfelt gift for a child’s keepsake collection, an eye-catching display piece for a nursery shelf, or a delightful challenge for an intermediate crocheter looking to elevate their toy-making skills.
Amigurumi is the art of Japanese toy knitting or crocheting, and it relies heavily on creating tight, structurally sound three-dimensional shapes. Alice is worked primarily in seamless spirals to give her a smooth, professional finish with clean color transitions. Her charming green-and-dark-green striped shirt, tailored burgundy shorts with straps, miniature embroidered patch, and delicate hair accessories offer a wonderfully diverse palette of techniques that will keep you engaged from the very first loop to the final stitch. In this detailed guide, we provide everything you need to create your own Alice from scratch, ensuring that you can follow along directly from your screen with absolute confidence. Let’s pick up our hooks and breathe life into this timeless companion!
| Difficulty Intermediate | Time 6-8 Hours | Hook Size 2.5 mm | Yarn Weight Sport (#2) | Finished Size 18 cm Tall |
Gauge
Achieving a proper gauge is vital in amigurumi to ensure that the fiber stuffing does not peek through your stitches and that the doll’s clothing fits proportionally.
- Gauge Specification: 26 stitches and 26 rows = 10cm x 10cm (4″ x 4″) square worked in single crochet in continuous spirals using a 2.5 mm crochet hook.
- Hook Size Used: 2.5 mm (US B/1 or C/2 depending on brand consistency)
- Yarn Weight Used: Sport Weight (Fine / #2)
Materials List
To complete Alice the Doll and her spinning lollipop accessory, collect the following materials prior to starting:
- Yarn: Sport weight cotton or cotton-acrylic blend yarn (approx. 50g per main skein) in the following shades:
- Color A: Beige / Skin-tone (Head, hands, legs)
- Color B: Medium Brown (Hair, boots)
- Color C: Burgundy Red (Shorts, collar ruffle, hair bow, lollipop swirl)
- Color D: Olive Green (Shirt stripes, patch)
- Color E: Dark Forest Green (Shirt stripes)
- Color F: Crisp White (Socks, lollipop swirl)
- Crochet Hook: 2.5 mm size
- Safety Eyes: One pair of 6mm black plastic safety eyes
- Notions & Tools:
- High-quality polyester fiberfill stuffing
- Two miniature brown buttons (approx. 4mm or 5mm) for the short straps
- Fine black or dark brown embroidery floss for the nose/facial framing
- Pink cosmetic blush or fabric pastel with a small makeup brush for the cheeks
- One wooden dowel or sturdy lollipop stick (approx. 10cm long and 3mm thick)
- 30cm of flexible crafting wire (approx. 1.5mm to 2mm gauge) for structural support in the neck and lollipop stem
- Yarn needle, embroidery needle, stitch markers, and sharp scissors
Abbreviations Table
The following standard US crochet terminology is utilized throughout the entirety of this pattern:
| Abbreviation | Full Technique Name |
| ch | Chain stitch |
| st(s) | Stitch(es) |
| sc | Single crochet |
| inc | Single crochet increase (2 single crochets into the same stitch) |
| dec | Invisible single crochet decrease (joining two stitches together) |
| dc | Double crochet |
| BLO | Back loops only |
| FLO | Front loops only |
| sl st | Slip stitch |
| rnd(s) | Round(s) |
| MR | Magic Ring |
Pattern Instructions
Part 1: Head & Neck
The head is worked in continuous spirals from the top down using Color A (Beige). Do not join rounds unless explicitly stated.
- Technique Note (Magic Ring): A magic ring is an adjustable loop technique that eliminates the hollow center hole common when beginning circular crochet projects.
- Rnd 1: Work 6 sc into a MR. (6)
- Rnd 2: Work 1 inc in each of the next 6 sts. (12)
- Rnd 3: [1 sc, 1 inc] repeat 6 times. (18)
- Rnd 4: [2 sc, 1 inc] repeat 6 times. (24)
- Rnd 5: [3 sc, 1 inc] repeat 6 times. (30)
- Rnd 6: [4 sc, 1 inc] repeat 6 times. (36)
- Rnd 7: [5 sc, 1 inc] repeat 6 times. (42)
- Rnd 8: [6 sc, 1 inc] repeat 6 times. (48)
- Rnd 9–19: Work 1 sc in each st around. (48)
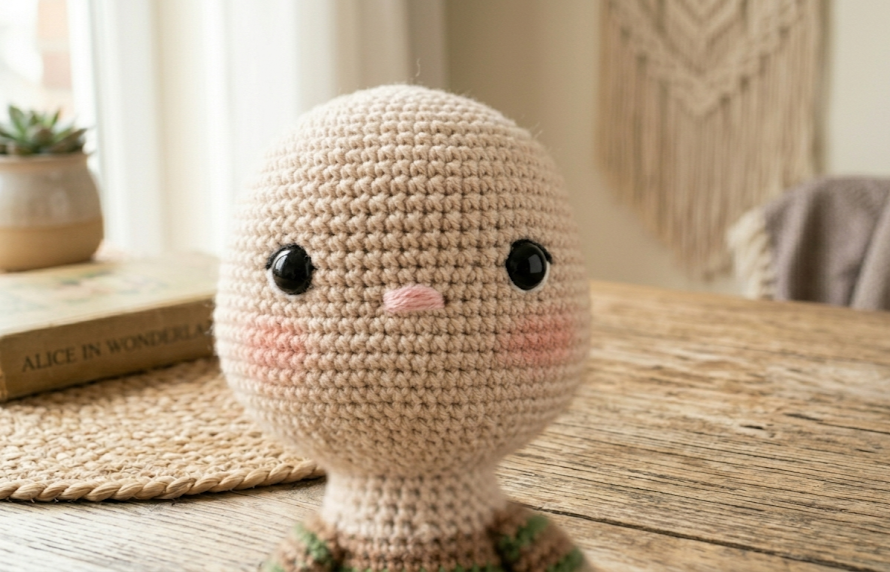
- Note: Place the 6mm safety eyes between Rnds 15 and 16, leaving an interim space of 9 stitches between them.
- Rnd 20: [6 sc, 1 dec] repeat 6 times. (42)
- Rnd 21: [5 sc, 1 dec] repeat 6 times. (36)
- Rnd 22: [4 sc, 1 dec] repeat 6 times. (30)
- Rnd 23: [3 sc, 1 dec] repeat 6 times. (24)
- Begin stuffing the head firmly with polyester fiberfill, making sure it holds a smooth, round shape without stretching the stitches.
- Rnd 24: [2 sc, 1 dec] repeat 6 times. (18)
- Rnd 25: [1 sc, 1 dec] repeat 6 times. (12)
- Rnd 26–28: Work 1 sc in each st around for the neck column. (12)
- Fasten off, leaving a long yarn tail for later attachment to the torso.
Part 2: Hair Cap & Braids
The main cap is worked in continuous spirals using Color B (Brown).
- Rnd 1: Work 6 sc into a MR. (6)
- Rnd 2: Work 1 inc in each of the next 6 sts. (12)
- Rnd 3: [1 sc, 1 inc] repeat 6 times. (18)
- Rnd 4: [2 sc, 1 inc] repeat 6 times. (24)
- Rnd 5: [3 sc, 1 inc] repeat 6 times. (30)
- Rnd 6: [4 sc, 1 inc] repeat 6 times. (36)
- Rnd 7: [5 sc, 1 inc] repeat 6 times. (42)
- Rnd 8: [6 sc, 1 inc] repeat 6 times. (48)
- Rnd 9–18: Work 1 sc in each st around. (48)
- Check the fit against Alice’s head. It should sit comfortably over the top half.
- Braid Instructions (Make 2): Cut 9 lengths of Color B yarn, each 25cm long. Group into sets of three, thread through the lower side margins of the hair cap, braid tightly for roughly 6cm, and tie off securely with a small strand of Color C (Burgundy). Fasten off.
Part 3: Legs & Boots
Start from the bottom of the boot using Color B (Brown). Make 2.
- Technique Note (Working the second side of a chain): To create an oval foundation base, you will crochet along the initial chain row normally, rotate the piece 180 degrees, and crochet along the unhatched loops on the opposite underside of the same chain.
- Ch 6.
- Rnd 1: Starting in the second ch from hook, work 4 sc, 3 sc in the final ch loop. Rotate to work along the second side of the chain: 3 sc, 1 inc in the starting ch space. (12)
- Rnd 2: 1 inc, 3 sc, 3 inc, 3 sc, 2 inc. (18)
- Rnd 3: 1 sc, 1 inc, 4 sc, 1 inc, 2 sc, 1 inc, 4 sc, 1 inc, 2 sc. (22)
- Rnd 4: Work 1 sc in each st around in BLO. (22)
- Rnd 5: Work 1 sc in each st around. (22)
- Rnd 6: 6 sc, 5 dec, 6 sc. (17)
- Rnd 7: 5 sc, 3 dec, 6 sc. (14)
- Rnd 8–9: Work 1 sc in each st around. (14)
- Rnd 10 (Boot Cuff): In FLO, work [1 sc, ch 1] in each st around. Sl st to close and fasten off Color B. (14)
- Join Color C (Burgundy) to the unworked back loops of Rnd 9 to start the leg ruffles.
- Rnd 11: In BLO, work 1 sc in each st around. (14)
- Rnd 12: In FLO, work [ch 2, 2 dc in same st, skip 1 st, sl st in next] repeat around to form the leg trim. Fasten off Color C.
- Join Color F (White) to the internal remaining back loops of Rnd 11. Stuff the boot base firmly.
- Rnd 13: Work 1 sc in each st around. (14)
- Rnd 14: Change to Color D (Green), work 1 sc in each st around. (14)
- Rnd 15–16: Change to Color F (White), work 1 sc in each st around. (14)
- Rnd 17–18: Change to Color D (Green), work 1 sc in each st around. (14)
- Rnd 19–20: Change to Color A (Beige), work 1 sc in each st around. (14)
- Stuff the remainder of the leg firmly. Fasten off the first leg. Repeat for the second leg, but do not cut the yarn on the second leg; proceed to connect them.
Part 4: Torso & Clothing
To join the legs, continue from the second leg with Color A.
- Rnd 1: Work 14 sc around the second leg, ch 2, join to the first leg with a sc, work 13 sc around the first leg, work 2 sc along the joining ch, work 2 sc along the reverse side of the ch. (32)
- Rnd 2–6: Work 1 sc in each st around. (32)
- Change to Color C (Burgundy) to begin the shorts.
- Rnd 7: Work 1 sc in each st around in BLO to create a clothing ridge. (32)
- Rnd 8–11: Work 1 sc in each st around. (32)
- Change to Color D (Green) to begin the striped shirt.
- Rnd 12: Work 1 sc in each st around in BLO. (32)
- Rnd 13: Change to Color E (Dark Green), work [6 sc, 1 dec] repeat 4 times. (28)
- Rnd 14: Change to Color D (Green), work 1 sc in each st around. (28)
- Rnd 15: Change to Color E (Dark Green), work [5 sc, 1 dec] repeat 4 times. (24)
- Rnd 16: Change to Color D (Green), work 1 sc in each st around. (24)
- Rnd 17: Change to Color E (Dark Green), work [4 sc, 1 dec] repeat 4 times. (20)
- Rnd 18: Change to Color D (Green), work 1 sc in each st around. (20)
- Rnd 19: Change to Color E (Dark Green), work [3 sc, 1 dec] repeat 4 times. (16)
- Rnd 20: Change to Color D (Green), work 1 sc in each st around. (16)
- Rnd 21: Change to Color A (Beige), work [2 sc, 1 dec] repeat 4 times. (12)
- Rnd 22: Work 1 sc in each st around. (12)
- Fasten off, leaving an extra-long tail for assembly.
Part 5: Arms
Begin with Color A (Beige). Make 2. Do not stuff.
- Rnd 1: Work 6 sc into a MR. (6)
- Rnd 2: Work [2 sc, 1 inc] repeat 2 times. (8)
- Rnd 3–4: Work 1 sc in each st around. (8)
- Change to Color D (Green).
- Rnd 5: Work 1 sc in each st around in BLO. (8)
- Rnd 6: Change to Color E (Dark Green), work 1 sc in each st around. (8)
- Rnd 7–16: Repeat alternating stripes of Color D and Color E every round. (8)
- Flatten the top opening and work 4 sc through both layers to close the tube. Fasten off, leaving a tail.
Part 6: Lollipop Accessory
The swirl lollipop disk uses Color C (Burgundy) and Color F (White).
- Technique Note: To get a clean swirl, you carry both yarns simultaneously, alternating colors every 2 stitches.
- Rnd 1: Using both colors, work 6 sc into a MR (3 in White, 3 in Burgundy). (6)
- Rnd 2: Work 2 sc in each st around, maintaining alternating blocks of 2 white and 2 burgundy stitches. (12)
- Rnd 3: [1 sc, 1 inc] repeat 6 times around. (18)
- Rnd 4: [2 sc, 1 inc] repeat 6 times around. (24)
- Rnd 5: [3 sc, 1 inc] repeat 6 times around. (30)
- Fasten off both colors neatly. Make a matching plain backing disk in Color C (Burgundy) up to Rnd 5.
- Stem Wire Instructions: To structuralize the lollipop, take a 10cm wooden dowel and wrap a 15cm strand of crafting wire around the top 2cm. Sandwich this wire core between the swirl disk and the burgundy backing disk. Sew the outer edges of the two disks together around the stick using Color C yarn, completely sealing the inside elements. The wire must protrude 2cm into the core of the lollipop disk to avoid bending, and the remaining 8cm of the exposed wooden stick serves as the handle.
Assembly Steps
- Torso Wire Reinforcement: Insert a 10cm piece of crafting wire directly into the stuffed torso neck opening. Push the wire down precisely 6cm deep into the center of the fiberfill base within the body, leaving 4cm of exposed wire sticking straight up to stabilize the heavy head.
- Attaching the Head: Slide the neck column of the head over the protruding 4cm wire core. Using a yarn needle and the structural thread tail from the torso, whipstitch the 12 stitches of Rnd 22 of the body directly to the base of the head securely.
- Placing the Hair Cap: Fit the hair cap over the skull, positioning it slightly tilted toward the back to keep the forehead open. Pin it in place, then use a running stitch with Color B yarn around the entire lower hairline perimeter to affix it.
- Arm Attachment: Position the arms on either side of the torso exactly 1 round below the neck junction. Sew them flat against the body so they hang down naturally.
- Overalls Straps: Join Color C yarn to the back loop ridge left on Rnd 7 of the shorts. Chain 14, cross over the doll’s shoulders, and slip stitch to the front waist ridge. Sew the mini decorative buttons onto the front attachment points.
- Facial Accents & Lollipop Placement: Embroider a tiny horizontal bar nose between the eyes using Color A. Apply a tiny amount of real cosmetic blush to the fabric directly beneath the eyes to create a soft, rosy cheek effect. Pass the lollipop handle through Alice’s right hand, anchoring it with a hidden stitch through the arm panel.
Beginner/Intermediate Tips
- Achieving Perfect Color Stripes: When working the alternating green shirt bands, always perform your color change during the very last yarn-over of the previous stitch. This ensures the loop on your hook is already the new color when starting a fresh row, avoiding uneven steps.
- Invisible Decreases are Key: To prevent gaps in your amigurumi shapes, use the invisible decrease technique. Insert your hook into the front loops only of the next two stitches, yarn over, pull through both front loops, yarn over, and pull through the remaining two loops.
- Tension Uniformity: Cotton yarn has very little stretch compared to acrylic. Keep a firm, even pull on your working yarn to avoid loose stitches that drop or sag when fiberfill stuffing is compressed inside the cavities.
Variations
- The Holiday Festive Elf: Swap the burgundy shorts for bright candy cane red, use emerald green and white for the striped shirt, and give her little black elf boots to turn Alice into a delightful Christmas decoration.
- The Oversized Snuggle Version: Use a bulky blanket chenille yarn and a 5.0 mm crochet hook. This single adaptation scales Alice up from a small display doll to a massive, squishy 45cm plush huggable toy.
- Pastel Fairy Aesthetic: Re-imagine the colorway by utilizing soft lavender for the main clothes, cream for the hair, mint green for the accent stripes, and substituting the lollipop for a tiny star-tipped magic wand.
- The Garden Tea Party Doll: Eliminate the lollipop accessory entirely. Crochet a miniature sunhat in beige and adorn her hair with tiny yellow daisy appliqués instead of the burgundy bow.


