The Best Fluffy Pancakes recipe you will fall in love with. Full of tips and tricks to help you make the best pancakes.
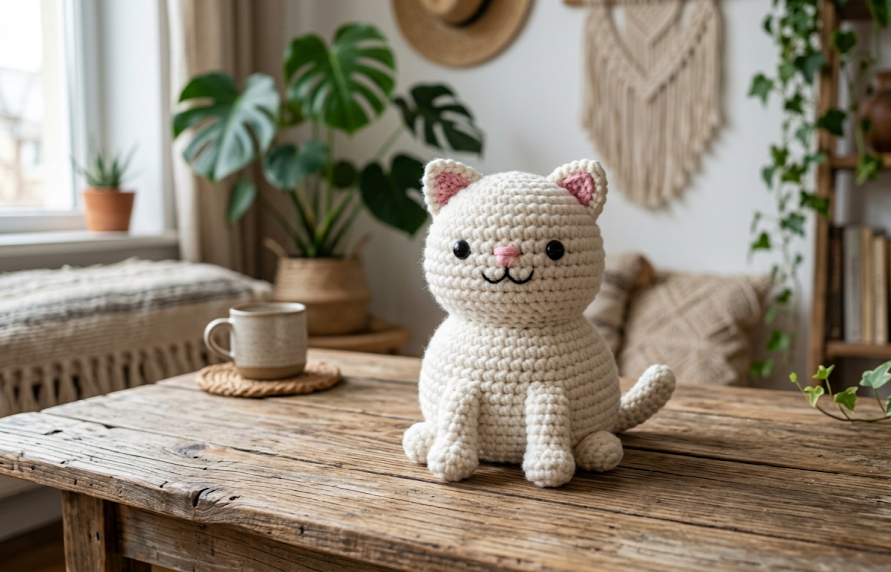
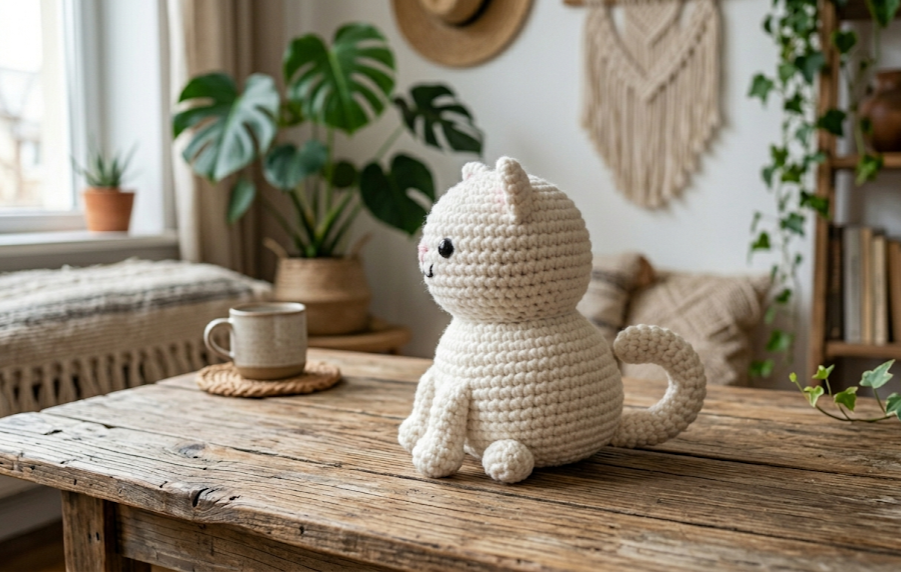
There is something undeniably magical about transforming a simple skein of yarn into a sweet, squishable companion. If you love cute, round plushies, this free crochet chubby cat amigurumi pattern is the ultimate weekend craft. Designed to look perfectly stout, round, and joyful, this adorable white kitten features chubby outspread arms with pink paw pads, tiny triangular ears, and a cute little tail. It is a wonderful handmade project for gifting, decorating a nursery, or adding a touch of cozy charm to your own desk setup.
Whether you are looking for a relaxing afternoon project or a quick handmade gift that guarantees a smile, this round kitty is designed to be highly rewarding and remarkably fast to stitch up. Using chunky chenille yarn ensures that your work builds up quickly, hiding small stitching imperfections while giving the final toy an incredibly soft, professional, store-bought texture. Let’s look at the foundational steps required to start your new favorite plush feline.
| Difficulty Beginner | Time 2-3 Hours | Hook Size 5.0 mm (H) | Yarn Weight Super Bulky | Finished Size 15 cm Tall |
Gauge and Swatch Information
Before diving straight into the stitch guide, working up a gauge swatch is highly recommended to ensure your stitches are tight enough to keep the fiberfill stuffing hidden completely inside.
- Gauge: 10 stitches and 10 rows = 10 cm x 10 cm (4″ x 4″) square worked in continuous rounds of single crochet.
- Hook Size Used: 5.0 mm (US H-8) crochet hook.
- Yarn Weight Used: Super Bulky (Weight 6), chenille or blanket style yarn.
If your swatch turns out larger than 10 cm, your stitches may be loose, meaning the stuffing could peek through; consider switching to a smaller hook size. If your swatch is smaller, try upgrading to a larger hook.
Materials List
Gathering high-quality materials before casting on keeps your workspace tidy and your crafting seamless. For this project, you will need:
- Primary Yarn: Super Bulky Chenille Yarn (Weight 6) – approximately 65 yards of Crisp White.
- Accent Yarn: Super Bulky Chenille Yarn (Weight 6) or Medium Weight Acrylic Yarn – small scrap amounts of Soft Pink for the nose, inner ears, and paw pads.
- Crochet Hook: 5.0 mm (US H-8) or size needed to obtain gauge.
- Safety Eyes: One pair of 10mm glossy black plastic safety eyes with secure backings.
- Stuffing: High-loft premium polyester fiberfill.
- Notions: A large-eye blunt tapestry needle for sewing plush yarn, a stitch marker to track continuous rounds, sharp embroidery scissors, and fine sewing pins to balance limbs before stitching.
Abbreviations Table
This pattern utilizes standard US crochet terminology. Review the full breakdown below before beginning:
| Abbreviation | Stitch / Technique |
| ch | Chain stitch |
| st(s) | Stitch(es) |
| sc | Single crochet |
| inc | Single crochet increase (two single crochets in one stitch) |
| dec | Single crochet decrease (joining two stitches together into one) |
| MR | Magic Ring (adjustable yarn loop used to start round items seamlessly) |
| Rnd(s) | Round(s) |
| BLO | Back Loop Only (inserting hook through only the rear strand of a stitch) |
Pattern Instructions
This amigurumi piece is worked in continuous spiral rounds. Do not join with a slip stitch or chain at the end of rounds unless explicitly instructed to do so. Move your stitch marker up into the first stitch of each new round to track your placement accurately.
Head & Body
The main body of our chubby cat is worked as a single, continuous piece from the top of the head down to the base of the belly, minimizing the amount of sewing required later.
Rnd 1: Form a Magic Ring (MR), then work 6 sc directly into the adjustable loop. (A magic ring is made by looping yarn around your fingers to create an adjustable circle, then stitching directly into that circle to ensure the center hole can pull perfectly closed). (6 sts)
Rnd 2: Work an inc in each of the next 6 sts around. (12 sts)
Rnd 3: *1 sc in the next st, 1 inc in the next st*; repeat from * to * 6 times total. (18 sts)
Rnd 4: *1 sc in each of the next 2 sts, 1 inc in the next st*; repeat from * to * 6 times total. (24 sts)
Rnd 5: *1 sc in each of the next 3 sts, 1 inc in the next st*; repeat from * to * 6 times total. (30 sts)
Rnds 6–12: Work 1 sc in each st around across these seven continuous rounds. (30 sts)
Note: Between rounds 9 and 10, insert your 10mm plastic safety eyes, leaving roughly 5 unworked stitches of space between them. Secure the backings firmly inside the head before moving forward.
Rnd 13: *1 sc in each of the next 3 sts, 1 dec in the next st*; repeat from * to * 6 times total. (24 sts)
Rnd 14: *1 sc in each of the next 2 sts, 1 dec in the next st*; repeat from * to * 6 times total. (18 sts)
Begin stuffing the upper portion of the head firmly with your polyester fiberfill, making sure to shape the cheeks evenly.
Rnd 15: *1 sc in the next st, 1 dec in the next st*; repeat from * to * 6 times total. (12 sts)
Finish stuffing the remainder of the body completely until it forms a very solid, plump sphere.
Rnd 16: Work 6 dec stitches consecutively around. (6 sts)
Fasten off your white yarn, leaving a 20 cm yarn tail. Using your tapestry needle, thread the tail through the front loops of the remaining 6 stitches and pull firmly to close the bottom opening securely. Weave in the loose end inside the body.
Ears (Make 2)
The ears are small triangles worked from the tip down to the base. Do not stuff them.
Rnd 1: Form a Magic Ring, then work 4 sc directly into the loop. (4 sts)
Rnd 2: *1 sc in the next st, 1 inc in the next st*; repeat from * to * 2 times total. (6 sts)
Rnd 3: Work 1 sc in each of the next 6 sts around. (6 sts)
Rnd 4: *1 sc in each of the next 2 sts, 1 inc in the next st*; repeat from * to * 2 times total. (8 sts)
Rnd 5: Work 1 sc in each of the next 8 sts around. (8 sts)
Fasten off, leaving an extra-long tail for assembly. Press the ears completely flat to create a triangular cone. Using pink accent yarn and a tapestry needle, stitch a tiny triangle onto the center front of each ear to represent the inner ear coloring.
Arms (Make 2)
The outspread paws give this chubby cat its welcoming, cute expression.
Rnd 1: Form a Magic Ring, then work 6 sc directly into the loop. (6 sts)
Rnd 2: *1 sc in the next st, 1 inc in the next st*; repeat from * to * 3 times total. (9 sts)
Rnds 3–5: Work 1 sc in each of the next 9 sts around. (9 sts)
Rnd 6: Work 1 sc in each st around. (9 sts)
Fasten off, leaving a long tail for attachment. Stuff the lower half of the arms lightly with fiberfill, keeping the opening relatively flat. Take your pink yarn and embroider a larger circular pad in the center of the hand and three tiny accent dots above it to form a distinct cat paw print on each arm.
Legs (Make 2)
The stubby legs help give the cat stability when resting on flat surfaces.
Rnd 1: Form a Magic Ring, then work 6 sc directly into the loop. (6 sts)
Rnd 2: Work an inc in each of the next 6 sts around. (12 sts)
Rnd 3: Work 1 sc in each of the next 12 sts around in BLO. (Working in the Back Loop Only means inserting your hook exclusively beneath the rear loop of the stitch, leaving the front loop exposed to create a clean, flat ridge that defines the base of the foot). (12 sts)
Rnd 4: Work 1 sc in each of the next 12 sts around normally. (12 sts)
Fasten off, leaving a tail for sewing. Stuff the foot firmly with fiberfill to ensure a stable bottom edge.
Tail
Rnd 1: Form a Magic Ring, then work 5 sc directly into the loop. (5 sts)
Rnds 2–8: Work 1 sc in each of the next 5 sts around across these seven rows. (5 sts)
Fasten off, leaving a tail for assembly. You can leave the tail unstuffed so it remains flexible and naturally curved.
Assembly Steps
Assembling your amigurumi accurately is what transforms separate crocheted pieces into a character overflowing with personality. Follow these detailed steps to construct your cat:
- Positioning the Ears: Place the flat base of the ears symmetrically on top of the head. Position them along Rounds 3 to 6, leaving roughly 4 stitches of space between them. Pin them down securely. Use the remaining yarn tail to whipstitch around the bottom edge of the ears into the head, sewing through both thicknesses.
- Attaching the Legs: Turn the main body base-up. Position the two stuffed legs side by side on the very bottom curve of the body (around Rounds 14 to 15). Space the legs exactly 2 cm apart from one another so they allow the cat to sit upright without tilting. Sew securely around the rim of each leg.
- Placing the Outspread Arms: Position the decorated arms high on the sides of the body, just beneath the neckline indentation (around Round 11). Angle the arms slightly upward and forward so the embroidered pink paw pads face straight out. Ensure they sit symmetrically on the left and right sides, roughly 6.5 cm apart from each other across the front chest. Sew them down flat against the body.
- Attaching the Tail: Pin the base of the tail centered on the lower back of the body, just above the seating line (around Round 13). Sew firmly around the 5 stitches of the tail opening to prevent sagging.
- Finishing the Face: Using a tapestry needle and your pink accent yarn, embroider a tiny horizontal nose directly centered between the safety eyes, roughly 1 cm wide. Tie off your threads inside the fabric structure to hide the raw ends completely.

Beginner / Intermediate Tips
- Embrace the Invisible Decrease: When working the decrease stitches on the head and body, always utilize the invisible decrease technique. To do this, insert your hook into the front loops only of the next two consecutive stitches, yarn over, pull through both front loops, yarn over, and pull through the final two loops on your hook. This keeps your decreases smooth and completely prevents gaps where fiberfill can escape.
- Keep Track with Markers: Plush chenille yarn has a dense, fluffy texture that makes individual stitch definition difficult to see. Always keep a plastic split ring marker in your first stitch, and count your total stitches at the end of every single round before moving forward to catch mistakes immediately.
- Tension Control: Avoid pulling plush yarn too hard, as excessive friction can cause the chenille fibers to strip or shred right off the inner structural thread. Keep your tension firm but fluid.
Creative Variations
- The Calico Mix: Swap yarn colors mid-round to create a patchy calico look! Introduce soft ginger and dark grey yarn sections across the back and ears while keeping the face and belly white.
- Velvet Feline: Substitute the super bulky plush yarn for a sport weight or worsted weight velvet yarn using a 3.0mm hook. This scales down the entire pattern into a miniature, pocket-sized keychain kitty while preserving the smooth texture.
- Sleepy Eyes: If you are gifting this toy to an infant or young child, bypass plastic safety eyes entirely. Instead, use black embroidery floss to stitch closed, curved, sleepy eyelashes for a safe and dreamy facial design.
- Pumpkin Feline Holiday Variant: Give your plush cat a seasonal theme by using bright orange yarn for the body and substituting the tail with a tiny green stem to create a whimsical autumn room decoration.


