The Best Fluffy Pancakes recipe you will fall in love with. Full of tips and tricks to help you make the best pancakes.
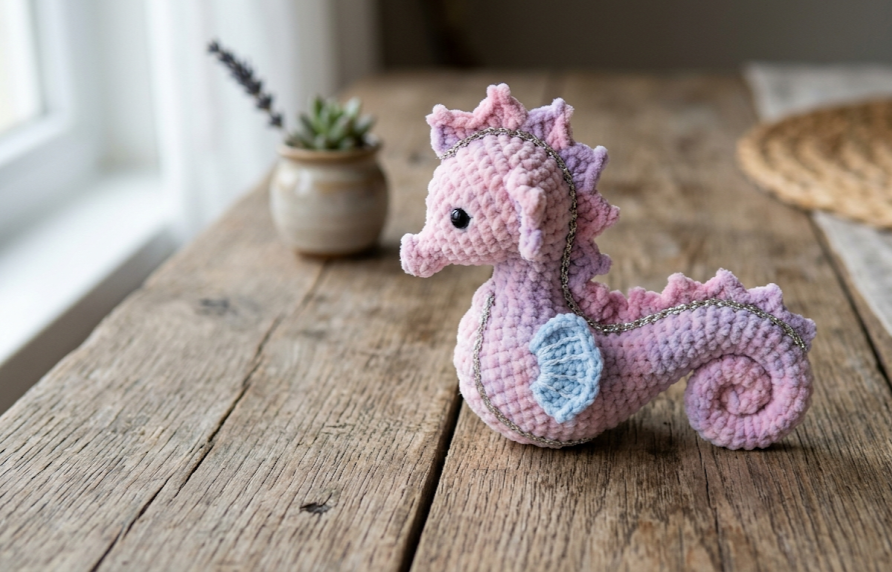
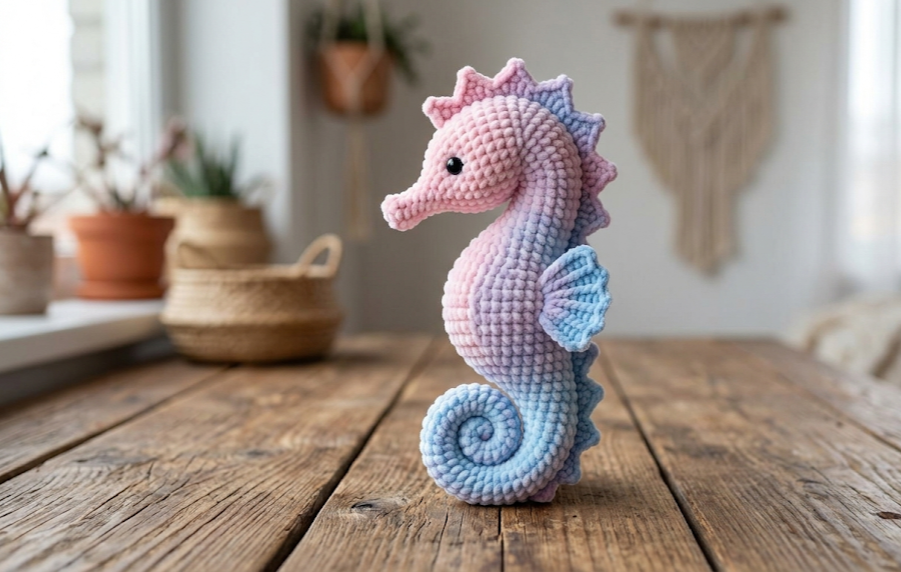
If you’ve ever wanted to bring the ocean’s most enchanting creature to life with just a hook and yarn, this crochet mini fancy seahorse pattern is exactly what you need. Standing approximately 14 cm tall, this little amigurumi seahorse features a gracefully curved body, a spiky dorsal crest running from head to tail, delicate fan-shaped side fins, and an elegantly coiled tail — all rendered in dreamy pastel gradient yarn with optional shimmering metallic thread accents. The result is a keepsake-quality piece that looks far more complex than it actually is to make.
This pattern is perfect for intermediate crocheters who are comfortable working in the round, managing stitch counts, and assembling multiple small pieces. The finished seahorse makes a beautiful nursery decoration, a thoughtful handmade gift, or a charming addition to any ocean-themed display. Whether you crochet it in soft pastels, deep ocean blues, or bold tropical colors, this tiny seahorse is sure to become one of your most-loved makes.
|
Difficulty
Intermediate
|
Time
4–6 Hours
|
Hook Size
3.0–3.5 mm
|
Yarn Weight
DK / Chenille
|
Finished Size
~14 cm Tall
|
Gauge
Gauge: 18 sc × 20 rows = 10 cm × 10 cm worked in single crochet in the round with a 3.5 mm hook using soft chenille or DK-weight yarn.
Gauge is important for achieving the correct finished size of approximately 14 cm tall. If your gauge is looser, your seahorse will be larger; tighter, and it will be smaller. The dense fabric is intentional — it prevents stuffing from showing through.
Hook size used: 3.0–3.5 mm crochet hook
Yarn weight used: DK / light worsted (chenille or fine cotton-chenille blend)
Materials
- Soft chenille yarn in pastel gradient (main color — body, snout, tail): approximately 60 g
- Fine cotton yarn for fins (secondary color — blue or complementary pastel): approximately 10 g
- Optional: metallic thread (very thin, for crest accent): small amount
- Small beads (2–3 mm, for crest decoration): optional
- 8 mm black safety eyes: 2
- Polyester fiberfill stuffing: approximately 30 g
- Yarn needle for sewing and weaving in ends
- Scissors
- Stitch marker to track round beginnings
Abbreviations
| Abbreviation | Meaning |
|---|---|
| sc | Single crochet |
| inc | Increase — work 2 sc into the same stitch |
| dec | Invisible decrease — insert hook under front loops only of the next 2 stitches, yarn over and pull through both, yarn over and pull through 2 loops on hook |
| MR | Magic ring — form an adjustable loop, work the specified number of stitches into it, then pull the tail to close the center hole |
| sl st | Slip stitch — insert hook, yarn over, pull through both loops in one motion |
| ch | Chain |
| Rnd | Round |
| BLO | Back loop only — insert hook only into the back loop of the indicated stitch |
| rep | Repeat |
Pattern Instructions
Part 1: Body
The body is worked in continuous rounds from the top (head area) downward.
Gauge note: Begin with a magic ring (MR). To work a magic ring, wrap yarn around two fingers, insert the hook through the center, pull up a loop, and chain 1 before working your first round of stitches into the ring. Pull the tail end to close the hole before continuing.
Rnd 1: 6 sc into MR. Pull tight to close. (6)
Rnd 2: Inc in each st around. (12)
Rnd 3: Sc, inc rep around. (18)
Rnd 4: 2 sc, inc rep around. (24)
Rnd 5: 3 sc, inc rep around. (30)
Rnds 6–18: Sc around — work even with no increases or decreases. (30) each round
Rnd 19: 3 sc, dec rep around. (24)
Rnd 20: 2 sc, dec rep around. (18)
Insert 8 mm safety eyes between Rnds 6–7, spaced approximately 8–9 stitches apart, before closing the opening further.
Begin stuffing firmly with polyester fiberfill now and continue adding stuffing as you work the remaining rounds.
Rnd 21: Sc, dec rep around. (12)
Rnd 22: Dec rep around. (6)
Fasten off and weave in the tail end, closing the remaining gap fully.
Part 2: Snout
The snout is a small tube worked separately and attached to the front of the head.
Rnd 1: 6 sc into MR. Pull tight. (6)
Rnds 2–5: Sc around — work even. (6) each round
Leave a long tail for sewing. Do not stuff. Attach to the head with the open end flush against the face fabric, centered and positioned just below the eyes. Stitch around the entire perimeter securely.
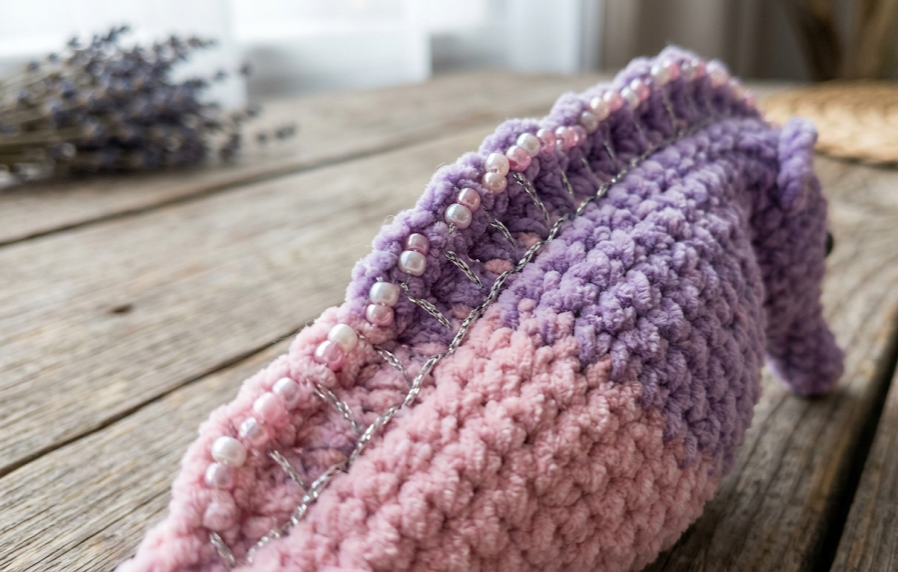
Part 3: Crest
The crest runs along the back of the seahorse from the top of the head to the beginning of the tail. It is worked by picking up stitches along the back seam of the body.
Row 1: Working back from head to tail along the back edge, sc, ch 2, sl st into the same stitch — repeat this across the full length of the back. (Repeat sequence)
Row 2: Sl st along the edge to secure.
If desired, weave a strand of thin metallic thread along the crest after completion, and add 2–3 mm decorative beads at intervals by threading them onto the metallic strand before securing.
Part 4: Side Fins (make 2)
Each fin is worked flat and then folded slightly before sewing to the body.
Rnd 1: 6 sc into MR. (6)
Rnd 2: Inc in each st. (9)
Rnd 3: 2 sc, inc rep 3 times. (12)
Rnd 4: 3 sc, inc rep 3 times. (15)
Rnd 5: 4 sc, inc rep 3 times. (18)
Rnd 6: Sc around. (18)
Fasten off, leaving a long tail for sewing. Fold the fin slightly along its natural curve to give it a gentle wave shape. Pin to the side of the body at approximately the mid-body point (around Rnds 10–12) and sew securely around the base. Repeat on the opposite side.
Assembly Steps
- Attach the snout: Center the snout on the front face of the body just below the eyes. The open end of the snout tube should be flush against the body. Sew around the entire base of the snout using the tail end and a yarn needle, making small stitches all the way around for security. Knot and weave in the tail.
- Install the safety eyes: Before the body is fully closed (after Rnd 20), position the 8 mm safety eyes between Rnds 6–7. They should be centered on the front face, approximately 8–9 stitches apart horizontally. Press the washers firmly into place from the inside.
- Stuff the body: Fill the body cavity firmly with polyester fiberfill. The body should feel dense and hold its S-curve shape when positioned. Add extra stuffing to the lower body before closing.
- Attach the crest: Working along the back edge of the finished body, stitch or crochet the crest from the top of the head to the beginning of the coiled tail section (approximately 8–10 cm of spine length). Secure both ends firmly.
- Attach the fins: Position each side fin at the mid-body level (roughly 5–6 cm down from the top of the head). The base of each fin should overlap the body by approximately 1 cm. Sew securely around the entire base.
- Shape the tail: The lower body naturally curves into the coiled tail due to the decreases. If needed, gently hand-shape the tail into a tight spiral by winding the tip around your finger and holding it for 30–60 seconds, or use a small piece of craft wire inserted into the tail before closing — thread the wire through the center of the tail tube, coil the tail around a pencil, remove, and close the tail tip with a sl st. Secure the wire end by folding it back on itself inside the tail and stitching over it.
- Weave in all ends using a yarn needle, threading through at least 3–4 stitches in multiple directions to secure.
Beginner and Intermediate Tips
Working with chenille yarn: Chenille has a pile direction that can make it difficult to identify individual stitches. Use a stitch marker to track the beginning of each round, and count frequently — every 5–6 stitches — rather than waiting until round end.
Invisible decrease: Insert your hook under the front loops only of the next two stitches before pulling through. This reduces the visible “hole” that a standard sc2tog creates, giving the finished surface a smoother appearance, which is especially important on the head section.
Stuffing density: Stuff more firmly than you think you need to. Chenille compresses over time, and a loosely stuffed body will lose its shape quickly. Pack stuffing into the head and snout in small pinches rather than large clumps.
Crest positioning: Before working the crest, use pins or removable markers to identify the exact center-back seam line of the body. The crest should sit perfectly centered on this line to keep the seahorse’s profile symmetrical.
Attaching small parts: When sewing the snout and fins, use a yarn needle with a blunt tip and make smaller stitches than you think are necessary. Double-knot your starting and ending threads, then weave the tail in two opposite directions before trimming.
Variations
- Ocean Ombre: Work the body in a hand-dyed gradient yarn that shifts from deep teal at the head through aqua to seafoam at the tail for a realistic tropical reef look.
- Galaxy Seahorse: Use a black or deep navy yarn with silver metallic thread throughout the crest and fins, adding iridescent seed beads for a night-sky effect.
- Nursery Mobile: Make three seahorses in different pastel colorways — blush, mint, and lavender — and suspend them from a driftwood piece using lengths of clear thread at varying heights.
- Larger Display Piece: Scale up to a 5 mm hook with bulky yarn for a seahorse approximately 25 cm tall. All stitch counts remain the same; only the finished size changes.
- Keychain Version: Reduce to a 2 mm hook with fingering weight thread and omit the fins for a tiny seahorse charm, approximately 5–6 cm tall, perfect for a bag accessory.
Save This Pattern for Later!
Love this crochet mini fancy seahorse? Save this post to your Pinterest boards so you can come back to it anytime — and share your finished seahorse with the hashtag #FoodieRippleCrochet to be featured!


