The Best Fluffy Pancakes recipe you will fall in love with. Full of tips and tricks to help you make the best pancakes.
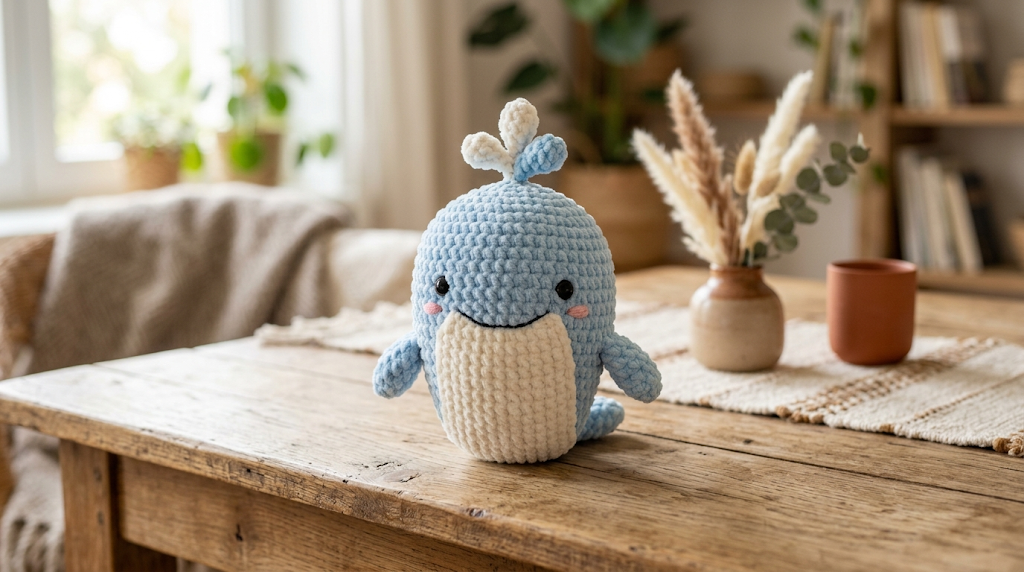
If you’ve been searching for a crochet project that’s equal parts charming, beginner-friendly, and irresistibly huggable, this crochet baby whale amigurumi is exactly what you need. With its round, squishy body, soft light blue plush yarn, rosy embroidered cheeks, and a sweet little water spout on top, this little whale is one of those projects that makes everyone in the room stop and smile. Whether you’re making it as a nursery decoration, a baby shower gift, or just a joy project for yourself, this pattern walks you through every step from the magic ring all the way through final assembly.
This pattern uses plush chenille-style yarn — sometimes labeled “velvet” or “velour” yarn — which gives the finished whale that cloud-soft, sensory-pleasing texture. It’s worked entirely in single crochet rounds, making it an excellent project for anyone who has completed a few basics but wants to expand into amigurumi. The finished whale measures approximately 12 cm tall and 10 cm wide when stuffed, making it a satisfying palm-sized plushie.
|
Difficulty
Beginner–Intermediate
|
Time
3–5 Hours
|
Hook Size
2.5 mm
|
Yarn Weight
Plush / Chenille
|
Finished Size
~12 cm tall
|
Gauge
Before beginning, crochet a gauge swatch to ensure your finished size matches the expected dimensions.
Gauge: 16 stitches × 18 rows = 10 cm × 10 cm in single crochet using plush/chenille yarn and a 2.5 mm crochet hook.
If your swatch is larger than 10 cm, try a smaller hook. If it’s smaller, try a larger hook. Gauge is especially important in amigurumi because inconsistent tension creates gaps that allow stuffing to show through.
Hook size used: 2.5 mm
Yarn weight used: Super Bulky equivalent in texture (chenille/velvet plush yarn — often marketed as worsted or bulky but behaves as a dense, thick single-ply)
Materials
- Light Blue plush/chenille yarn — approximately 50 g
- White plush/chenille yarn — approximately 15 g
- Blue plush/chenille yarn — approximately 5 g (optional accent, for water spout)
- Pink yarn — small amount for embroidered cheeks
- Black yarn or black embroidery thread — small amount for smile
- 2 × 8 mm black safety eyes
- Polyester fiberfill stuffing
- 2.5 mm crochet hook
- Yarn needle
- Scissors
- Stitch markers (optional but helpful for tracking rounds)
Abbreviations
| Abbreviation | Meaning |
|---|---|
| sc | single crochet |
| inc | increase (2 sc in the same stitch) |
| dec | invisible decrease (insert hook into front loops only of next 2 stitches and sc them together — creates a smooth, invisible join) |
| BLO | back loop only (insert hook under the back loop only of the stitch; creates a ridge on the fabric) |
| MR | magic ring (an adjustable loop used to start rounds; pull the tail to close the center hole completely) |
| sl st | slip stitch |
| ch | chain |
| sc around | single crochet in every stitch around with no increases or decreases |
| ( ) x N | repeat the instructions in parentheses N times |
| [N] | stitch count at end of round |
Pattern Instructions
Work in continuous rounds (do not join with a slip stitch unless noted). Use a stitch marker to track the first stitch of each round.
Part 1: Head
Yarn: Light Blue
R1: 6 sc in a MR. Magic ring: wrap yarn around fingers to form a loop, insert hook, pull up a loop, ch 1, work 6 sc into the ring, then pull the yarn tail firmly to close the center hole. [6]
R2: inc in each sc around. [12]
R3: (sc, inc) × 6. [18]
R4: (2 sc, inc) × 6. [24]
R5: (3 sc, inc) × 6. [30]
R6: (4 sc, inc) × 6. [36]
R7–R12: sc around. (6 rounds) [36]
R13: (4 sc, dec) × 6. [30]
R14: (3 sc, dec) × 6. [24]
R15: (2 sc, dec) × 6. [18]
Insert safety eyes between R7 and R8, approximately 6–7 stitches apart. Attach the washers firmly on the inside before continuing.
R16: (sc, dec) × 6. [12]
R17: dec × 6. [6]
Fasten off, leaving a long tail for sewing. Close the remaining hole by threading the tail through the front loops of the 6 remaining stitches and pulling tight.
Part 2: Body
Yarn: Light Blue
R1: 6 sc in a MR. [6]
R2: inc × 6. [12]
R3: (sc, inc) × 6. [18]
R4: (2 sc, inc) × 6. [24]
R5: (3 sc, inc) × 6. [30]
R6: (4 sc, inc) × 6. [36]
R7–R11: sc around. (5 rounds) [36]
R12: (4 sc, dec) × 6. [30]
R13: (3 sc, dec) × 6. [24]
R14: (2 sc, dec) × 6. [18]
R15: (sc, dec) × 6. [12]
R16: dec × 6. [6]
Fasten off, leaving a long tail for sewing. Stuff body firmly before closing.
Part 3: Arms / Fins (Make 2)
Yarn: Light Blue
R1: 6 sc in a MR. [6]
R2: (sc, inc) × 3. [9]
R3: (sc, inc) × 4, sc. [13]
R4: sc around. [13]
R5: sc around. [13]
R6: sc around. [12]
R7: (sc, dec) × 4. [8] (Note: R6 count of 12 corrects natural tension loss; work evenly.)
R8: sc around. [8]
Fasten off, leaving a long tail for sewing. Do not stuff arms. Flatten slightly before sewing to body.
Part 4: Ears / Fins / Wings / Spout
Yarn: Light Blue or Blue accent
R1: 6 sc in a MR. [6]
R2: inc × 6. [12]
R3: (sc, inc) × 6. [18]
R4: sc around. [18]
R5: (sc, dec) × 6. [12]
R6: (sc, dec) × 4. [8] (slight count correction to taper the spout top)
R7: sc around. [8]
Fasten off, leaving a long tail for sewing. Stuff lightly. Make 1.
Part 5: Tail
Yarn: Light Blue
R1: 6 sc in a MR. [6]
R2: inc × 6. [12]
R3: (sc, inc) × 6. [18]
R4–R5: sc around. (2 rounds) [18]
R6: (sc, dec) × 6. [12]
Fasten off, leaving a long tail for sewing. Do not stuff. Make 2 identical pieces, then sew the flat edges of the two tail halves together to form a flat double-lobe whale tail shape.
Part 6: Special Feature — Water Spout
Yarn: White or Blue
Ch 10. Sl st in the 2nd ch from hook and in each ch across. When working a slip stitch back along a chain, insert the hook under both loops of each chain stitch. This creates a skinny twisted tendril. Fasten off, leaving a long tail for sewing. Make 3 of these tendrils for a fuller water spout effect.
Part 7: Face Details
- Insert safety eyes between R7 and R8 of the head, with 6–7 stitches between them (already placed in Part 1).
- Using black yarn or thread, embroider a small curved smile below and between the eyes.
- Using pink yarn, embroider a small circular blush on each cheek, approximately 1–2 stitches wide, just below and to the outside of each eye.
Assembly
- Head to body: Position the head on top of the body, aligning center points. The head should sit centered on R9–R12 of the body. Pin in place before sewing. Using the long tail from the head, whipstitch the head to the body through both layers, going around the full circumference. Secure firmly and weave in the end.
- Fins (arms) to body: Attach the two fins to each side of the body between R9 and R12, with approximately 8–10 stitches between them across the front. Flatten each fin slightly so the wide end faces forward. Sew through the flat base of each fin and into the body for a secure attachment.
- Tail to body back: Sew the completed double-lobed tail flat against the back lower section of the body, centered, between R12 and R14. The tail should extend 2–3 cm outward from the body. Sew all the way around the base of the tail for security.
- Water spout to head top: Gather all 3 ch tendrils together, align their base tails, and sew the bundle to the very top center of the head (at the gathered R17 closure point). Fan the tendrils slightly outward for a natural spout effect. Secure tightly and trim ends evenly to approximately 2–3 cm length.
- Weave in all ends on the inside of each piece. Tug gently to make sure no tails are visible through the plush yarn surface.
Your Baby Whale is complete!
Beginner and Intermediate Tips
Working with plush/chenille yarn: This yarn is beautiful but can make it harder to see individual stitches, especially when decreasing. Use your fingernail or the tip of your hook to feel for the two loops of each stitch rather than relying only on sight. Work under good lighting or use a contrasting-color stitch marker frequently.
Invisible decrease technique: Insert your hook under the front loop only of the next stitch, then under the front loop only of the stitch after that. Yarn over and pull through both loops, then yarn over and pull through the last 2 loops. This creates a much neater decrease than the traditional method and is essential for smooth amigurumi surfaces.
Stuffing evenly: Fill the body and head firmly but not so tightly that the fabric stretches and shows gaps. The body should feel solid but still give slightly when squeezed — think of the density of a stress ball. Add stuffing gradually through the narrowing rounds rather than all at once at the end.
Safety eye placement: Safety eyes are easiest to place before fully closing the piece. Test placement by pinning with pins first, then remove one pin at a time to insert each eye. Once the washer is snapped on, repositioning is very difficult.
Keeping rounds even: Even tension is the difference between a round amigurumi and one that looks lopsided. If your rounds are pulling to one side, try placing a stitch marker at every 6th stitch to double-check your increase spacing.
Variations
1. Rainbow Whale: Work each section in a different color — a coral body, teal fins, yellow tail, and white spout — for a vibrant version perfect as a nursery mobile accent.
2. Narwhal Upgrade: Add a long single crochet spiral horn (ch 20, sc 2 into each ch) in white or gold yarn instead of the water spout for an instant narwhal transformation.
3. Keychain Miniature: Scale the pattern down using fingering weight yarn and a 1.5 mm hook to create a palm-sized version, then add a lobster clasp loop to the top before closing the head.
4. Whale Pillow: Triple all stitch counts and use a super bulky plush yarn with a 6 mm hook for a lap-sized whale pillow that doubles as a child’s reading buddy.
5. Ocean Friends Set: Make the whale alongside a matching crochet jellyfish (domed body with chain tentacles) and a small crochet fish in coordinating colors for a complete ocean creature set.
If this free crochet baby whale pattern made you smile, save it to your Pinterest boards so you can come back to it anytime — and share it with a fellow crocheter who needs a little ocean magic in their project queue. Tag your finished whale with #FoodieRippleCrochet so the whole community can admire your work!


