The Best Fluffy Pancakes recipe you will fall in love with. Full of tips and tricks to help you make the best pancakes.
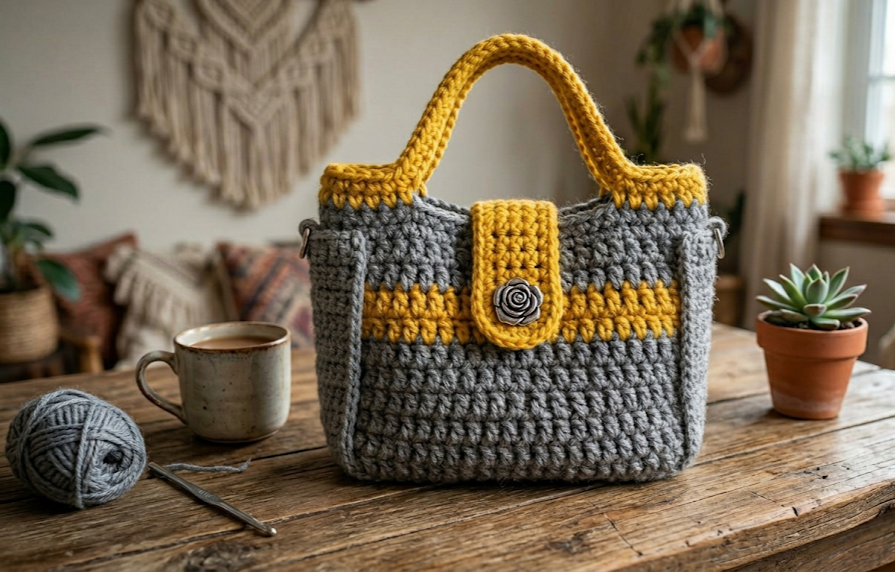
Crochet bags are more than a quick weekend project; they are the perfect intersection of everyday practicality and high-fashion style. If you are searching for a handmade accessory that transitions flawlessly from morning market runs to late-night coffee dates, the Giada Crochet Bag is your next essential project. Featuring a robust, textured grey body contrasted beautifully with a vivid yellow handle and front accent strap, this bag balances modern minimalism with a charming pop of bohemian color. Anchored by a classic silver metallic closure, this design holds its structure beautifully while showcasing rich, dense stitch definition that mimics premium woven boutique bags.
This pattern is thoughtfully structured for modern makers. It provides an excellent canvas for intermediate crocheters to practice clean stitch rhythm, row-by-row symmetry, and minor hardware integration. Because the bag utilizes a denser, structural variation of traditional crochet textures, it retains its rectangular elegance without requiring immediate fabric lining, though a liner can always be added for a luxurious touch. Let’s dive straight into the technical foundations so you can gather your supplies and begin crafting this beautiful handbag today.

| Difficulty Intermediate | Time 4-6 Hours | Hook Size 4.0 mm | Yarn Weight Worsted (4) | Finished Size 23 x 18 cm |
Gauge and Sizing Guide
Achieving the correct gauge is absolutely critical for the Giada Crochet Bag. Because this is a structural accessory designed to carry personal items without stretching out of shape, a loose stitch tension will cause the handbag to sag or warp over time.
- Gauge Specification: 16 stitches and 14 rows = 10 cm x 10 cm (4″ x 4″) square worked in the main pattern stitch (alternating rows of extended single crochet and textured compact stitches) using a 4.0 mm hook.
- Hook Size Used: 4.0 mm (US G/6) crochet hook.
- Yarn Weight Used: Worsted / Medium / Category 4.
To make a gauge swatch, chain 22. Work in the main stitch pattern described in the instructions below for 20 rows. Lay your swatch flat on a hard surface, measure a 10 cm square inside the edges, and count your stitches and rows carefully. If your swatch is larger than 10 cm, scale down to a 3.5 mm hook; if it is smaller, increase your hook size to 4.5 mm.
Materials List
Before striking your first chain, ensure your notions bag is fully stocked. High-quality materials give this bag its distinct, polished look.
- Main Color Yarn (MC): Worsted weight sturdy cotton yarn, 250 meters (approx. 273 yards) in Charcoal Grey. Cotton is highly recommended for bags due to its minimal stretch and exceptional stitch definition.
- Accent Color Yarn (AC): Worsted weight sturdy cotton yarn, 60 meters (approx. 65 yards) in Bright Canary Yellow.
- Crochet Hook: 4.0 mm (US G/6) or size needed to obtain gauge.
- Closure: One 25mm metallic silver rose-shaped metal button.
- Hardware: Two 15mm silver metal D-rings (for attaching optional shoulder straps).
- Notions: Yarn needle for weaving ends, sharp scissors, and 4 locking stitch markers.
Abbreviations Table
This pattern utilizes standard US crochet terminology. Refer to this comprehensive directory if you encounter any shorthand within the steps.
| Abbreviation | Stitch Name / Technique |
| ch | Chain Stitch |
| st(s) | Stitch(es) |
| sl st | Slip Stitch |
| sc | Single Crochet |
| hdc | Half Double Crochet |
| dc | Double Crochet |
| ext-sc | Extended Single Crochet |
| BLO | Back Loop Only |
| inc | Increase (2 stitches in same base stitch) |
| dec | Decrease (Single crochet two stitches together) |
| MC | Main Color (Charcoal Grey) |
| AC | Accent Color (Bright Canary Yellow) |
| Rem | Remaining |
Pattern Instructions
Main Body Panel (Make 2)
The front and back panels are worked from the bottom up in flat rows. The texture is created by pairing single crochet variations to keep the fabric dense and secure.
Using Main Color (MC) Grey yarn and a 4.0 mm hook, ch 38.
- Row 1: Sc in the second ch from hook and in each ch across to the end of the row, turn. (37 sts)
- Row 2: Ch 1 (does not count as a stitch here or throughout), ext-sc in the first st and in each st across to the end of the row, turn. Note: To make an ext-sc (extended single crochet), insert your hook, yarn over and pull up a loop, yarn over and pull through the first loop on your hook, then yarn over and pull through both remaining loops. (37 sts)
- Row 3: Ch 1, sc in the first st and in each st across to the end of the row, turn. (37 sts)
- Row 4: Ch 1, ext-sc in each st across to the end of the row, turn. (37 sts)
- Rows 5–26: Repeat Rows 3 and 4 alternately. (37 sts)
- Row 27: Ch 1, sc in each st across to the end of the row, turn. (37 sts)
- Row 28 (Decrease Row): Ch 1, dec over the first two sts, ext-sc in each st until 2 sts remain, dec over the final two sts, turn. Note: To perform a dec (decrease), insert hook into the first st, yarn over and pull up a loop, insert hook into next st, yarn over and pull up a loop, yarn over and pull through all three loops on the hook. (35 sts)
- Row 29: Ch 1, sc in each st across to the end of the row, turn. (35 sts)
- Row 30: Ch 1, ext-sc in each st across to the end of the row, turn. (35 sts)
- Row 31 (Decrease Row): Ch 1, dec over the first two sts, sc in each st until 2 sts remain, dec over the final two sts, turn. (33 sts)
- Row 32: Ch 1, ext-sc in each st across to the end of the row, turn. (33 sts)
- Row 33: Ch 1, sc in each st across to the end of the row, turn. (33 sts)
- Row 34: Ch 1, ext-sc in each st across to the end of the row. Fasten off MC, leaving a short tail. (33 sts)
Side and Bottom Gusset (Make 1)
The gusset is a long, continuous strip that connects the front and back panels, giving the bag its dimensional depth.
Using MC Grey yarn, ch 9.
- Row 1: Sc in the second ch from hook and in each ch across, turn. (8 sts)
- Row 2: Ch 1, ext-sc in each st across, turn. (8 sts)
- Row 3: Ch 1, sc in each st across, turn. (8 sts)
- Rows 4–94: Repeat Rows 2 and 3 alternately. The long strip should easily wrap around the side, bottom, and opposite side of a main panel. Adjust row count slightly if needed to perfectly match the edge perimeter. Fasten off MC, leaving a 100 cm long tail for assembly. (8 sts)
Yellow Accent Strap (Make 1)
This decorative horizontal band defines the top front edge of the Giada Bag and anchors the metallic button closure.
Using Accent Color (AC) Yellow yarn, ch 29.
- Row 1: Sc in the second ch from hook and in each ch across, turn. (28 sts)
- Row 2: Ch 1, working in BLO (Back Loop Only), hdc in each st across to the final st, 3 hdc in the final st to round the corner cleanly. Do not turn your work. Note: Working in BLO means inserting your hook only under the rear half of the stitch loop that is furthest away from you. Now work down the opposite side of the foundation chain: hdc in each of the next 26 chains along the raw edge, 2 hdc in the last chain base. Sl st to the first hdc of the row to join. Fasten off AC, leaving a 40 cm tail for sewing. (60 sts around the perimeter of the strap)
Top Handles (Make 2)
These thick, rounded handles provide a comfortable grip and a stunning contrast against the neutral body.
Using AC Yellow yarn, ch 36.
- Row 1: Sc in the second ch from hook and in each ch across, turn. (35 sts)
- Row 2: Ch 1, sc in each st across, turn. (35 sts)
- Row 3: Ch 1, dc in each st across, turn. (35 sts)
- Row 4: Ch 1, sc in each st across, turn. (35 sts)
- Row 5: Ch 1, sc in each st across. Do not fasten off. Fold the strap lengthwise down the middle, sandwiching Rows 2 and 3 inside. Slip stitch the edges of Row 1 and Row 5 together stitch-for-stitch across the entire length to create a sturdy, thick, tubular cord. Leave the first 3 stitches and the last 3 stitches un-joined; keep them flat so they can serve as square tabs for sewing. Fasten off, leaving a 30 cm tail on both ends. (29 sl sts along the tube length)
Assembly Steps
- Prepare Panels and Gusset: Lay your first Main Body Panel flat. Use your locking stitch markers to pin the Side and Bottom Gusset along the left edge, bottom edge, and right edge of the main panel. Ensure the corners line up perfectly.
- Seam the Base Structure: Thread your yarn needle with the long MC tail left on the gusset. Whip stitch the gusset to the first Main Body Panel, passing through both loops of the edge stitches on both pieces. Maintain uniform tension so the seam remains flat and structural. Repeat this process to join the second Main Body Panel to the remaining open side of the gusset.
- Attach Hardware: Position one 15mm silver D-ring at the top left interior rim of the bag gusset, exactly where the gusset meets the front panel corner. Using a strand of MC yarn, sew over the flat bar of the D-ring securely, anchoring it 1.5 cm deep into the bag’s interior wall. Repeat for the second D-ring on the top right interior rim.
- Install Front Accent Strap: Center the Yellow Accent Strap horizontally on the upper third of the front panel. The strap should rest exactly 3.5 cm below the top edge rim of the bag. Use the AC yarn tail to stitch around the entire perimeter of the yellow strap, securing it permanently to the grey front panel.
- Affix Button Closure: Place your 25mm metallic silver rose button precisely in the center of the Yellow Accent Strap. Sew it into place securely, passing through the yellow strap and the grey panel body multiple times. On the back panel rim, create a simple loop using a short strand of MC yarn (ch 8, sl st back to baseline) to loop over the button when closing the bag.
- Secure the Handles: Position the first Top Handle on the inside upper rim of the front panel. The flat, un-joined tabs should rest exactly 4 cm in from the left and right side seams, extending 2.5 cm down into the interior rim. Securely stitch the flat tabs to the panel interior wall using your AC tail. Repeat this process with the second handle on the interior rim of the back panel, ensuring absolute alignment with the front handle.
Beginner / Intermediate Tips
- Yarn Tension Check: When working the extended single crochet rows, it is easy to accidentally make the initial pulled-up loop too tight. Focus on pulling that first loop up to the full height of a normal stitch before finishing your yarn-overs to maintain a soft, even texture that doesn’t buckle inward.
- Counting Stitches: Always count your stitches at the end of the decrease rows (Rows 28 and 31). Missing a decrease or accidentally deleting an extra stitch will cause your panels to look asymmetrical when you try to sew the gusset on later.
- Seamless Whipstitching: For an invisible join on the outer edges, pull your whip stitches through the inside loops only (the loops that sit face-to-face when the panels are pinned together). This leaves a clean, defined ridge on the outside of your bag.

Variations
- Monochrome Chic: Swap out the bright yellow accent color for a deep slate grey or crisp cream yarn. This creates a subtle, uniform tone that highlights the metallic rose button and fits a classic minimalist wardrobe.
- Crossbody Transformation: Use the installed D-rings to clip on a long adjustable leather strap or a heavy iron chain strap. This turns your handheld Giada bag into a hands-free crossbody purse.
- Summer Straw Aesthetic: Substitute the worsted weight cotton yarn for a natural raffia or paper yarn. The resulting bag will be incredibly lightweight and display a beautiful beachy, straw-like structure.
- Oversized Tote Version: Double your yarn strands and switch to an 8.0 mm hook. Follow the pattern exactly as written to create a thick, chunky, oversized statement tote with excellent structural weight.
Save this elegant pattern to your crafting boards today! Pin it now and start stitching your new favorite wardrobe staple. #FoodieRippleCrochet


