The Best Fluffy Pancakes recipe you will fall in love with. Full of tips and tricks to help you make the best pancakes.
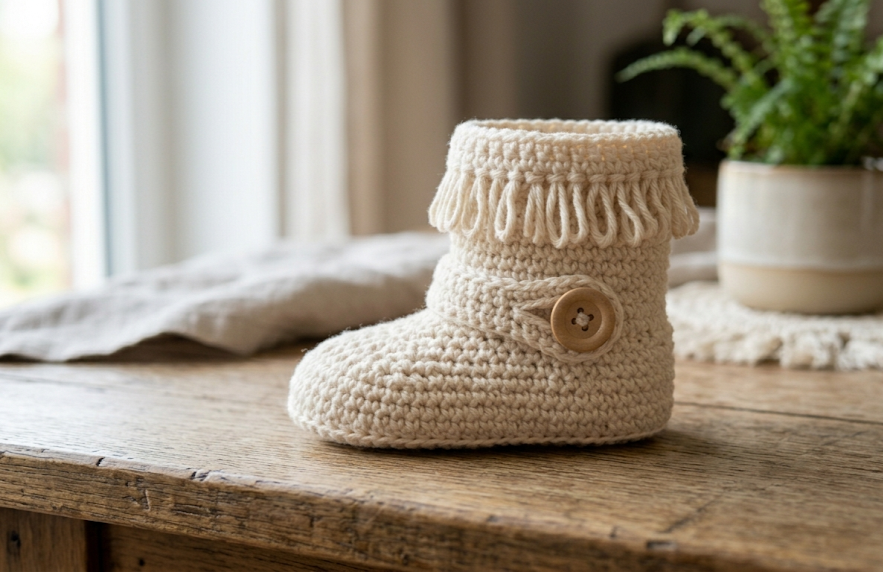
Welcoming a newborn into the world is an event filled with warmth, hope, and an abundance of preparation. Crafters everywhere know that nothing quite expresses love like a handmade item designed to shelter a new baby from the elements. If you are looking to create a true showstopper for a baby shower or want your own infant to rock a vintage boho vibe, these Furrylicious Baby Boots are the perfect project. Blending a beautifully structured sole with a soft, dramatic loop stitch fringe along the ankle shafts, these tiny boots mimic the chicest winter footwear trends while keeping delicate feet enveloped in cloud-like softness.
These boots are specifically engineered for babies aged 0 to 6 months. Their high-profile ankle coverage ensures they do not easily slip off shifting feet, while the whimsical fringe creates a wonderful sensory texture that instantly modernizes traditional baby wear. Whether styled alongside a linen romper or paired with warm winter tights, these stunning accessories add a distinctive handmade flair to any outfit. Gather your supplies, clear your crafting space, and follow along with this complete, step-by-step pattern to bring this adorable footwear to life.
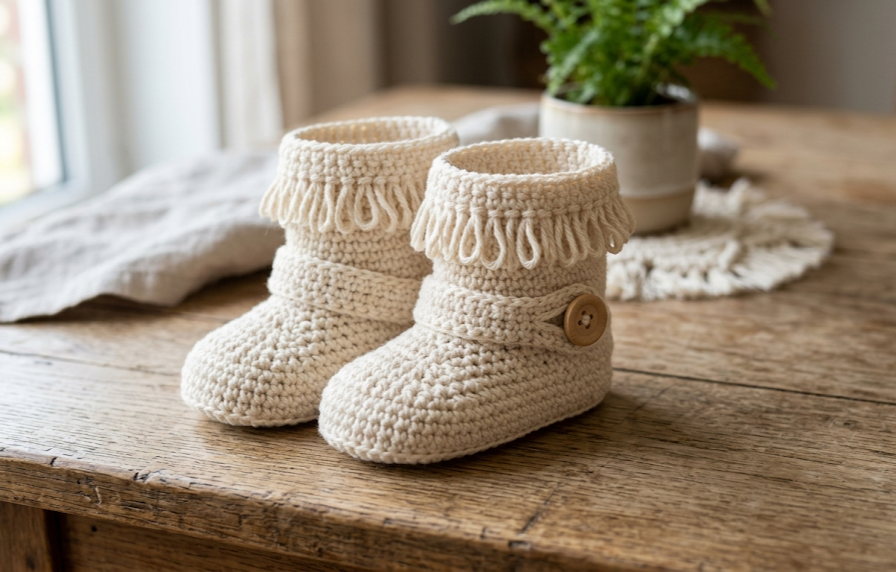
| Difficulty Intermediate | Time 3-4 Hours | Hook Size 3.25 mm | Yarn Weight Sport (#2) | Finished Size 0-6 Months |
Understanding the Gauge
Achieving correct measurements is paramount when creating footwear for infants. If your gauge is too loose, the booties will slide right off or lose their structural integrity. If it is too tight, the boots may pinch tiny ankles or prove impossible to slip on.
To ensure a perfect fit, crochet a gauge swatch using your 3.25 mm hook and chosen sport weight yarn. Work a square in standard single crochet. Your goal is to achieve exactly 22 stitches and 24 rows per 10 cm (4 inch) square. If you have too many stitches in your 10 cm window, your tension is tight; try switching to a 3.5 mm hook. If you have too few stitches, your tension is loose; try reducing your hook size to a 3.0 mm model. Do not skip this step, as even a tiny deviation can drastically alter the final shoe size.
Comprehensive Materials List
To craft a matching pair of Furrylicious Baby Boots, you will need the following high-quality craft materials:
- Yarn: 1 skein (approx. 150 meters / 164 yards) of Sport Weight (#2) yarn in Cream, Off-White, or Ivory. Cotton-acrylic blends or superwash merino wool are highly recommended for durability and easy washing.
- Crochet Hook: 3.25 mm (US Size D-3) aluminum or ergonomic crochet hook.
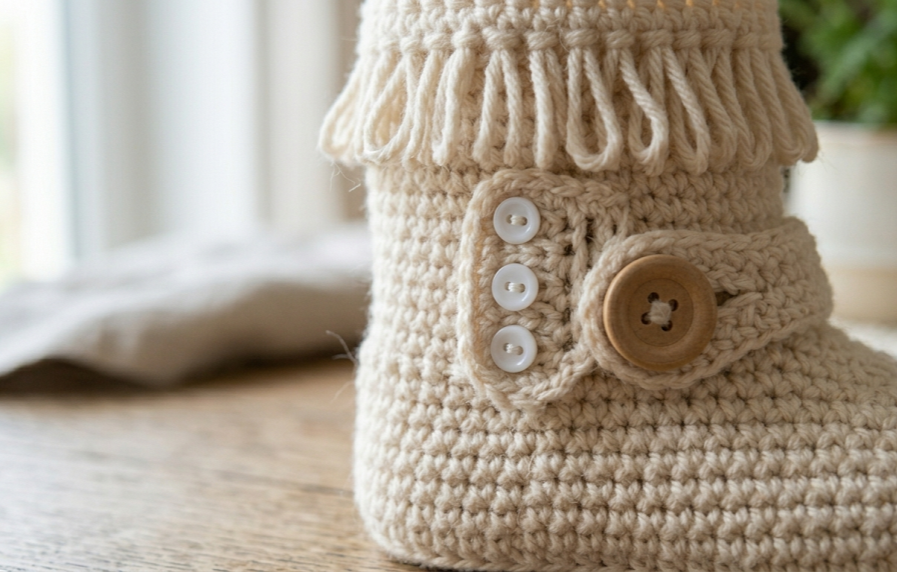
- Buttons: 6 small, glossy white or mother-of-pearl buttons (approx. 10 mm in diameter) for the decorative side panels.
- Notions:
- Sharp tapestry needle for sewing components and weaving in ends.
- Sewing needle and matching off-white sewing thread to secure the buttons safely.
- 2 locking stitch markers to mark alignment points on the toe and heel.
- Sharp scissors.
Abbreviations Table
Refer to this comprehensive guide for every abbreviation utilized across the pattern directions:
| Abbreviation | Stitch Name & Description |
| ch | Chain stitch |
| st(s) | Stitch(es) |
| sl st | Slip stitch |
| sc | Single crochet |
| hdc | Half double crochet |
| dc | Double crochet |
| sc2tog | Single crochet two stitches together (Decrease) |
| hdc2tog | Half double crochet two stitches together (Decrease) |
| dc2tog | Double crochet two stitches together (Decrease) |
| BLO | Back Loop Only |
| FLO | Front Loop Only |
| LP | Loop Stitch (Creating decorative fringe loops) |
| rep | Repeat instructions |
| rnd | Round |
Complete Pattern Instructions
This pattern details the creation of a single boot. Repeat all sections identically a second time to complete your gorgeous, high-texture set.
Part 1: The Sole
The sole is worked in continuous rounds around both sides of a central foundation chain.
Round 1: Chain 11. Working into the second chain from your hook, make 2 sc. Sc in next 4 chains, hdc in next 2 chains, dc in next 2 chains. In the very last chain stitch, work 5 dc (this forms the rounded curve of the toe). Now, turn your work upside down to work down the second side of the chain loop. Note on working second side of chain: Rotate the piece 180 degrees so you are stitching directly into the unworked remaining loops on the opposite side of your initial foundation line. Dc in next 2 loops, hdc in next 2 loops, sc in next 4 loops. In the final loop (the same one you started in), work 1 more sc. Sl st to the first sc to join the round. (24 sts)
Round 2: Ch 1. Work 2 sc in each of the first 2 sts. Sc in next 8 sts. Work 2 hdc in each of the next 5 toe sts. Sc in next 8 sts. Work 2 sc in each of the last 1 st. Sl st to first sc to join. (32 sts)
Round 3: Ch 2 (does not count as st). Hdc in first st, work 2 hdc in next st. Hdc in next 9 sts. Repeat (2 hdc in next st, hdc in next st) a total of 5 times around the toe curve. Hdc in next 9 sts. Work 2 hdc in next st, hdc in final st. Sl st to first hdc to join. (39 sts)
Part 2: The Shoe Body and Toe Shaping
This section shifts the direction of the crochet work upwards, transitioning from the flat sole to the walls of the bootie.
Round 4: Ch 1. Work 1 sc into the BLO of every stitch around. Note on BLO (Back Loop Only): Insert your crochet hook exclusively under the rear horizontal loop furthest away from you, leaving the front loop unworked to create a neat structural ridge that helps the shoe stand upright. Sl st to first sc to join. (39 sts)
Round 5: Ch 1. Sc in each stitch around. Sl st to join. (39 sts)
Round 6: Ch 1. Sc in next 11 sts. Repeat (sc2tog, sc in next st) a total of 6 times across the front toe area. Sc in next 10 sts. Sl st to join. (33 sts)
Round 7: Ch 1. Sc in next 10 sts. Repeat (hdc2tog) a total of 6 times across the toe space to pull the front profile together sharply. Sc in next 11 sts. Sl st to join. (27 sts)
Round 8: Ch 1. Sc in next 9 sts. Repeat (dc2tog) a total of 4 times over the remaining center-toe stitches. Sc in next 10 sts. Sl st to join. Fasten off yarn and weave in this specific end. (23 sts)
Part 3: The Ankle Cuff and Loop Fringe Placket
The ankle shaft is worked in flat rows rather than rounds to accommodate a split-front design where the buttons attach. You will attach yarn to the center front split to begin.
Row 1: Join yarn with a slip stitch at the front-center of Row 8. Ch 1. Sc in each of the 23 sts around the ankle opening, turning your work at the end of the row rather than joining. (23 sts)
Row 2 (Fringe Base Row): Ch 1, turn. Work 1 LP in the FLO of every stitch across. Note on LP (Loop Stitch): Wrap the yarn around your index finger to form a 1.5 cm loop behind the work, insert hook into the front loop only, pull the yarn loops through, and finish like a standard single crochet to lock the loop permanently in place. Turn. (23 sts)
Row 3: Ch 1, turn. Working into the unworked back loops left behind from Row 2, work 1 sc in each stitch across. Turn. (23 sts)
Row 4: Ch 1, turn. Work 1 sc in each stitch across. Turn. (23 sts)
Row 5: Ch 1, turn. Work 1 LP in the FLO of every stitch across to build your second cascading layer of fringe texture. Turn. (23 sts)
Row 6: Ch 1, turn. Working into the unworked back loops from Row 5, work 1 sc in each stitch across. Turn. (23 sts)
Row 7: Ch 1, turn. Work 1 sc in each stitch across. Turn. (23 sts)
Row 8: Ch 1, turn. Work 1 LP in the FLO of every stitch across for your third plush layer of fringe. Turn. (23 sts)
Row 9: Ch 1, turn. Working into the unworked back loops from Row 8, work 1 sc in each stitch across. Turn. (23 sts)
Row 10: Ch 1, turn. Work 1 sc in each stitch across. Turn. (23 sts)
Row 11: Ch 1, turn. Work 1 LP in the FLO of every stitch across for the final top layer of decorative fringe. Turn. (23 sts)
Row 12: Ch 1, turn. Working into both loops normally, work 1 sc in each stitch across to finish the upper collar rim cleanly. Fasten off and weave in all structural ends securely. (23 sts)
Detailed Assembly Steps
- Block and Align the Boot Body: Lay the finished crochet boot body flat on a clean surface. Gently tug at the four distinct layers of loop fringe so that they cascade downward evenly toward the toe line, creating an overlapping “furry” effect.
- Position the Flaps: Smooth down the front edges where Row 1 through Row 12 formed an open split placket at the front-lateral side of the boot ankle. Overlap the outside edge slightly over the inside edge by approximately 1 cm (0.4 inches) to establish a clean, draft-free closure line.
- Button Placement and Sewing: Grab your small white buttons, sewing needle, and thread. Position three buttons vertically along the overlapping outer edge of the ankle cuff.
- Place the bottom button exactly 1.5 cm (0.6 inches) above the ankle join line.
- Place the top button exactly 0.5 cm (0.2 inches) below the top collar rim.
- Center the middle button perfectly between the top and bottom markers (approx. 1.8 cm spacing).
- Stitch firmly through both layers of yarn to permanently anchor the placket shut. Because baby booties require a reliable hold and are easy to slide on without functional unbuttoning, sewing the flap permanently closed keeps the footwear secure during kicks.
- Repeat for Boot Two: Complete steps 1-3 on the second boot, mirroring the flap overlap so the buttons sit beautifully on the outside ankle of each respective foot.
Beginner and Intermediate Success Tips
- Maintain Uniform Loop Heights: When execution of the Loop Stitch (LP) is required, use a solid object like your thumb or a thick piece of cardboard cut to a 1.5 cm width to wrap your yarn around. This prevents your fringe from looking jagged and uneven.
- Prevent Stretchy Soles: If your sole feels too thin or easily distorted, try working the entire flat sole section with a smaller hook size (such as 2.75 mm) while utilizing the standard 3.25 mm hook for the rest of the shoe body. This keeps the base sturdy and wind-resistant.
- Secure Small Notions Thoroughly: Since these boots are destined for infants, ensure your decorative buttons are anchored with extra knots. Babies love to pull on dangling fringe and plastic elements; checking item safety keeps your craft worry-free.
Creative Variations
- The Autumn Fox Look: Work the main sole and body of the boot in a deep burnt orange shade, but switch to a stark cream-colored yarn exclusively for the loop fringe rows to create a charming woodland animal contrast.
- The Oversized Winter Boot: Double up your yarn by holding two strands together and upgrade to a 4.5 mm crochet hook. Follow the pattern identically to scale up the finished dimensions for older infants aged 9 to 12 months.
- Ribbon Tie Alternative: Omit the three buttons entirely. Instead, weave a 50 cm long piece of matching cream satin ribbon through the stitches at the base of the ankle cuff to tie a beautiful, adjustable bow at the front.
- Sparkle Trim Edition: Choose a cream yarn that features a subtle metallic silver thread spun throughout its fibers to create an ethereal, holiday-ready pair of boots that gleam in the winter light.
Ready to fill your feed with cozy craft inspiration? Pin this pattern to your favorite board so you can jump right back into stitching whenever inspiration strikes! #FoodieRippleCrochet


