The Best Fluffy Pancakes recipe you will fall in love with. Full of tips and tricks to help you make the best pancakes.
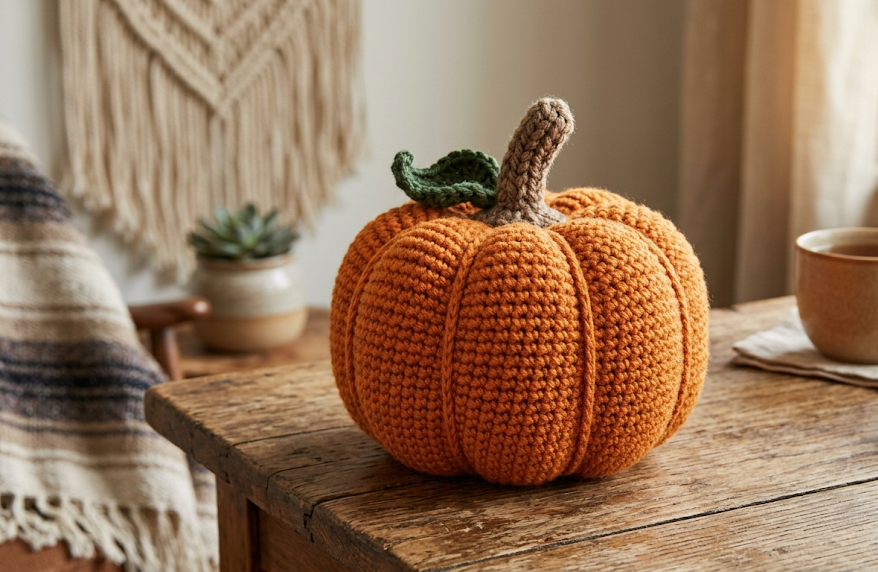
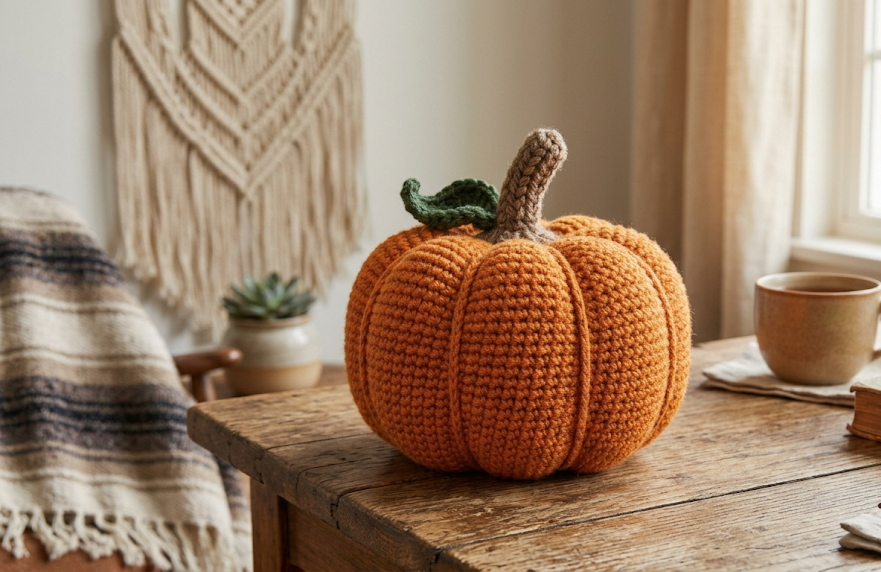
There is something undeniably cozy about a handmade pumpkin sitting on your shelf in autumn. This crochet pumpkin pattern produces a plump, palm-sized gourd with six beautifully rounded segments and a twisted braided stem — the kind of décor piece that looks like it took weeks of skill but actually works up in a single relaxed afternoon. Whether you are making one for your own mantle, gifting it in a fall care package, or stitching up an entire harvest bowl full of them, this little pumpkin is one of those projects that gets requested again and again.
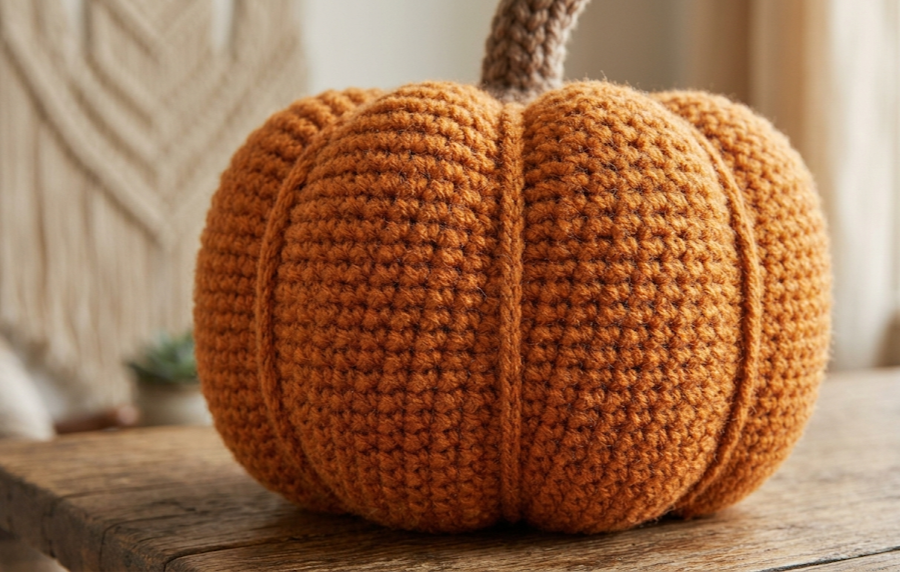
The finished pumpkin measures approximately 10 cm (4 inches) wide and 7 cm (2.75 inches) tall, nestling perfectly in the palm of your hand. The segments are created by a clever cinching technique using embroidery thread or yarn pulled through the center of the stuffed body — no separate panels to sew together. The stem is worked as a small tube, partially filled with fiberfill, and secured to the top with a few whipstitches before being twisted into a natural-looking coil. The result is a pumpkin that looks far more complex than it actually is.
This is an ideal project for anyone who has mastered the magic ring and basic single crochet shaping. It is also a wonderful stash buster — the entire body uses less than 50g of worsted weight yarn.
|
Difficulty
Beginner – Intermediate
|
Time
3 – 5 Hours
|
Hook Size
4.0 mm
|
Yarn Weight
Worsted (Size 4)
|
Finished Size
10 cm wide × 7 cm tall
|
Gauge
14 sc × 16 rows = 10 cm × 10 cm (4 × 4 inches)
Hook: 4.0 mm
Yarn Weight: Worsted (size 4)
Gauge is important for this pattern because it affects the final size of the pumpkin body. Work a gauge swatch before beginning and adjust your hook size if needed. Going down a hook size will produce a tighter fabric that holds stuffing better.
Materials
- Orange worsted weight yarn (size 4): approximately 45–50g / 90–100m (such as Lion Brand Vanna’s Choice in Pumpkin, or any orange worsted)
- Brown worsted weight yarn (size 4): approximately 5–8g / 10–15m for the stem
- 4.0 mm crochet hook
- Polyester fiberfill stuffing
- Yarn needle
- Stitch marker
- Scissors
- Embroidery floss or thin yarn in orange or brown (approximately 80 cm) for cinching segments
- Large blunt tapestry needle for cinching
Abbreviations
| Abbreviation | Meaning |
|---|---|
| MR | Magic ring — adjustable loop that closes tightly at the center |
| ch | Chain |
| sc | Single crochet |
| inc | Increase — 2 sc worked into the same stitch |
| dec | Invisible decrease — insert hook through the front loops only of the next 2 stitches and sc them together |
| sl st | Slip stitch |
| BLO | Back loop only — work into the back loop of the stitch only |
| FLO | Front loop only — work into the front loop of the stitch only |
| st(s) | Stitch(es) |
| rnd | Round |
| rep | Repeat |
| pm | Place marker |
Pattern Instructions
Part 1: Pumpkin Body
The body is worked in continuous rounds. Place a stitch marker at the beginning of each round and move it up as you go.
Rnd 1: MR, 6 sc into ring. Pull tail to close ring tightly. (6)
Rnd 2: Inc in each st around. (12)
Rnd 3: \[Sc 1, inc] × 6. (18)
Rnd 4: \[Sc 2, inc] × 6. (24)
Rnd 5: \[Sc 3, inc] × 6. (30)
Rnd 6: \[Sc 4, inc] × 6. (36)
Rnd 7: \[Sc 5, inc] × 6. (42)
Rnd 8: Sc in each st around. (42)
Rnd 9: Sc in each st around. (42)
Rnd 10: Sc in each st around. (42)
Rnd 11: Sc in each st around. (42)
Rnd 12: [Sc 5, dec] × 6. (36)
Rnd 13: [Sc 4, dec] × 6. (30)
Rnd 14: [Sc 3, dec] × 6. (24)
Begin stuffing the body firmly at this point. Continue stuffing as you close.
Rnd 15: \[Sc 2, dec] × 6. (18)
Rnd 16: \[Sc 1, dec] × 6. (12)
Rnd 17: Dec × 6. (6)
Invisible decrease: Insert hook through the front loops only of the next 2 stitches simultaneously, yarn over and pull through both front loops (2 loops on hook), yarn over and pull through both loops — this creates a nearly invisible join.
Fasten off, leaving a 15 cm tail. Thread tail onto yarn needle and weave through the front loops of all 6 remaining stitches. Pull tight to close the hole. Weave in end securely.
Part 2: Creating the Segments
This technique transforms the round ball into a six-segment pumpkin shape.
Cut a length of embroidery floss or thin matching yarn approximately 80 cm long. Thread it onto a large blunt tapestry needle.
Step 1: Push the needle down through the very top center of the pumpkin (where the stem will attach) and out through the very bottom center.
Step 2: Loop the thread around the outside of the pumpkin from bottom to top, creating a vertical groove. Pull moderately firm — enough to create a visible indentation but not so tight that the yarn pulls through the fabric.
Step 3: Bring the needle back down through the center top to center bottom again and shift approximately 60 degrees around the circumference.
Step 4: Repeat to create a total of 6 grooves dividing the pumpkin into 6 equal segments.
Step 5: Tie off the thread tightly at the base center, knot several times, and bury the tail inside the pumpkin using the tapestry needle.
Part 3: Stem
The stem is worked in continuous rounds.
Rnd 1: MR, 5 sc into ring. (5)
Rnd 2: Inc in each st around. (10)
Rnd 3: Sc in each st around. (10)
Rnd 4: Sc in each st around. (10)
Rnd 5: Sc in each st around. (10)
Rnd 6: Sc in each st around. (10)
Rnd 7: Sc in each st around. (10)
Rnd 8: [Sc 3, dec] × 2. (8)
Rnd 9: Sc in each st around. (8)
Rnd 10: Sc in each st around. (8)
Rnd 11: Sc in each st around. (8)
Lightly stuff the bottom 2–3 rounds of the stem only — the top remains flatter and more flexible for twisting.
Fasten off, leaving a 20 cm sewing tail. Do not close the top of the stem.
Twisting the stem: Before attaching, hold the base of the stem firmly and gently twist the top portion 2–3 times in one direction to create a natural spiraling shape. The light stuffing at the base will hold the twist.
Assembly
- Position the stem base at the top center of the pumpkin body, centered over the cinch point where all six grooves meet.
- Using the 20 cm sewing tail and a yarn needle, whipstitch around the base of the stem, catching the stitches of the pumpkin body beneath. Work 2–3 full passes around the perimeter of the stem base for security.
- The stem base should sit approximately 1 cm down into the top center of the pumpkin — meaning the first 1–2 rounds of the stem are slightly recessed, making it look naturally embedded.
- Pull the sewing tail through to the bottom of the pumpkin and tie off internally. Weave in and trim all remaining ends.
Final check: The stem should feel secure when gently tugged. If it shifts, add an additional round of whipstitches before burying the tail.
Beginner and Intermediate Tips
Tension consistency: Because this pumpkin relies on a smooth, even surface before the grooves are added, tension matters more than it might in a textured pattern. Work your single crochets at a consistent rhythm and avoid pulling the working yarn too tight — this causes the fabric to curl inward and makes stuffing and shaping harder.
Stuffing firmly: Underfilling is the most common issue with amigurumi pumpkins. Pack the fiberfill firmly in stages, especially through rounds 13 and 14 when the gap is still wide enough to reach inside. A well-stuffed body holds the segment indentations cleanly.
Even segment spacing: Before threading the cinching yarn, use six pins or stitch markers placed evenly around the circumference of the pumpkin to mark your six groove positions. This ensures the segments are equal in width.
Cinching tension: Pull each groove to the same tension — firm but not distorting the shape. If a groove pulls too deep, loosen it slightly before knotting off.
Magic ring tip: After completing Rnd 1, pull the ring closed firmly and tug the short tail to secure it before continuing. A loosely closed magic ring will leave a small hole at the top or bottom of the pumpkin.
Stem twist: If your stem untwists after sewing it on, add a small stitch through the stem at a midpoint, tacking it to itself to lock the spiral in place.
Variations
1. Mini Pumpkin: Use fingering weight yarn (size 1) with a 2.0 mm hook and reduce all rounds by two increase rounds in the body to produce a pumpkin approximately 5 cm wide — perfect for garlands or bowl fillers.
2. White Ghost Pumpkin: Work the entire body in cream or off-white yarn and use a grey or ivory stem for a pale decorative heirloom look. Add a simple embroidered face with black embroidery floss for a Halloween display piece.
3. Deep Harvest Tones: Instead of bright orange, use terracotta, rust, or dusty pumpkin shades for a more muted, farmhouse aesthetic. Mixed bowls of rust, cream, and sage pumpkins make a stunning seasonal vignette.
4. Jumbo Pumpkin: Use bulky weight yarn (size 5 or 6) with a 6.0 mm hook and add two additional even rounds between the increase and decrease sections of the body. This produces a pumpkin approximately 16–18 cm wide, suitable as a centerpiece.
5. Striped Harvest Pumpkin: Work two rounds in orange alternating with one round in a deeper rust or burnt sienna throughout the body for a subtle vertical stripe effect once the segments are cinched.
If you made this crochet pumpkin, save this pin for your next cozy crochet session! Tag your finished pumpkins and follow along for more free patterns on Pinterest at #FoodieRippleCrochet 🧡


