The Best Fluffy Pancakes recipe you will fall in love with. Full of tips and tricks to help you make the best pancakes.
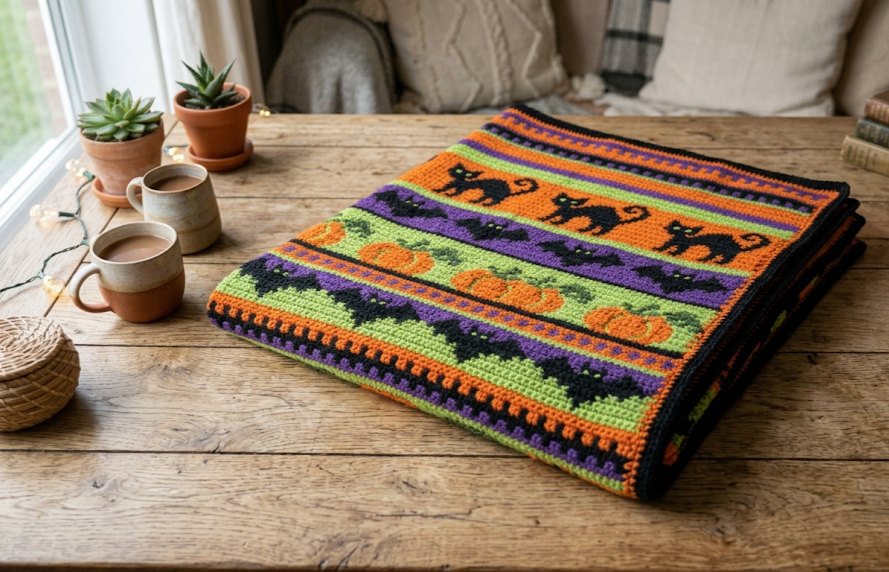
As autumn breezes roll in and the leaves start turning into vibrant shades of amber and rust, there is nothing quite like cozying up on the couch with a festive crochet project. If you love the spooky season and want to inject a handmade touch of whimsy into your home decor, the Halloween Dreams Blanket is your ultimate autumn project. This striking, graphic lap blanket features a series of playful, spooky stripes showcasing iconic Halloween imagery: curious black cats silhouetted against glowing orange full moons, spooky bats taking flight across a lime green midnight sky, and alternating accent bands of purple, white, and black geometric textures.
Designed specifically for makers who love clean graphic elements and vibrant color stories, this blanket is perfect for draping over your favorite armchair, adding a pop of handmade seasonal warmth to a kid’s bedroom, or snuggling under while watching your favorite classic scary movies. Using standard worsted-weight yarn and traditional tapestry crochet methods, this design allows you to create a completely reversible, dense, and ultra-cozy throw that will become a cherished family heirloom pulled out year after year as soon as October 1st arrives.
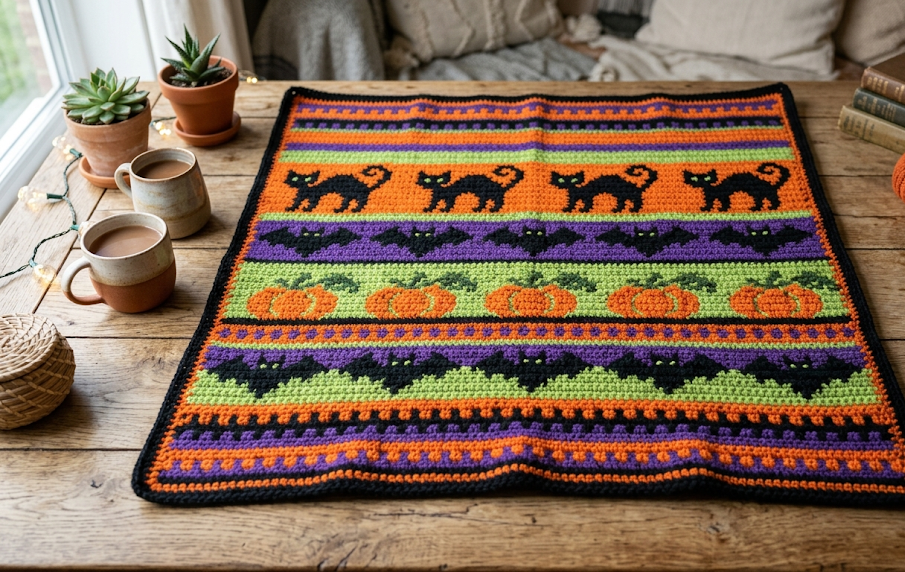
| Difficulty Intermediate | Time 25-30 Hours | Hook Size 4.5 mm (G/7) | Yarn Weight Worsted (#4) | Finished Size 40″ x 50″ |
Gauge
To ensure your blanket matches our finished measurements and uses the estimated yarn quantities, it is highly recommended to work up a quick gauge swatch before diving into the main body of the project.
- Gauge Swatch Specification: 16 stitches and 18 rows of single crochet = 10 cm x 10 cm (4 inches x 4 inches) using a 4.5 mm crochet hook.
- Hook Size Used: 4.5 mm (US G/7)
- Yarn Weight Used: Worsted Weight (Medium #4)
If your swatch is too small, try switching to a larger hook size; if your swatch is too large, try dropping down a hook size.
Materials List
To craft this blanket successfully, gather the following high-quality worsted-weight acrylic or wool-blend yarns and essential notions.
Yarn Requirements (Worsted Weight, Medium #4):
- Color A: Jet Black — 4 skeins (approx. 800 yards)
- Color B: Pumpkin Orange — 2 skeins (approx. 400 yards)
- Color C: Lime Green — 2 skeins (approx. 400 yards)
- Color D: Amethyst Purple — 2 skeins (approx. 350 yards)
- Color E: Bright White — 1 skein (approx. 200 yards)
Notions & Tools:
- Crochet Hook: 4.5 mm (US G/7) or size needed to obtain gauge
- Tapestry Needle: Large-eye yarn needle for weaving in ends securely
- Scissors: Sharp embroidery scissors
- Stitch Markers: Locking plastic markers to track row repeats and border edges
Abbreviations Table
This pattern utilizes standard US crochet terminology. Refer to this convenient reference table for all abbreviations used across the instructions.
| Abbreviation | Stitch / Technique Name |
| ch | Chain |
| st(s) | Stitch(es) |
| sc | Single Crochet |
| dc | Double Crochet |
| sl st | Slip Stitch |
| sk | Skip |
| rs | Right Side of work |
| ws | Wrong Side of work |
| rep | Repeat |
Pattern Instructions
Technique Notes:
- Tapestry Crochet Color Changes: When changing colors mid-row, work the last single crochet of the old color until two loops remain on your hook, drop the old color to the back or carry it along the top of your stitches, yarn over with the new color, and draw through both loops to complete the stitch.
- Carrying Yarn: Carry the unused yarn color along the top of the previous row, working your active single crochet stitches directly over it to hide it inside the fabric. This ensures a clean look on both sides and minimizes loose tails.
Main Blanket Body
Section 1: The Purple & White Geometric Base
Row 1 (RS): Using Color D (Purple), ch 161. Starting in the second ch from your hook, sc across to the end of the chain. Turn. (160 sts)
Note: When working into the initial foundation chain, insert your hook into the back bump of the chain for a clean, professional edge that mirrors your finishing border.
Row 2 (WS): Ch 1, sc in each st across. Turn. (160 sts)
Row 3: Ch 1, sc in each st across. Turn. (160 sts)
Row 4 (Color Change Section): Join Color E (White). Ch 1, *sc 2 with Color D, sc 2 with Color E; rep from * across to the end of the row. Turn. (160 sts)
Row 5: Ch 1, *sc 2 with Color E, sc 2 with Color D; rep from * across to the end of the row. Turn. (160 sts)
Rows 6–7: Drop Color E. Using Color D, ch 1, sc in each st across. Turn. (160 sts)
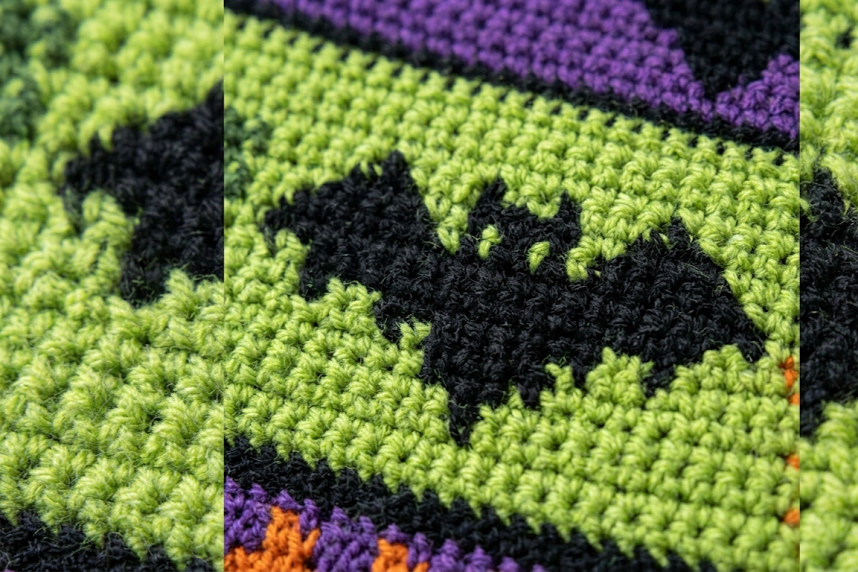
Section 2: The Flying Bats Stripe
Rows 8–9: Join Color C (Lime Green). Ch 1, sc in each st across. Turn. (160 sts)
Row 10 (Bat Silhouette Start): Ch 1, sc 10 with Color C. Join Color A (Black). *Sc 12 with Color A, sc 18 with Color C; rep from * across until 10 sts remain, sc 10 with Color C. Turn. (160 sts)
Row 11: Ch 1, sc 8 with Color C, *sc 16 with Color A, sc 14 with Color C; rep from * across until 12 sts remain, sc 12 with Color C. Turn. (160 sts)
Row 12: Ch 1, sc 6 with Color C, *sc 20 with Color A, sc 10 with Color C; rep from * across until 14 sts remain, sc 14 with Color C. Turn. (160 sts)
Row 13: Ch 1, sc 6 with Color C, *sc 4 with Color A, sc 3 with Color C, sc 6 with Color A, sc 3 with Color C, sc 4 with Color A, sc 10 with Color C; rep from * across. Turn. (160 sts)
Row 14: Ch 1, sc 7 with Color C, *sc 2 with Color A, sc 5 with Color C, sc 4 with Color A, sc 5 with Color C, sc 2 with Color A, sc 12 with Color C; rep from * across. Turn. (160 sts)
Rows 15–16: Drop Color A. Using Color C, ch 1, sc in each st across. Turn. (160 sts)
Section 3: Orange & Black Accent Band
Rows 17–18: Join Color B (Orange). Ch 1, sc in each st across. Turn. (160 sts)
Row 19: Join Color A (Black). Ch 1, *sc 4 with Color A, sc 4 with Color B; rep from * across to the end of the row. Turn. (160 sts)
Row 20: Ch 1, *sc 4 with Color B, sc 4 with Color A; rep from * across to the end of the row. Turn. (160 sts)
Rows 21–22: Drop Color A. Using Color B, ch 1, sc in each st across. Turn. (160 sts)
Section 4: The Black Cat & Moon Silhouette
Rows 23–25: Join Color A (Black). Ch 1, sc in each st across. Turn. (160 sts)
Row 26 (Moon Base Start): Ch 1, sc 15 with Color A. Join Color B (Orange). *Sc 16 with Color B, sc 24 with Color A; rep from * across until 25 sts remain, sc 25 with Color A. Turn. (160 sts)
Row 27: Ch 1, sc 13 with Color A, *sc 20 with Color B, sc 20 with Color A; rep from * across. Turn. (160 sts)
Row 28 (Introduce Cat Silhouette): Ch 1, sc 12 with Color A, *sc 8 with Color B, sc 4 with Color A (cat lower body), sc 8 with Color B, sc 18 with Color A; rep from * across. Turn. (160 sts)
Row 29: Ch 1, sc 12 with Color A, *sc 7 with Color B, sc 6 with Color A (cat torso), sc 7 with Color B, sc 18 with Color A; rep from * across. Turn. (160 sts)
Row 30: Ch 1, sc 13 with Color A, *sc 6 with Color B, sc 5 with Color A, sc 1 with Color B, sc 2 with Color A (tail curve), sc 6 with Color B, sc 20 with Color A; rep from * across. Turn. (160 sts)
Row 31 (Cat Head and Ears): Ch 1, sc 15 with Color A, *sc 5 with Color B, sc 4 with Color A (head/ears), sc 7 with Color B, sc 24 with Color A; rep from * across. Turn. (160 sts)
Rows 32–34: Drop Color B. Using Color A, ch 1, sc in each st across. Turn. (160 sts)
Section repeats:
To reach full blanket length, repeat Sections 1 through 4 four additional times (for a total of 5 complete holiday motif bands), then finish the body by working Section 1 once more to create a perfectly symmetrical border framing your top and bottom edges. Fasten off all accent colors at the end of the final row.
Assembly Steps
Because this entire blanket is created in one single flat panel using continuous tapestry colorwork changes, there are no individual motifs or panels to sew together! However, creating a flawless finish requires a few specific steps to assemble your final presentation look.
- Block the Main Panel: Lay your finished blanket body out flat on blocking mats. Spritz it generously with cool water until it is damp. Pin the edges out carefully using rustproof T-pins, ensuring your corners form perfect 90-degree right angles and your overall width measures 40 inches and length measures 50 inches. Let it dry completely overnight before unpinning.
- Clean Up the Edges: Before adding a border, look along the raw side edges where color changes occurred. Tie any structural yarn tails together with a secure square knot right along the edge of your fabric.
- Weave in the Ends: Thread your tapestry needle with the leftover yarn tails. Weave each tail horizontally through the matching colored stitch columns for at least 3 inches, then reverse direction and weave back through another 2 inches to ensure no tails slip out when the blanket is thrown in the washing machine.
- Attach a Simple Border (Optional): To create a clean outline around the entire blanket, join Color A (Black) at any corner stitch. Work 1 sc into every stitch across the top and bottom edges, and distribute sc stitches evenly along the raw row ends on both sides (approximately 1 sc per row). Work (sc 1, ch 2, sc 1) into each of the four corner points to ensure a neat, flat corner border. Sl st to your first stitch, fasten off, and weave in your final tail.
Beginner/Intermediate Tips
- Manage Your Yarn Skeins: When doing tapestry crochet with multiple colors simultaneously, your yarn balls can easily get tangled. Keep your dark yarn on the left side of your lap and your bright accent colors (orange, green, white) on your right side. Always drop your yarns in the exact same direction to prevent a massive ball twist.
- Watch Your Tension: Carrying yarn inside your single crochet stitches can cause your fabric to stiffen up. Maintain a slightly relaxed tension, and tug gently on the carried yarn every 10–15 stitches to ensure it isn’t bunching up or pulling the blanket rows too tightly.
- Invisible Color Shifts: To keep your black silhouettes perfectly sharp against the orange and green backdrops, always pull through your new color on the final loop of the preceding stitch. This ensures the loop sitting on top of the next stitch matches the body of the stitch perfectly.
Variations
- The Neon Nights Remix: Swap the traditional Halloween colors for a bright neon color palette. Use a stark neon pink background instead of lime green for the bats, and a luminous glow-in-the-dark yarn for the full moons behind the cats.
- Cozy Toddler Security Blanket: Cut the initial chain count in half (ch 81) and run through the pattern sections just twice to create a perfectly proportioned stroller or security blanket for infants and toddlers celebrating their very first Halloween.
- Spooky Wall Hanging Tapestry: Instead of working a thick throw, drop down to a fine sport-weight cotton yarn and a 2.75 mm hook. Once completed, slip a wooden dowel through the top border row to create a gorgeous, lightweight autumn wall hanging.
- The Velvet Luxury Throw: Work this exact pattern using a plush, chunky velvet or chenille blanket yarn with an 8.0 mm crochet hook. This will dramatically increase the final size into a massive king-sized luxury bedspread while making the spooky details extra soft to touch.


