
The Best Fluffy Pancakes recipe you will fall in love with. Full of tips and tricks to help you make the best pancakes.

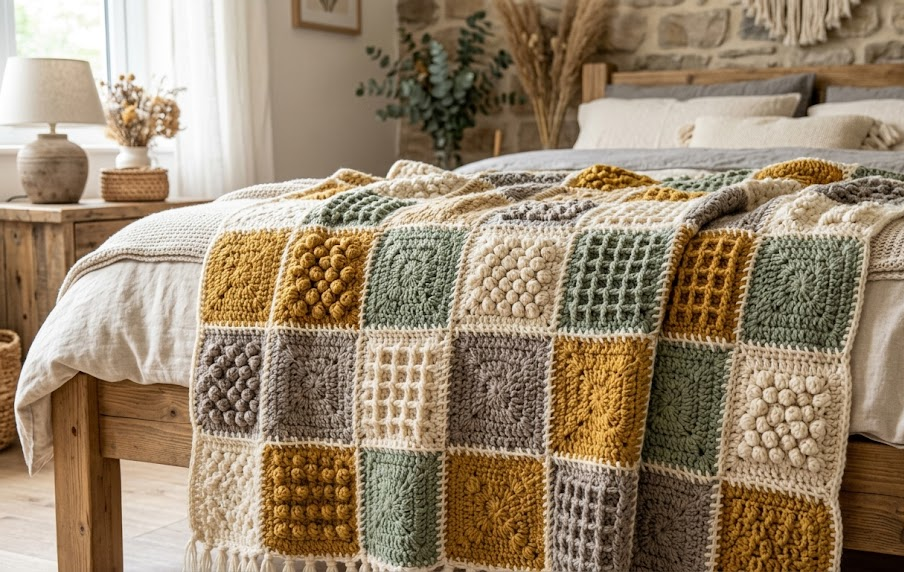
There’s something deeply satisfying about a blanket that tells a story in texture. This Textured Fusion Granny Square Throw brings together four different stitch techniques — bobble, popcorn, waffle, and star puff — into one patchwork masterpiece that feels like a modern heirloom the moment it comes off your hook. Worked in a warm palette of cream, mustard gold, sage green, and soft gray, this throw has the kind of tactile, dimensional surface that photographs beautifully and feels even better draped over your lap on a chilly evening.
This pattern is built for intermediate crocheters who already feel comfortable with basic granny squares and are ready to level up. You’ll learn four distinct textured stitch families, all worked into the same square format, so by the end you’ll have a genuinely versatile skill set you can reuse in future projects — pillows, wall hangings, or an entirely different color story. The finished piece measures roughly 100cm x 120cm (39″ x 47″), making it the perfect size for a sofa throw, a lap blanket, or a light layer at the foot of the bed. Grab your hook, pick your palette, and let’s build this one square at a time.
|
Difficulty
Intermediate
|
Time
25–30 hours
|
Hook Size
5.5mm (I-9)
|
Yarn Weight
Worsted (4)
|
Finished Size
100cm x 120cm
|
Gauge
- Gauge: One completed square (before border) measures 18cm x 18cm using a 5.5mm hook
- Stitch gauge: 14 stitches x 14 rows = 10cm x 10cm in double crochet
- Hook size used: 5.5mm (US I-9)
- Yarn weight used: Worsted weight (Yarn weight 4)
Always crochet a test square first and check it against these measurements. If your square runs smaller, size up to a 6mm hook; if it runs larger, size down to a 5mm hook.
Materials List
- Cream/Ivory worsted weight yarn (Yarn A): approximately 600g — used as the base for every square and for joining
- Mustard Gold worsted weight yarn (Yarn B): approximately 300g
- Sage Green worsted weight yarn (Yarn C): approximately 250g
- Warm Gray worsted weight yarn (Yarn D): approximately 250g
- 5.5mm (US I-9) crochet hook
- Yarn needle for weaving in ends and whip stitching
- Stitch markers (at least 2)
- Scissors
Abbreviations Table
| Abbreviation | Meaning |
|---|---|
| ch | chain |
| ch-sp | chain space |
| sl st | slip stitch |
| sc | single crochet |
| hdc | half double crochet |
| dc | double crochet |
| tr | treble crochet |
| bobble | 5 unfinished dc worked in same stitch, pulled through together |
| popcorn | 5 dc worked in same stitch, then folded and closed at the top |
| puff | 4 unfinished hdc worked in same stitch, pulled through together |
| BLO | back loop only |
| rnd | round |
| rep | repeat |
| st(s) | stitch(es) |
| RS | right side |
| ( ) | stitch count at end of round |
Pattern Instructions
You will make 30 squares total (5 columns x 6 rows): 8 Bobble Bloom Squares, 8 Popcorn Cluster Squares, 7 Waffle Texture Squares, and 7 Star Puff Squares. Each square starts with Yarn A and is finished at 5 rounds. Every square uses a magic ring start — this means wrapping the yarn into a loop, working your first round of stitches into it, then pulling the tail to close the center hole tightly before joining.
Part 1: Bobble Bloom Square (make 8, mustard gold centers)
Round 1 (Yarn B): Magic ring. Ch 3 (counts as first dc throughout), 2 dc in ring, ch 2, [3 dc in ring, ch 2] 3 times, join with sl st to top of ch-3. (12 dc, 4 ch-2 corner spaces)
Round 2 (Yarn A): Join in any ch-2 corner space. Ch 3, (dc, ch 2, 2 dc) in same space — this is your corner. *Dc in each dc to next corner space, (2 dc, ch 2, 2 dc) in corner space; rep from * around, join to top of ch-3. (24 dc, 4 corner spaces)
Round 3 (Yarn C): Join in any corner space. Ch 3, (dc, ch 2, 2 dc) in same space. *Dc in each dc to next corner, work a bobble in next dc (yarn over, insert hook, pull up a loop — repeat 4 more times in same stitch for 5 total loops on hook, yarn over and pull through all loops), dc in each remaining dc to corner, (2 dc, ch 2, 2 dc) in corner space; rep from * around, join. (36 sts, 4 corner spaces)
Round 4 (Yarn A): Join in corner space, ch 3, (dc, ch 2, 2 dc) in same space. Dc across each side (working a dc into the bobble as if it were a regular stitch), (2 dc, ch 2, 2 dc) in each corner. Join. (48 dc, 4 corner spaces)
Round 5 (Yarn D): Join in corner space, ch 1, sc evenly around entire square working 3 sc in each corner space to keep it square. Join, fasten off, weave in ends. (Square should now measure 18cm x 18cm)
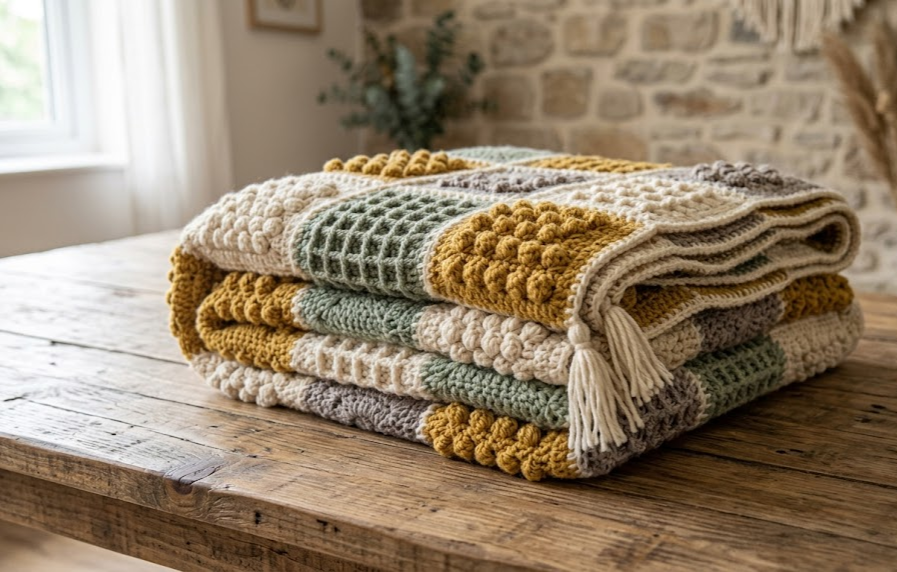
Part 2: Popcorn Cluster Square (make 8, sage green centers)
Round 1 (Yarn C): Magic ring. Ch 3, 2 dc in ring, ch 2, [3 dc, ch 2] 3 times, join. (12 dc, 4 corner spaces)
Round 2 (Yarn A): Same corner method as above: ch 3, (dc, ch 2, 2 dc) in corner, dc across side, rep around, join. (24 dc, 4 corner spaces)
Round 3 (Yarn B): Join in corner. Work corner as established. Across each side, replace the center stitch with a popcorn: work 5 dc into the same stitch, drop your loop, insert hook front to back through the top of the first dc of the group, pick up the dropped loop and pull through to close the popcorn into a raised bump. Complete side in regular dc, corners as normal. Join. (36 sts, 4 corner spaces)
Round 4 (Yarn A): Standard dc round with corners, working a dc into each popcorn top. (48 dc, 4 corner spaces)
Round 5 (Yarn D): Sc border round, 3 sc in each corner space. Join, fasten off, weave in ends.
Part 3: Waffle Texture Square (make 7, gray base)
Round 1 (Yarn D): Magic ring. Ch 3, 2 dc, ch 2, [3 dc, ch 2] 3 times, join. (12 dc, 4 corner spaces)
Round 2 (Yarn A): Corner method as established, working through BLO only across each side to create a ridged, waffle-like texture (BLO means inserting your hook only under the back loop of each stitch rather than both loops — this leaves the front loop exposed as a visible horizontal ridge). (24 dc, 4 corner spaces)
Round 3 (Yarn B): Repeat Round 2 construction, again working BLO across sides. This second ridged row is what creates the waffle grid effect once complete. (36 dc, 4 corner spaces)
Round 4 (Yarn A): One more BLO round, same corner structure. (48 dc, 4 corner spaces)
Round 5 (Yarn D): Sc border round, 3 sc per corner space. Join, fasten off, weave in ends.
Part 4: Star Puff Square (make 7, mustard and cream mixed)
Round 1 (Yarn A): Magic ring. Ch 2 (counts as first hdc), 11 hdc in ring. Join to top of ch-2. (12 hdc)
Round 2 (Yarn B): Ch 1, *puff stitch in next st (yarn over, insert hook, pull up a loop to hdc height — repeat 3 more times in same stitch for 4 total loops, yarn over and pull through all loops plus the ch-1 to close), ch 1, sc in next st; rep from * around. Join. (6 puffs, 6 sc)
Round 3 (Yarn A): Ch 3, working around the puffs and sc, work 2 dc in each ch-1 space and increase 3 dc into each of the 4 corner points to square off the circle. Join. (44 dc, 4 corner points established)
Round 4 (Yarn C): Standard corner-and-side dc round as used in Parts 1–3: ch 3, (dc, ch 2, 2 dc) in each corner, dc across sides. Join. (52 dc, 4 corner spaces)
Round 5 (Yarn D): Sc border round, 3 sc per corner space. Join, fasten off, weave in ends. (Squaring this round evens out the circular start into an 18cm square.)
Assembly Steps
- Lay all 30 finished squares right-side up on a flat surface and arrange into a 5-column x 6-row grid, alternating the four square types so no two identical squares touch edge to edge — this is what gives the “fusion” patchwork look.
- Once you’re happy with the layout, join squares in horizontal rows first. Place two squares right sides together and whip stitch along one edge using Yarn A, inserting your needle through the back loops only of both squares for a nearly invisible seam, working from corner to corner in even stitches roughly 1cm apart.
- Continue joining until each row of 5 squares is complete, then join the 6 rows together the same way, matching corners carefully so the grid lines stay straight.
- Once the full 5×6 grid is joined, flip the blanket right side up. With Yarn A, work 3 rounds of sc directly into the outer edge of the whole assembled blanket, working 3 sc into each of the 4 outer corners to keep the border flat and square.
- On the final border round, switch to Yarn D and work a simple sc edge, then fasten off and weave in the final tail.
- Steam block the finished throw lightly (hover a steamer 5cm above the surface, do not press) to even out any square-to-square size variation and help the seams lie flat.
Beginner/Intermediate Tips
- If your bobbles or popcorns feel tight to close, drop down a half hook size only for that single stitch, then switch back — this keeps your fabric from puckering.
- Keep a stitch marker in your working loop every time you set the project down; with four different square types in rotation it’s easy to lose your place mid-round.
- Work all 30 squares before you start joining. Blocking them in a batch at the end gives a much more consistent finished size than blocking one at a time.
- When whip stitching, keep tension consistent — pulling too tight will pucker your seams and distort the grid lines between squares.
Variations
- Monochrome Edition: Work all 30 squares in a single cream yarn for an all-white textured throw that leans more minimalist than boho.
- Mini Pillow Set: Make just 4 squares (one of each type) and join into a 2×2 grid to create a textured accent pillow cover instead of a full throw.
- Baby Blanket Scale: Reduce to a 4×4 grid of 16 squares using DK weight yarn and a 4.5mm hook for a smaller, softer nursery-ready version.
- Jewel Tone Palette: Swap the earthy cream/mustard/sage/gray palette for deep emerald, burgundy, navy, and gold for a richer, more dramatic finished look.
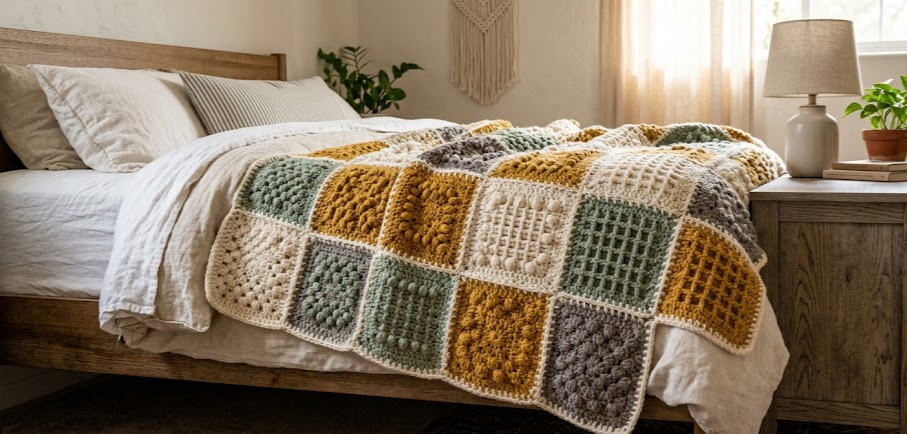
Save This Pattern
If you loved this textured patchwork design, save this pin so you can find it again when you’re ready to start! Tag your finished throw and share your color combinations — I love seeing how everyone makes this pattern their own. #FoodieRippleCrochet



