
The Best Fluffy Pancakes recipe you will fall in love with. Full of tips and tricks to help you make the best pancakes.

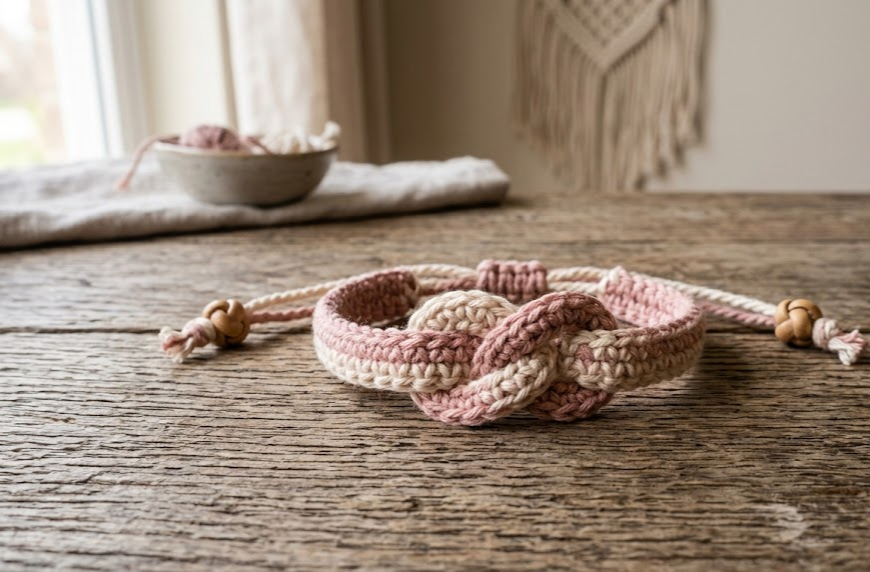
There’s something quietly satisfying about a bracelet you made yourself — especially one as delicate and meaningful as this crochet infinity knot bracelet. Worked in a soft blush pink and creamy white, this piece combines a tight, cord-like crochet technique with a classic figure-eight knot centerpiece that symbolizes everlasting connection. It’s the kind of project that looks far more complicated than it actually is, making it a wonderful choice for anyone who has mastered basic single crochet and wants to try something new: crocheting a rope-like tube instead of a flat fabric.
This bracelet works beautifully as a gift for a best friend, a thoughtful handmade Mother’s Day present, or a treat for yourself. Because the closure is a sliding adjustable cord, one bracelet fits nearly any wrist size, which makes it ideal for craft fairs, stocking stuffers, or bridesmaid proposal gifts. The two-tone color combination gives it a soft, romantic look, but the pattern is easily adaptable to any color pairing you like.
Grab a small crochet hook and some fingering-weight yarn or crochet thread, and let’s get started.
|
Difficulty
Intermediate
|
Time
2–3 Hours
|
Hook Size
2.5mm
|
Yarn Weight
Fingering (#1)
|
Finished Size
Adjustable 15–20cm
|
Gauge
- 20 stitches and 22 rows = 10cm x 10cm square in single crochet
- Hook used: 2.5mm
- Yarn weight used: Fingering weight (Yarn Weight #1) or size 3 crochet thread
Gauge is less critical for this project than for garments, since the finished band is adjustable, but working a small swatch first will help you judge how tightly to crochet your tube so it holds its rounded shape without gaps.
Materials List
- Fingering weight yarn or crochet thread in Blush Pink — approximately 15g / 40m
- Fingering weight yarn or crochet thread in Cream — approximately 15g / 40m
- 2.5mm crochet hook
- Yarn needle for weaving in ends
- Small scissors
- Optional: two small wooden or acrylic beads for the sliding closure ends
- Stitch marker
Abbreviations Table
| Abbreviation | Meaning |
|---|---|
| ch | chain |
| sc | single crochet |
| sl st | slip stitch |
| st(s) | stitch(es) |
| rnd(s) | round(s) |
| MR | magic ring |
| inc | increase (2 sc in same st) |
| dec | invisible decrease |
| BLO | back loop only |
| ( ) | stitch count at end of round/row |
Pattern Instructions
Part 1: The Crochet Cord (make 2, one in each color)
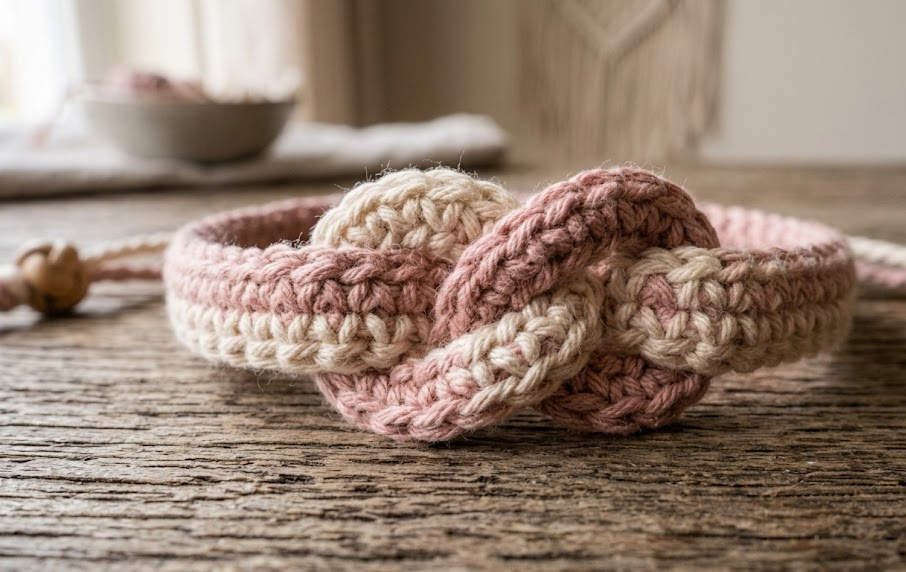
The band and knot are both made from a tight, tubular crochet cord technique. This is worked as a continuous spiral of single crochet around a small foundation, pulled snug so no stuffing is visible and the tube curls naturally into a rounded rope.
Technique note — continuous spiral cord: Instead of joining each round with a slip stitch, you work in a continuous spiral, placing a stitch marker in the first stitch of each round to track your place. This avoids a visible seam and lets the tube curl into a smooth rope shape.
Foundation Round:
Ch 4, join with sl st to form a ring. (4 sts)
Round 1: 2 sc in each st around. (8 sts)
Rounds 2–40: Sc in each st around, working tightly so the tube closes and no gap shows in the center. (8 sts each round)
Move your stitch marker up each round. By round 4 or 5, the tube will naturally begin to curl into a rope — this is normal and desired.
Fasten off, leaving a 20cm tail for assembly. Repeat this entire section in the second color, making a second cord of the same length (40 rounds).
Tip: If you want a slightly thicker, plumper cord, work rounds 2–40 in the back loop only (BLO) — inserting your hook only under the back loop of each stitch — which adds subtle ridged texture and a rounder profile.
Part 2: Sliding Closure Cords (make 2, one in each color)
Foundation: Ch 60 (this creates a slim crochet chain cord, not a stitched tube).
Row 1: Sc in 2nd ch from hook and in each ch across. (59 sts)
Fasten off, leaving a 15cm tail on each end for finishing.
Repeat to make a second cord in the second color.
Assembly Steps
- Lay the two 40-round tubular cords (blush and cream) side by side, each about 20cm long once curled.
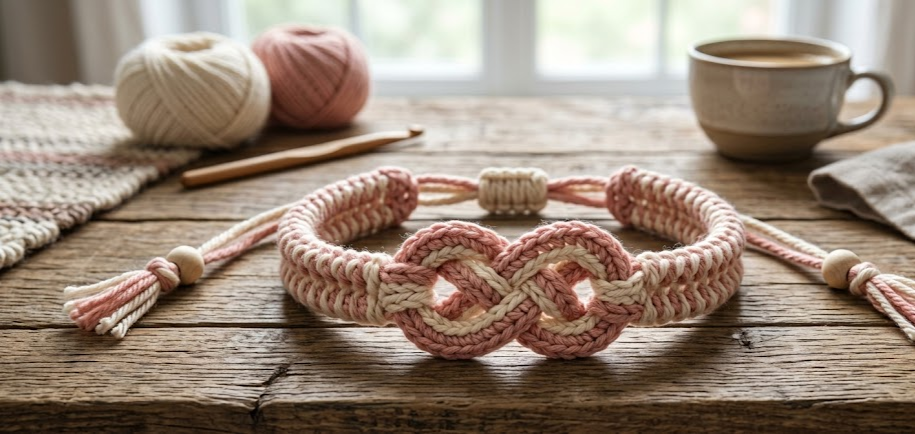
- Cross the blush cord over the cream cord roughly at their midpoints to form a loose figure-eight (infinity) shape — this is your knot centerpiece.
- Using the yarn tails, tack the two cords together at the two or three points where they overlap, sewing through both tubes with your yarn needle so the knot holds its shape permanently. Space these tack points about 1.5cm apart.
- From the knot, let the four remaining tube ends extend outward to become the two sides of the bracelet band — one blush and one cream end on each side.
- On each side, lay the matching-color slip cord (from Part 2) alongside the tube end and stitch them together for about 2cm of overlap, so the slim cord becomes the extension leading to the closure.
- At each of the four cord tips (two per side), thread on a small wooden or acrylic bead if using, and tie a secure overhand knot below it to stop the bead from sliding off. If not using beads, simply tie a firm knot at each tip.
- To create the adjustable sliding closure, cross the two slip cords (one from each side) where they meet at the back opening of the bracelet, and wrap one cord around the other 4–5 times in a coil, then repeat with the second cord wrapping around the first in the same spot. Pull to test — sliding the coils toward or away from each other should shrink or expand the bracelet.
- Trim any excess length so the loose ends (with their knotted, beaded tips) hang about 3–4cm past the sliding coils on each side.
- Weave in any remaining yarn tails from the tubular cords into the inside of the knot section, where they’ll be hidden from view.
Beginner/Intermediate Tips
- If your tube cord looks flat instead of round, you’re likely crocheting too loosely — drop to a smaller hook or tighten your tension.
- Keep your stitch marker moving every single round; it’s very easy to lose track of the spiral start point on a tube this small.
- When forming the infinity knot in step 2–3, pin the shape in place with a locking stitch marker before sewing, so it doesn’t shift while you stitch.
- Practice the sliding knot closure on scrap cord first — it takes a couple of tries to get the coil wraps even and smooth-sliding.
Variations
- Monochrome version: Use a single color for both tubular cords for a more minimalist, elegant look.
- Chunky statement bracelet: Work the tube in a worsted weight yarn with a 4mm hook for a bolder, thicker band.
- Layered stack: Make three thinner versions in different pastel shades to wear stacked together on one wrist.
- Anklet style: Add an extra 10 rounds to each tubular cord for a longer piece that wraps comfortably as an anklet instead.
Save this pattern so you can come back to it anytime you want to whip up a quick, meaningful handmade gift — #FoodieRippleCrochet



