
The Best Fluffy Pancakes recipe you will fall in love with. Full of tips and tricks to help you make the best pancakes.

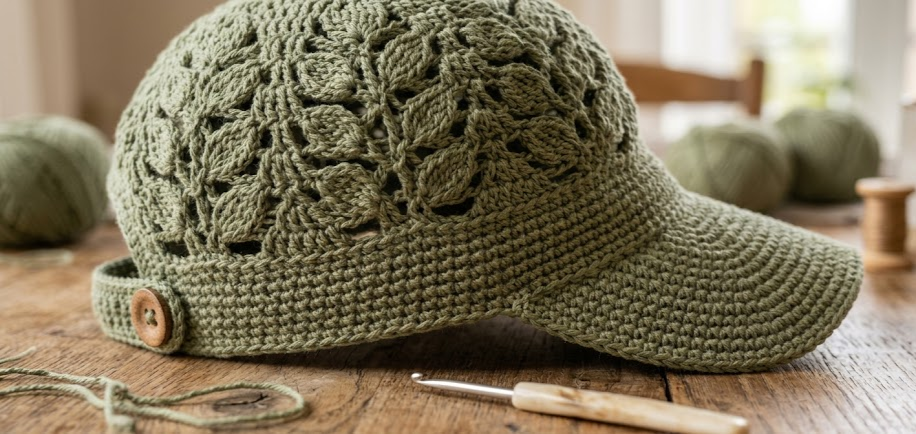
A crochet lace baseball cap is such a fun way to combine the relaxed shape of a classic baseball hat with the delicate beauty of handmade lace crochet. This sage-green version has an airy leaf-and-vine crown, a comfortable lower band, a curved crochet visor, and an adjustable opening at the back.
The finished cap has a surprisingly polished appearance while still being approachable for an experienced beginner or intermediate crocheter. The lace crown gives it a lightweight, handmade look, while the denser stitches around the band and brim provide structure.
This crochet baseball cap pattern is designed for worsted-weight cotton yarn and a 4.0 mm crochet hook. Cotton is especially useful here because it gives the stitches definition and enough body to help the cap retain its shape.
The pattern is written primarily for an adult medium with a finished head circumference of approximately 22 inches (56 cm). Size adjustments are included so you can make a smaller or larger cap by changing the number of lace vine repeats.
Whether you want a handmade summer accessory, a thoughtful crochet gift, or a wearable project with a little more personality than a basic hat, this crochet lace cap pattern makes a beautiful addition to a handmade wardrobe.
|
Difficulty
Easy / Intermediate
|
Time
6–8 Hours
|
Hook Size
4.0 mm (G/6)
|
Yarn Weight
Worsted / Category 4
|
Finished Size
20–23 in head
|
Gauge
Work the gauge swatch in single crochet using the same yarn and hook specified below.
- 18 sc × 20 rows = 10 × 10 cm (4 × 4 inches)
- Hook: 4.0 mm (US G/6)
- Yarn: Worsted-weight cotton, Category 4
- Gauge should be measured after gently blocking the swatch.
- Do not stretch the swatch aggressively when measuring.
Because the lace crown is intentionally open and flexible, the gauge is primarily used to establish the firmness of the lower band and the general scale of the finished cap.
If your gauge is too loose, switch to a smaller hook. If your gauge is too tight, use a larger hook.
Materials List
- Approximately 150–180 g worsted-weight cotton yarn, Category 4, sage olive green
- Approximately 120–150 g for the medium size
- Approximately 150–170 g for large size
- 4.0 mm (US G/6) crochet hook
- Yarn needle
- Stitch markers
- Small sewing needle
- Matching sewing thread
- One ½-inch to ¾-inch button for the back closure
- Scissors
- Measuring tape
- Blocking pins
- Blocking mat or clean towel
- Optional: fabric stiffener for extra brim structure
- Optional: thin plastic or flexible brim insert, if desired
The reference design uses one main yarn color, but the pattern can easily be adapted to contrasting leaves, a darker brim, or a multicolor lace crown.
Abbreviations Table
| Abbreviation | Meaning |
|---|---|
| ch | chain |
| sc | single crochet |
| hdc | half double crochet |
| dc | double crochet |
| tr | treble crochet |
| sl st | slip stitch |
| st | stitch |
| sts | stitches |
| sk | skip |
| sp | space |
| ch-sp | chain space |
| rep | repeat |
| BLO | back loop only |
| FLO | front loop only |
| inc | increase |
| dec | decrease |
| RS | right side |
| WS | wrong side |
Chain-space note: When a pattern says to work into a chain space, insert your hook underneath the complete chain rather than trying to work into one individual chain loop.
BLO note: For BLO, insert the hook only under the back loop of the stitch. This creates a subtle horizontal ridge that helps add structure to the lower band.
FLO note: For FLO, work under only the front loop. This can be used to create a decorative ridge without adding bulk.
Pattern Instructions
Part 1 — Leaf Motifs
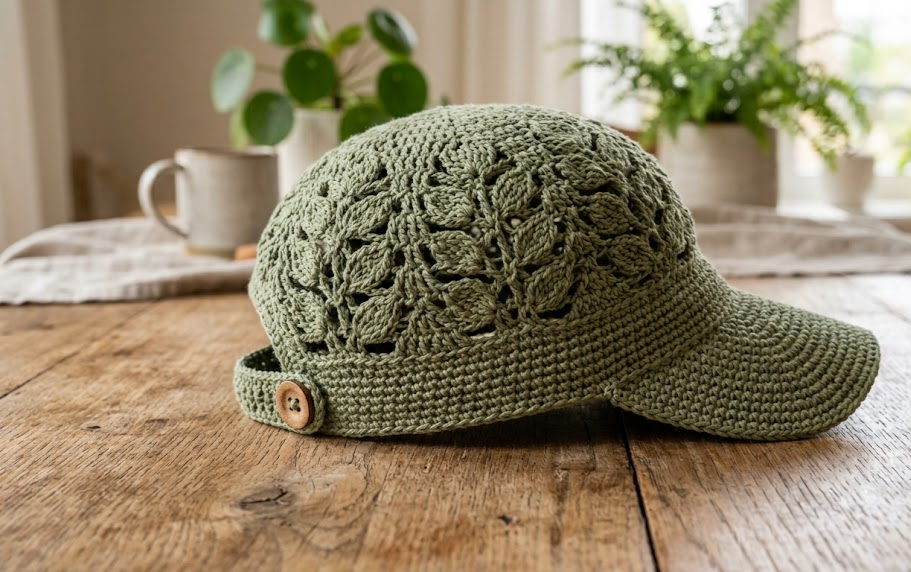
The leaf motifs create the decorative openwork that appears around the crown.
Make 12–14 leaf motifs for an adult cap, depending on desired circumference. The medium sample uses 13 motifs.
Leaf Motif
Chain 10.
Row 1: Sc in 2nd ch from hook, sc in next 2 ch, hdc in next 2 ch, dc in next 3 ch, 5 dc in last ch; rotate your work so you can crochet along the opposite side of the foundation chain, dc in next 3 ch, hdc in next 2 ch, sc in next 3 ch. Fasten off. (24 sts)
The five stitches worked into the final chain form the pointed turning end of the leaf. When working down the opposite side, use the unused loops of the foundation chain.
Weave in the tail at the narrow base of the leaf.
Optional Larger Leaf
For a slightly fuller leaf, use the same construction but add one additional dc to each side of the center.
Row 1: Sc in 2nd ch from hook, sc in next 2 ch, hdc in next 2 ch, dc in next 3 ch, 5 dc in last ch, dc in next 3 ch, hdc in next 2 ch, sc in next 3 ch. (24 sts)
The two versions are essentially the same size, so use one version consistently throughout your cap.
Part 2 — Vine Strips
The vine strips connect the leaf motifs and create the repeating vertical lace structure seen on the crown.
For the medium size, make 6 vine strips. For a smaller cap, make 5–6. For a larger cap, make 7.
Each strip will contain approximately two leaf motifs per 10 cm, depending on your tension.
Vine Strip Foundation
Row 1: Ch 4, sl st into the narrow base of the first leaf motif, ch 4, sl st into the narrow base of the second leaf motif. Continue alternating ch 4 and sl st through the next leaf base until all leaves are connected. (6 ch-4 spaces)
Fasten off.
Do not pull the connecting chains extremely tightly. The vine must retain enough flexibility to curve naturally around the crown.
Joining the Strips
Lay the completed vine strips beside each other.
The leaf points should alternate slightly rather than lining up in a perfectly rigid grid. This gives the finished lace crown a more organic appearance.
Join adjacent strips using slip stitches at the corresponding leaf tips and connecting points.
At each joining point:
Join: Insert hook through corresponding point on both strips, yarn over, pull through both layers and directly through the loop on the hook. (1 sl st)
Repeat until the strips form a flexible lace panel.
Do not join every open space. Leaving selected spaces open is important because these openings become part of the airy lace design.
Part 3 — Crown
The crown is worked around the upper edge of the assembled lace panel.
The number of stitches can vary slightly depending on how your leaf strips fit together. For the medium sample, aim for approximately 72 stitches around the upper circumference.
Join yarn at the lower edge of the lace panel.
Round 1
Ch 1, sc evenly around the upper edge of the lace panel, placing approximately 72 sc around, sl st to first sc. (72 sts)
If your panel naturally produces 68–76 stitches, that is acceptable. The important point is that the crown should lie smoothly without puckering.
Round 2
Ch 3, sk 1 st, sc in next st, ch 3; repeat around, sl st to first sc. (36 sc, 36 ch-3 sps)
Round 3
Sl st into first ch-3 sp, ch 3, 2 dc in same sp, sc in next ch-3 sp; repeat around, sl st to beginning ch-3. (36 2-dc groups, 36 sc)
Round 4
Sl st to center of first 2-dc group, ch 3, 1 dc in same space, ch 2, 2 dc in same space, sc in next sc; repeat around, sl st to beginning. (36 shell groups, 36 sc)
Round 5
Sl st to next ch-2 space, ch 3, 2 dc in same space, ch 2, 3 dc in same space, sc in next sc; repeat around, sl st to beginning. (36 shell groups, 36 sc)
Round 6
Sl st to next ch-2 space, ch 3, 2 dc in same space, ch 1, 2 dc in same space, sc in next sc; repeat around, sl st to beginning. (36 shell groups, 36 sc)
The crown should now begin curving inward.
Round 7 — First Decrease Round
Sl st to first ch-1 space, ch 3, 1 dc in same space, ch 1, 2 dc in same space, sc in next sc; skip every fourth shell group while joining the neighboring shell groups with a sc; repeat around, sl st to beginning. (27 shell groups, 27 sc)
Round 8
Sl st to first ch-1 space, ch 3, 2 dc in same space, sc in next sc; repeat around, sl st to beginning. (27 shell groups, 27 sc)
Round 9 — Second Decrease
Sl st to first shell space, ch 3, 2 dc in same space, sc in next sc; skip every third shell group; repeat around, sl st to beginning. (18 shell groups, 18 sc)
Round 10
Sl st to first shell space, ch 3, 2 dc in same space, sc in next sc; repeat around, sl st to beginning. (18 shell groups, 18 sc)
Round 11 — Final Decrease
Sl st to first shell space, ch 3, 2 dc in same space, sc in next sc; skip every second shell group; repeat around, sl st to beginning. (9 shell groups, 9 sc)
Round 12
Sl st across to first shell space, ch 3, 2 dc in same space, sc in next sc; repeat around, sl st to beginning. (9 shell groups, 9 sc)
Round 13
Sc around, working one sc into each available stitch and chain space and decreasing evenly to close the top. (18 sc)
Round 14
Sc2tog around. A sc2tog means inserting the hook into one stitch, pulling up a loop, then inserting the hook into the next stitch, pulling up another loop, and completing both stitches together as one single crochet. (9 sc)
Cut yarn, leaving a 20 cm tail.
Thread the tail onto a yarn needle and weave it through the remaining stitches. Pull gently to close the crown. Secure firmly and weave in the end.
Part 4 — Lower Band
The lower band stabilizes the lace crown and gives the cap the snug fit expected from a baseball cap.
Join yarn at the bottom edge of the crown.
Round 1
Ch 1, hdc evenly around the bottom edge, sl st to first hdc. (72 hdc)
Round 2
Ch 1, hdc in each stitch around, sl st to first hdc. (72 hdc)
Round 3
Ch 1, hdc in BLO around, sl st to first hdc. (72 hdc)
Round 4
Ch 1, hdc in each stitch around, sl st to first hdc. (72 hdc)
Round 5
Ch 1, hdc in each stitch around, sl st to first hdc. (72 hdc)
For a slightly deeper band, add one additional round.
Round 6 — Optional
Ch 1, hdc in each stitch around, sl st to first hdc. (72 hdc)
The finished lower band should measure approximately 2–2½ inches (5–6.5 cm) deep.
Part 5 — Back Opening and Adjustable Strap
The back opening gives the hat the characteristic baseball-cap silhouette.
Place stitch markers approximately 2½–3 inches (6–7.5 cm) apart at the center back.
Leave this section open.
Strap Row 1
Attach yarn at one side of the opening, ch 20, hdc in 2nd ch from hook and across the chain, then sl st into the opposite side of the opening. (19 hdc)
Strap Row 2
Turn, ch 1, hdc across. (19 hdc)
Strap Row 3
Turn, ch 1, hdc across. (19 hdc)
Fasten off and weave in the end.
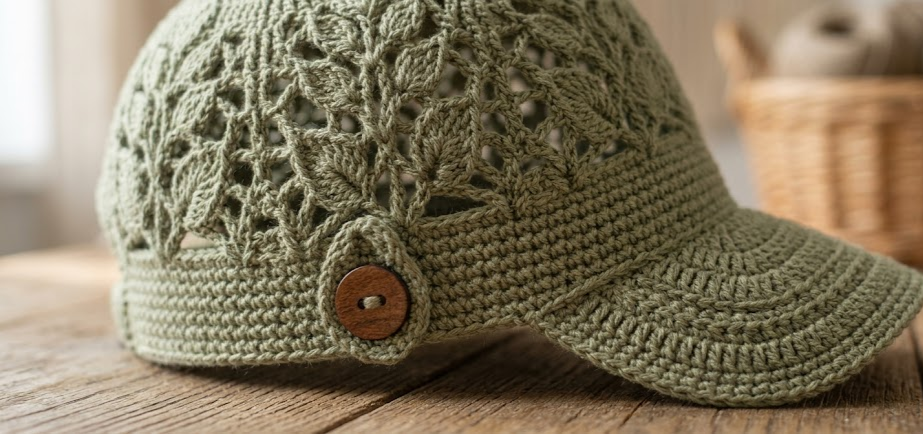
Sew the button securely to the opposite side of the opening.
For an adjustable fit, the strap can be passed around the button. If you prefer a simple decorative closure, sew the strap permanently into place.
Part 6 — Visor / Brim
The visor is worked from the front center of the lower band.
For the medium size, mark approximately 34 stitches across the front center.
The exact number can vary between 32–36 stitches depending on your gauge and desired brim width.
Row 1
Attach yarn at the first marked stitch, ch 1, hdc across the marked stitches. (34 hdc)
Row 2
Turn, ch 1, hdc across. (34 hdc)
Row 3
Turn, ch 1, hdc in first stitch, 2 hdc in next stitch, hdc across until 2 stitches remain, 2 hdc in next stitch, hdc in last stitch. (36 hdc)
Row 4
Turn, ch 1, hdc across. (36 hdc)
Row 5
Turn, ch 1, hdc in first stitch, 2 hdc in next stitch, hdc across until 2 stitches remain, 2 hdc in next stitch, hdc in last stitch. (38 hdc)
Row 6
Turn, ch 1, hdc across. (38 hdc)
Row 7
Turn, ch 1, hdc across. (38 hdc)
Row 8
Turn, ch 1, hdc in first stitch, 2 hdc in next stitch, hdc across until 2 stitches remain, 2 hdc in next stitch, hdc in last stitch. (40 hdc)
Row 9
Turn, ch 1, hdc across. (40 hdc)
Row 10
Turn, ch 1, hdc across. (40 hdc)
The brim should now extend approximately 2½–3 inches (6.5–7.5 cm) from the front of the crown.
Part 7 — Visor Edge
Work around the entire outside edge of the visor.
Round 1
Ch 1, sc evenly across the outer edge of the visor, placing 2 sc around each row-end where necessary, then continue around the opposite side, sl st to first sc. (76 sc)
Round 2
Ch 1, sc in each stitch around, placing 3 sc at each outer corner to keep the edge flat, sl st to first sc. (82 sc)
Fasten off and weave in the ends.
For a firmer brim, lightly steam-block the visor from a safe distance or use a removable flexible brim insert. Do not overheat cotton yarn.
Part 8 — Blocking
Blocking is especially helpful for the lace crown.
Dampen the finished cap lightly and shape it over a bowl or rounded form measuring approximately 7–7½ inches (18–19 cm) across.
Pin the leaf motifs gently into place.
Allow the cap to dry completely before removing it from the form.
Do not stretch the crown excessively. The goal is to open the lace stitches while preserving the rounded shape.
Assembly Steps
- Close the crown.
Weave the final tail through the remaining crown stitches and pull closed. Secure the tail inside the hat. - Shape the lace crown.
Place the crown over a rounded form approximately 18–19 cm wide. Gently arrange the leaf motifs so they sit evenly around the circumference. - Attach the lower band.
The band should measure approximately 5–6.5 cm deep and sit firmly around the lower edge of the lace crown. - Create the back opening.
Leave approximately 6–7.5 cm open at the center back. The opening should be centered directly opposite the visor. - Attach the strap.
Sew the strap securely to one side of the opening. The strap should extend approximately 10 cm before fastening around the button. - Attach the button.
Sew the button to the opposite side using several passes of strong matching thread. Reinforce the stitches from the inside of the cap. - Attach the visor.
Center the visor exactly opposite the back opening. The medium visor begins across approximately 34 stitches and reaches approximately 6.5–7.5 cm forward. - Check the curve.
Gently curve the visor upward at both sides so it resembles a traditional baseball cap rather than a flat crochet brim. - Finish the edge.
Inspect the entire brim for loose loops or uneven stitches. Weave every remaining yarn tail securely into the wrong side. - Final blocking.
Lightly block the crown and brim again if necessary. Allow the cap to dry completely before wearing.
Beginner/Intermediate Tips
Keep your lace relaxed. The leaf-and-vine crown should not be crocheted tightly. Tight tension can make the openwork look closed and may prevent the crown from fitting comfortably.
Count your repeats rather than forcing the circumference. If your completed vine panel is slightly larger or smaller than the measurements above, adjust the number of vine strips instead of stretching the finished piece.
Use cotton when possible. Cotton provides excellent stitch definition and helps the lower band and visor maintain their shape.
Mark the front center. Before attaching the brim, use a stitch marker at the exact front center of the cap. This makes it much easier to position the visor symmetrically.
Watch your decreases. The crown must gradually become smaller. If the crown begins forming a pointed shape, your decreases are happening too quickly. If it remains flat, you may need additional decreases.
Block the lace gently. Blocking can transform the appearance of lace crochet, but overstretching will make the motifs lose their definition.
Make the brim symmetrical. Count outward from the center rather than estimating visually. A centered brim makes a dramatic difference in the finished appearance.
Reinforce the button. The back button receives repeated tension from the strap, so sew it on using several passes through the same attachment points.
Test the opening before finishing. Try the cap on before weaving in the final band and strap ends. The opening should allow comfortable adjustment without pulling the lace crown out of shape.
Variations
1. Natural Summer Crochet Cap
Replace the sage green with cream, ivory, natural beige, or warm oatmeal cotton. These shades emphasize the lacework and create a lightweight summer accessory.
2. Two-Tone Lace Baseball Cap
Use one color for the leaf-and-vine crown and another for the lower band and visor. Cream with dusty green, beige with brown, or ivory with terracotta would all give the cap a beautiful boho appearance.
3. Smaller Child-Size Cap
Remove one or two vine strips and reduce the circumference of the lower band accordingly. Keep the same crown construction but check the wearer’s head circumference before completing the band.
4. Oversized Sun Hat Style
Make seven vine strips instead of six and slightly increase the visor length. A wider brim creates a softer, more relaxed silhouette while maintaining the baseball-cap shape.
5. Decorative Button Version
Instead of a plain button, use a wooden button, floral button, or handmade ceramic-style button. This works particularly well with earthy green and neutral yarn colors.
6. Solid Lace-Free Brim
For a more structured look, make the visor entirely in dense single crochet instead of half double crochet. The tighter fabric gives the brim extra body and creates a stronger contrast against the open lace crown.
Finished Size
The pictured design is intended for an adult head and can be adjusted as follows:
- Small: approximately 20–21 inches (51–53 cm)
- Medium: approximately 22 inches (56 cm)
- Large: approximately 23 inches (58 cm)
For the best fit, measure around the head just above the eyebrows and ears before beginning.
The finished cap takes approximately 6–8 hours depending on crochet speed, lace experience, blocking, and how quickly the individual leaf motifs are assembled.
This makes it a satisfying weekend project for someone comfortable with basic crochet stitches and ready to try openwork construction.
Save this Crochet Lace Baseball Cap pattern for your next handmade accessory project, and come back whenever you’re ready to make your own leafy lace cap! #FoodieRippleCrochet



