The Best Fluffy Pancakes recipe you will fall in love with. Full of tips and tricks to help you make the best pancakes.
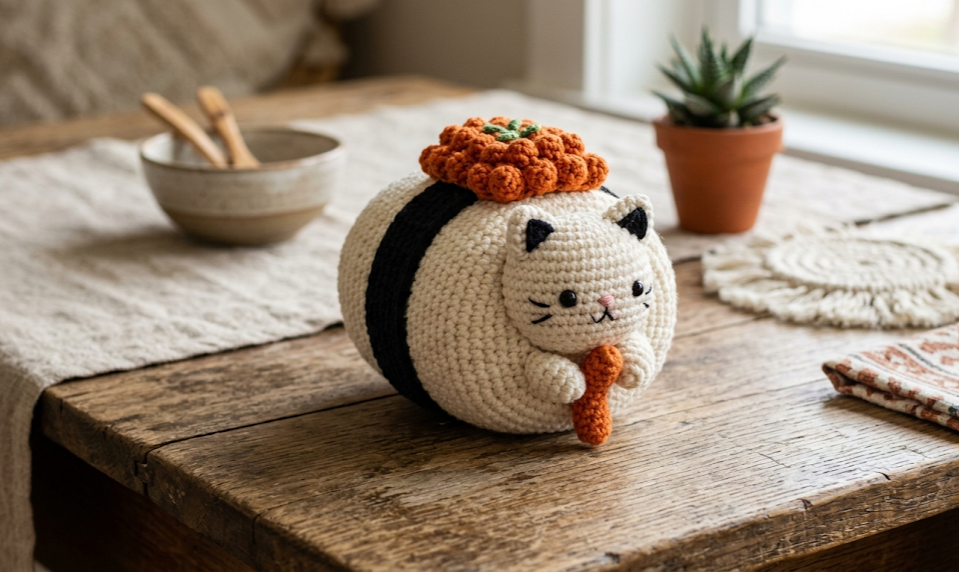
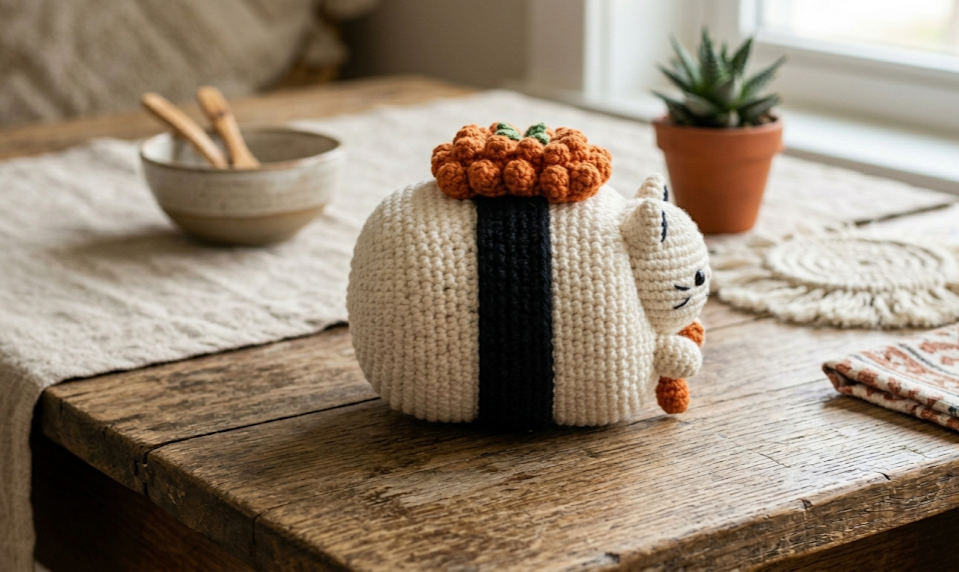
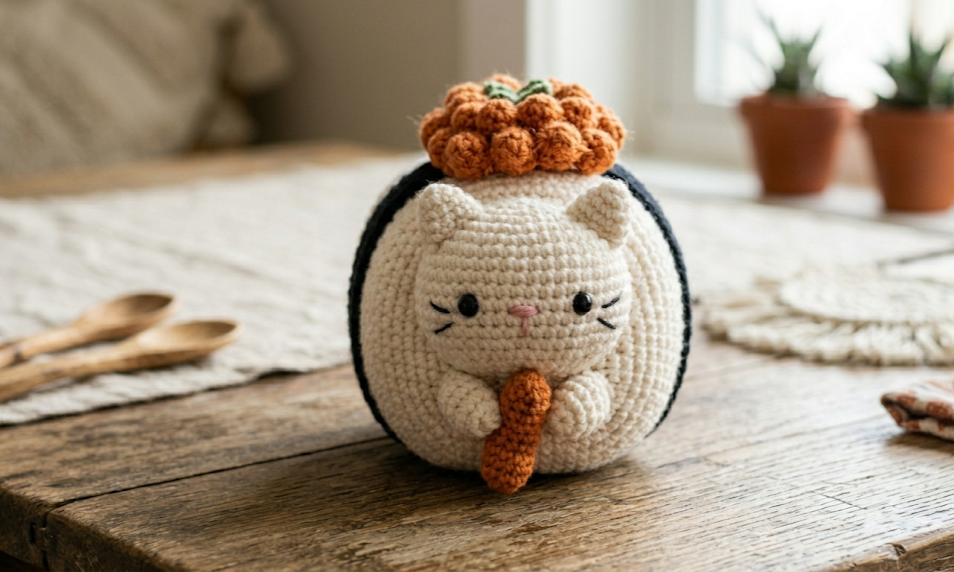
If there is one crochet project that has taken the crafting world by storm, it is the Chubby Sushi Cats amigurumi. These tiny, round, irresistibly adorable crochet characters combine two of the most beloved things in the world — cats and sushi — into one small, squishy bundle of joy. Whether this is a first amigurumi project or there is already a shelf full of crocheted creatures waiting for a new neighbor, this free pattern is exactly what belongs in the project queue.
These little cuties are worked in the round using simple stitches, making them accessible even for those who are fairly new to amigurumi. The finished set of three — a yellow tamago cat, an orange tobiko cat, and a pink salmon cat — makes a stunning display piece, a heartfelt handmade gift, or a wildly popular item at craft fairs.
|
Difficulty
Beginner
|
Time
3–5 Hours
|
Hook Size
2.5 – 3.0 mm
|
Yarn Weight
DK / Light #3
|
Finished Size
~6 cm / 2.5 in
|
Let’s dive right in.
Why You’ll Love This Pattern
Chubby Sushi Cats are small, fast to make, and deeply satisfying. Each one comes together in a few hours, making them perfect for a weekend crafting session or an evening project. The pattern uses only basic stitches — magic ring, single crochet, increases, and decreases — so the focus stays on having fun rather than decoding complicated instructions. The result is a professional-looking, incredibly charming set of amigurumi that looks far more difficult than it actually is.
Materials Needed
To make all three Chubby Sushi Cats, the following materials are needed:
- Yarn (DK weight / Light #3):
- Cream white (for the rice base)
- Black (for the nori seaweed wrap)
- Yellow (for the tamago egg topping)
- Orange (fluffy or textured yarn for the tobiko topping)
- Light pink (for the salmon topping)
- Small amount of pink for inner ear details
- Crochet Hook: 2.5mm or 3.0mm (depending on yarn brand and personal tension)
- Safety eyes: 6mm black, 3 pairs
- Polyester fiberfill stuffing
- Yarn needle for sewing and weaving ends
- Stitch markers
- Scissors
- Black embroidery floss for facial details (nose, mouth, whiskers)
Abbreviations
- MR – Magic Ring
- SC – Single Crochet
- INC – Increase (2 SC in the same stitch)
- DEC – Decrease (invisible decrease recommended)
- ST – Stitch
- SL ST – Slip Stitch
- CH – Chain
- BLO – Back Loop Only
- R – Round
- FO – Fasten Off
Gauge
Approximately 5 SC x 5 rows = 2.5cm (1 inch) using DK weight yarn and a 2.5mm hook. Gauge does not need to be exact for this project, but keeping stitches tight prevents the stuffing from showing through.
Pattern Instructions
PART 1: The Rice Body Base (Make 3 — in Cream White)
The rice body is the main chubby cube-like form that gives each sushi cat its signature shape.
R1: MR, 6 SC (6)
R2: INC in each ST (12)
R3: (SC, INC) x6 (18)
R4: (SC 2, INC) x6 (24)
R5: (SC 3, INC) x6 (30)
R6: (SC 4, INC) x6 (36)
R7–R12: SC in each ST (36) — 6 rounds even
R13: (SC 4, DEC) x6 (30)
R14: (SC 3, DEC) x6 (24)
Insert safety eyes between R8 and R9, approximately 6 stitches apart. Embroider nose and tiny smile with black floss before closing.
R15: (SC 2, DEC) x6 (18)
Stuff firmly with fiberfill.
R16: (SC, DEC) x6 (12)
R17: DEC x6 (6)
FO and close the opening.
PART 2: The Nori Wrap (Make 3 — in Black)
The nori band wraps around the middle of the rice body, just like a real piece of nigiri sushi.
CH 36. Join with SL ST to form a ring.
R1–R4: SC in each ST (36)
FO, leaving a long tail for sewing. Fit the band around the widest middle section of the rice body and sew in place using the yarn tail.
For a cleaner finish, use BLO for the first round of the nori wrap.
PART 3A: Tamago (Egg) Topping — in Yellow
R1: MR, 6 SC (6)
R2: INC in each ST (12)
R3: (SC, INC) x6 (18)
R4–R6: SC in each ST (18) — 3 rounds even
R7: (SC, DEC) x6 (12)
Lightly stuff. FO leaving a long tail. Sew to the top of the corresponding rice body.
PART 3B: Tobiko (Fish Roe) Topping — in Orange Fluffy Yarn
This topping uses a fluffy or loop-textured yarn to mimic the bumpy texture of tobiko roe.
R1: MR, 6 SC (6)
R2: INC in each ST (12)
R3: (SC, INC) x6 (18)
R4–R5: SC in each ST (18) — 2 rounds even
Do not stuff. FO leaving a long tail. The fluffy texture naturally creates a full, rounded look. Sew to the top of the black cat body.
PART 3C: Salmon Topping — in Light Pink
R1: MR, 6 SC (6)
R2: INC in each ST (12)
R3: (SC, INC) x6 (18)
R4–R6: SC in each ST (18) — 3 rounds even
R7: (SC, DEC) x6 (12)
Lightly stuff. FO leaving a long tail. Sew to the top of the corresponding rice body.
Optional: Use a darning needle to embroider horizontal lines across the salmon piece using a slightly darker pink thread to mimic the natural striping of salmon.
PART 4: Cat Ears (Make 6 — 2 per cat, in matching topping color)
R1: MR, 4 SC (4)
R2: INC in each ST (8)
R3: (SC, INC) x4 (12)
R4: SC in each ST (12)
FO leaving a long tail. Pinch the bottom of each ear slightly before sewing to create a natural ear shape. Sew to the top of each topping piece, one on each side.
Optional: Add a small inner ear detail with a single strand of pink yarn using a whip stitch.
PART 5: Tiny Paws (Make 6 — 2 per cat, in Cream White)
R1: MR, 5 SC (5)
R2: INC in each ST (10)
R3–R4: SC in each ST (10)
FO leaving a long tail. Do not stuff. Flatten slightly and sew to the lower front section of each rice body, just below the nori wrap.
Assembly Steps
- Sew the nori band around the middle of each rice body, making sure the seam sits at the back.
- Attach the toppings (tamago, tobiko, salmon) to the top of each body. Center them carefully and use plenty of stitches to secure.
- Sew ears onto each topping, positioned symmetrically.
- Attach the paws to the lower front of each body.
- Embroider facial details: tiny round or oval eyes (if not using safety eyes), small triangle nose, curved smile, and optional whisker dots.
- Weave in all ends securely.
Beginner Tips
- Use stitch markers to mark the beginning of each round — amigurumi is worked in a continuous spiral, and it’s easy to lose count.
- Stuff as you go rather than waiting until the very end. Reaching into a nearly closed piece is frustrating and results in uneven stuffing.
- Tight tension is the key to clean amigurumi. If stitches are too loose, switch to a smaller hook rather than trying to change technique.
- Safety eyes should be inserted and secured before the opening becomes too small to reach inside comfortably — typically around Round 14.
- Invisible decreases give a much smoother finish than standard decreases. Insert the hook into the front loops of two stitches simultaneously before pulling through.
Pattern Variations
Mini Version: Use fingering weight yarn and a 1.5mm hook for micro sushi cats that fit in the palm of a hand.
Keychain Version: Before fastening off the rice body, insert a jump ring and attach a lobster clasp for an adorable bag charm.
Holiday Edition: Swap the topping colors for red and green yarn to create Christmas sushi cats, or use pastel tones for a spring Easter version.
Spicy Tuna Cat: Use deep red yarn for the topping and add tiny white sesame seed beads across the surface.
Giant Plushie: Scale up to bulky weight yarn and a 6mm hook for a huggable oversized version.
Displaying Your Sushi Cats
These three little cats look stunning grouped together on a small wooden tray or displayed in a shallow ceramic dish for a gallery-worthy craft shelf moment. They also make wonderful gifts tucked into a small box with tissue paper, especially for sushi lovers, cat parents, or anyone who appreciates handmade gifts.
Save This Pattern to Pinterest!
Loved making these Chubby Sushi Cats? Save this free pattern to your crochet boards so it’s always easy to find, and share your finished makes using #FoodieRippleCrochet — the finished versions would love to be seen!


