The Best Fluffy Pancakes recipe you will fall in love with. Full of tips and tricks to help you make the best pancakes.
Introduction
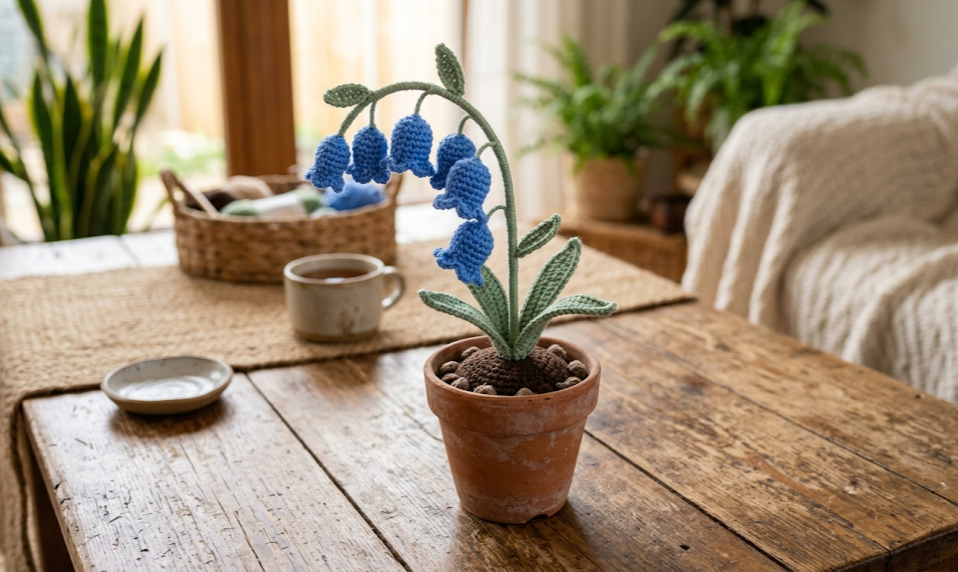
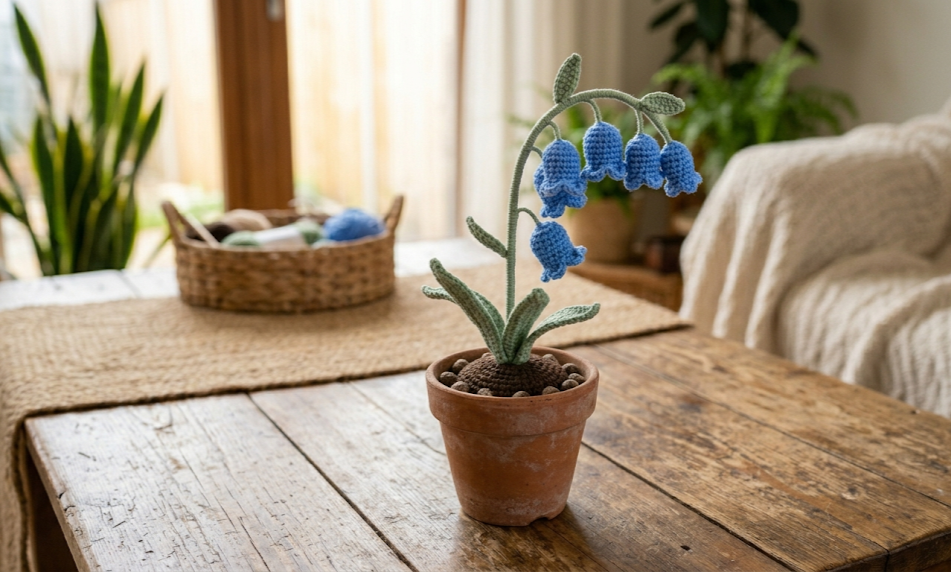
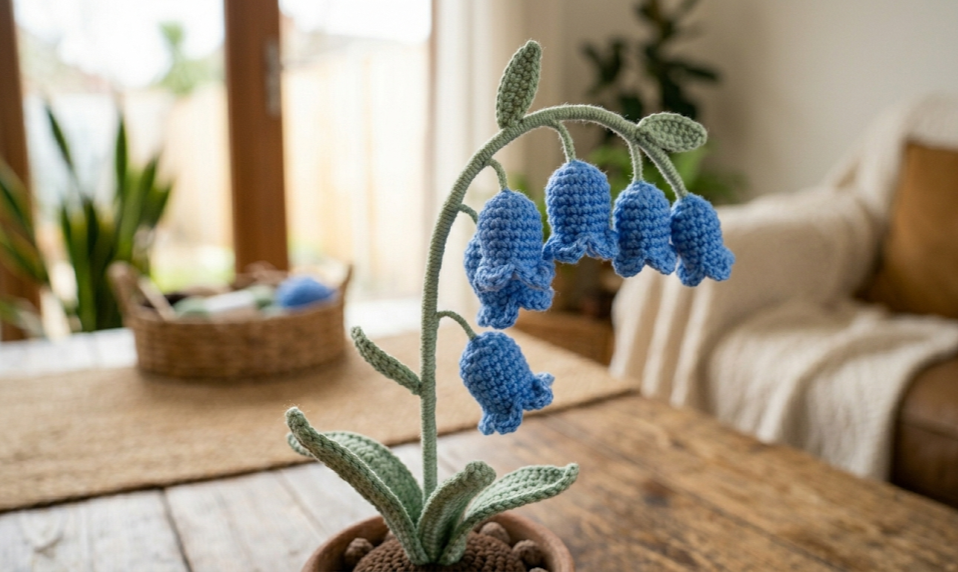
There is something quietly magical about a crocheted flower that never wilts. The crochet bluebell potted plant captures all the wild charm of a garden in bloom — royal blue bell-shaped flowers nodding gently on curved green stems, surrounded by cascading leaves with just enough bend to feel alive — all sitting in a cozy terracotta-inspired crocheted pot. This piece is as much home décor as it is a fiber art project, and it makes a gift that people genuinely gasp over.
This pattern is suited to intermediate crocheters — those who have worked in the round, can manage a magic ring, and are comfortable with increasing and decreasing. If you have made amigurumi before, you will find this project very approachable. The flowers are worked in the round using fingering weight yarn on a 2.5 mm hook, and the pot is built up in rounds using a slightly thicker DK yarn on a 3.5 mm hook. Floral wire inserted through the stems gives the whole arrangement its signature sculptural quality — you can position and pose each bloom individually.
The finished piece stands approximately 20 cm tall and 10 cm wide, making it ideal for a windowsill, bookshelf, or coffee table. It is the kind of project you will want to make more than once — in lavender, in white, in deep burgundy.
|
Difficulty
Intermediate
|
Time
6–9 Hours
|
Hook Size
2.5 mm / 3.5 mm
|
Yarn Weight
Fingering / DK
|
Finished Size
20 cm Tall
|
Gauge
Gauge is important for the pot to achieve its proper shape and for the flowers to stay proportionate.
- Flowers and Leaves (Fingering / 2.5 mm hook): 28 sc × 32 rows = 10 cm in a gauge swatch worked in the round.
- Pot (DK / 3.5 mm hook): 20 sc × 22 rows = 10 cm in a gauge swatch worked in the round.
Work a 15 cm square swatch before beginning and adjust hook size if needed.
Materials List
Yarn:
- Royal blue fingering weight yarn — approx. 40 m (for 4–5 flowers)
- Sage green fingering weight yarn — approx. 60 m (for stems and leaves)
- Terracotta / burnt orange DK weight yarn — approx. 50 m (for pot)
- Small amount of dark brown or tan yarn (optional, for soil surface)
Hook:
- 2.5 mm crochet hook (flowers, stems, leaves)
- 3.5 mm crochet hook (pot)
Notions:
- Floral wire (18-gauge), one 30 cm length per stem (4–5 stems needed)
- Wire cutters
- Pliers (optional, for bending wire tips)
- Polyester fiberfill stuffing
- Tapestry/yarn needle
- Scissors
- Stitch markers
Abbreviations Table
| Abbreviation | Meaning |
|---|---|
| ch | chain |
| sl st | slip stitch |
| sc | single crochet |
| hdc | half double crochet |
| dc | double crochet |
| inc | increase (2 sc in same stitch) |
| dec | invisible decrease (insert hook into front loops of next 2 sts, pull through, complete sc) |
| BLO | back loop only (insert hook into the back loop of the stitch only) |
| FLO | front loop only (insert hook into the front loop of the stitch only) |
| MR | magic ring |
| st(s) | stitch(es) |
| rnd | round |
| sk | skip |
| sp | space |
| RS | right side (the side you want to face outward) |
Note on the Invisible Decrease: Rather than inserting the hook through both loops of one stitch and both loops of the next, insert through only the front loop of the first stitch and the front loop of the second stitch simultaneously. This creates a much smoother, less visible decrease — essential for making the pot look clean and rounded.
Note on BLO: Working into the back loop only creates a visible horizontal ridge on the RS of the work. For this pattern, the BLO round on the pot creates the rim/lip detail.
Pattern Instructions
Part 1: The Pot
Use terracotta DK yarn and 3.5 mm hook throughout.
Base:
- Rnd 1: MR, 6 sc into ring, sl st to join. (6 sts)
- Rnd 2: inc in each st around. (12 sts)
- Rnd 3: sc 1, inc repeat 6 times. (18 sts)
- Rnd 4: sc 2, inc repeat 6 times. (24 sts)
- Rnd 5: sc 3, inc repeat 6 times. (30 sts)
- Rnd 6: sc 4, inc repeat 6 times. (36 sts)
- Rnd 7: sc 5, inc repeat 6 times. (42 sts)
Sides:
- Rnd 8: Working in BLO, sc in each st around. (42 sts) — This locks in the flat base and starts the walls of the pot.
- Rnds 9–16: sc in each st around. (42 sts each round) — 8 rounds total.
- Rnd 17: sc 5, inc repeat 7 times. (49 sts) — This slight flare mimics the widening rim of a traditional terracotta pot.
- Rnd 18: sc in each st around. (49 sts)
Rim:
- Rnd 19: Working in BLO, sc in each st around. (49 sts) — Creates the visible rim ridge.
- Rnd 20: sc in each st around. (49 sts)
- Sl st to first sc, fasten off, leave a 15 cm tail for finishing.
Do not stuff the pot with fiberfill. It should remain hollow to receive the stems.
Part 2: The Soil Disc (optional but recommended)
Use dark brown or tan DK yarn and 3.5 mm hook.
- Rnd 1: MR, 6 sc. (6 sts)
- Rnd 2: inc in each st. (12 sts)
- Rnd 3: sc 1, inc × 6. (18 sts)
- Rnd 4: sc 2, inc × 6. (24 sts)
- Rnd 5: sc 3, inc × 6. (30 sts)
- Rnd 6: sc 4, inc × 6. (36 sts)
- Rnd 7: sc 5, inc × 6. (42 sts)
- Sl st to join, fasten off, leave long tail.
Set aside — this disc will be sewn into the pot at the top to create the appearance of soil.
Part 3: The Flower (make 4–5)
Use royal blue fingering yarn and 2.5 mm hook.
Petal Ring:
- Rnd 1: ch 5, join with sl st to form a ring.
- Rnd 2: ch 1, sc 1 into ring, ch 3, dc 3 into ring, ch 3, sc 1 into ring repeat 3 times. (3 petals formed)
- Rnd 3: Working behind the petal ring and into the original ring base stitches, sl st into each base stitch, pulling to gather slightly. (3 sl st)
- Rnd 4: ch 1, sc 1, hdc 1, dc 3, hdc 1, sc 1, sl st into each ch-3 sp of Rnd 2. (3 petal extensions formed)
Tip: The petal ring forms the characteristic flared bell edge. Keep tension loose on the ch-3 spaces so the petals flare outward naturally.
Bell Body:
- Begin with MR.
- Rnd 1: 6 sc into MR, pull ring closed. (6 sts)
- Rnd 2: inc in each st. (12 sts)
- Rnd 3: sc 1, inc × 6. (18 sts)
- Rnd 4: sc in each st. (18 sts)
- Rnd 5: sc 1, dec × 6. (12 sts)
- Rnd 6: sc 2, dec × 3. (9 sts)
Do not stuff. Leave opening. The bottom of the bell will be attached to the stem.
Attaching Petal Ring to Bell Body:
Align the petal ring over the open wide end of the bell (Rnd 3 side), with RS of petals facing outward. Using a tapestry needle and blue yarn, sew the petal ring base (the original chain ring) to the outer edge of Rnd 3 of the bell body, spacing the 3 petals evenly. Fasten off, weave in ends.
Part 4: The Stem (make 4–5)
Use sage green fingering yarn and 2.5 mm hook.
- ch 2.
- Rnd 1: sc 6 in second ch from hook, join. (6 sts)
- Rnds 2–25 (or to desired height): sc in each st around. (6 sts) — Adjust length per stem; vary between 15 and 25 rounds for natural height variation.
Do not fasten off yet. Leave the tube open.
Wire Insertion:
Cut one length of 18-gauge floral wire approx. 5 cm longer than the crocheted tube. Using pliers, bend the top 1 cm of wire into a tiny hook or loop — this prevents the wire from poking through the tip. Insert the wire down through the center of the tube from the top open end. The excess wire should extend from the bottom opening. Once inserted, sc 3 sts across the bottom opening to partially close the base, leaving a small gap for the wire to emerge — this wire tail will anchor into the soil disc. Fasten off and weave in top end.
Part 5: The Leaf (make 6–8)
Use sage green fingering yarn and 2.5 mm hook.
- ch 14.
- Rnd 1 (first side of chain): Starting in 2nd ch from hook — sl st 1, sc 2, hdc 3, dc 3, hdc 2, sc 1, 3 sc into last ch (tip of leaf). Note on working the second side of chain: After working 3 sc into the last chain (the leaf tip), rotate your work and continue working back along the underside of the same foundation chain — insert your hook into the same chain loops from the opposite direction. This is called working the second side of the chain and creates the other half of the leaf.
- Rnd 1 (second side of chain): sc 1, hdc 2, dc 3, hdc 3, sc 2, sl st 1, sl st into first st to join. (approx. 28 sts total)
- Rnd 2: ch 1, sc around entire leaf, working 3 sc into the tip (middle stitch of the 3-sc cluster at the tip), and sc2tog at the base. (approx. 28 sts)
Fasten off, leave a 10 cm tail for sewing.
Assembly Steps
- Prepare the soil disc: Using the long tail, sew the soil disc securely to the inside top of the pot, approx. 1.5–2 cm below the pot rim. The disc should sit flush against the inside walls. If it buckles, add a small amount of fiberfill beneath it for support before sewing closed. The disc creates the foundation that holds all stems in place.
- Insert stems: Push the wire tail at the base of each stem down through the soil disc surface and into the hollow pot, spacing stems approximately 2–2.5 cm apart in a loose cluster (off-center looks most natural). Push each wire approximately 3–4 cm deep into the hollow pot cavity. If the stems are loose, add a small amount of fiberfill into the pot beneath the disc to brace them.
- Secure stems: From inside the pot (before sewing the disc fully closed), use a tapestry needle and matching green yarn to tack each stem base to the soil disc with 3–4 stitches. This prevents rotation.
- Attach flowers: Slide each flower bell down onto the top of its stem approximately 0.5 cm. Using blue yarn and a tapestry needle, sew the bottom of the bell body (the Rnd 6 narrowed opening) to the top of the stem tube, stitching around the circumference 3–4 times. The flower should sit at a slight downward nod — angle the wire gently before securing.
- Attach leaves: Sew leaves directly to the stem tubes at varying heights — approximately 3 cm, 6 cm, and 9 cm from the base. Two to three leaves per stem gives the fullest look. Sew through the base of each leaf twice in an X-pattern for security, then bend the leaf body outward gently.
- Finishing the pot: Sew the soil disc edge to the pot interior cleanly around the full circumference. Weave in all ends. Optionally, add a small amount of brown or green yarn fringe to the soil surface for a textured “earth” effect.
Beginner and Intermediate Tips
Tension matters for the flowers. If your petals curl inward instead of flaring outward, your tension is too tight. Try going up half a hook size for the petal ring only — this is one of those cases where deliberately loose tension is correct.
Wire safety for the stems. Always bend the wire tip into a loop before inserting it. A sharp wire tip will pierce through the top of the stem over time. The looped tip stays inside the bell body and acts as an anchor for sewing the flower on.
Magic ring closure on the bell body. After Round 2, pull the magic ring tail firmly to close the center hole completely before continuing. A gap at the center top of the bell body will be visible since the flower is not stuffed.
Varying stem heights creates realism. Do not make all stems the same length. Use 15, 18, 20, 22, and 25 rounds respectively for a natural staggered arrangement. Bluebell plants in nature grow with blooms at different stages.
The soil disc size matters. If your disc is too small, stems will wobble. If too large, it will not fit inside the pot rim. Check by holding the disc over the pot opening before sewing — it should fit inside with about 2–3 mm of room on all sides.
Variations
- Lavender Bluebells: Swap the royal blue for soft lavender or pale lilac yarn for a more romantic, cottagecore aesthetic. Pair with a cream-colored pot worked in white DK yarn.
- Miniature Version: Use lace weight yarn on a 1.5 mm hook to create a tiny bluebell plant that fits in a shot glass or a mini terracotta pot. These make stunning table setting décor or favor gifts.
- Wildflower Mixed Pot: Add other flower varieties to the same pot — small crocheted daisies (white with yellow centers), tiny rosebuds in pink, or crocheted lavender sprigs — using the same wire-stem technique. This creates a full wildflower bouquet arrangement.
- Seasonal Color Switch: Work the bells in warm sunset tones (coral, peach, tangerine) with rust-brown stems for an autumn version, or in cream and blush for a wedding or spring bridal display piece.
- Hanging Wall Planter Version: Instead of a pot, attach 4–5 finished wire-stem flowers directly to a small wooden ring or dowel using the wire tails. Hang with macramé cord for a bohemian wall art piece.
Love this crochet bluebell pattern? Save it to your Pinterest boards so you can come back to it anytime — and tag your finished blooms with #FoodieRippleCrochet so we can see your garden growing!


