The Best Fluffy Pancakes recipe you will fall in love with. Full of tips and tricks to help you make the best pancakes.
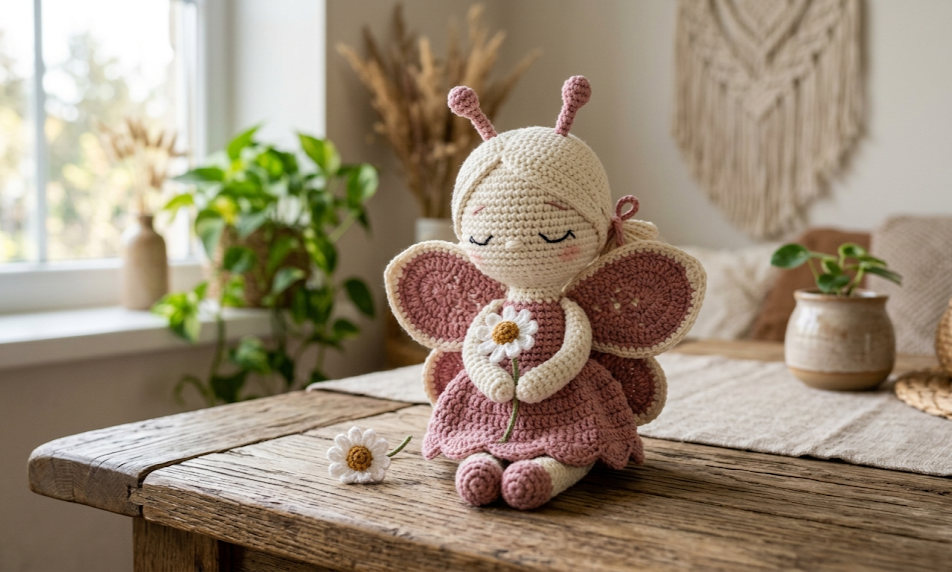
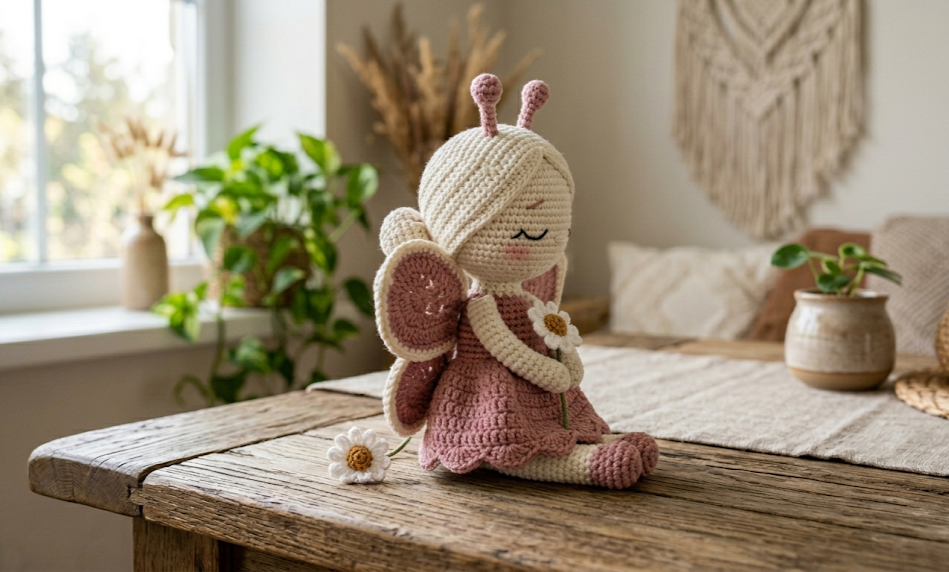
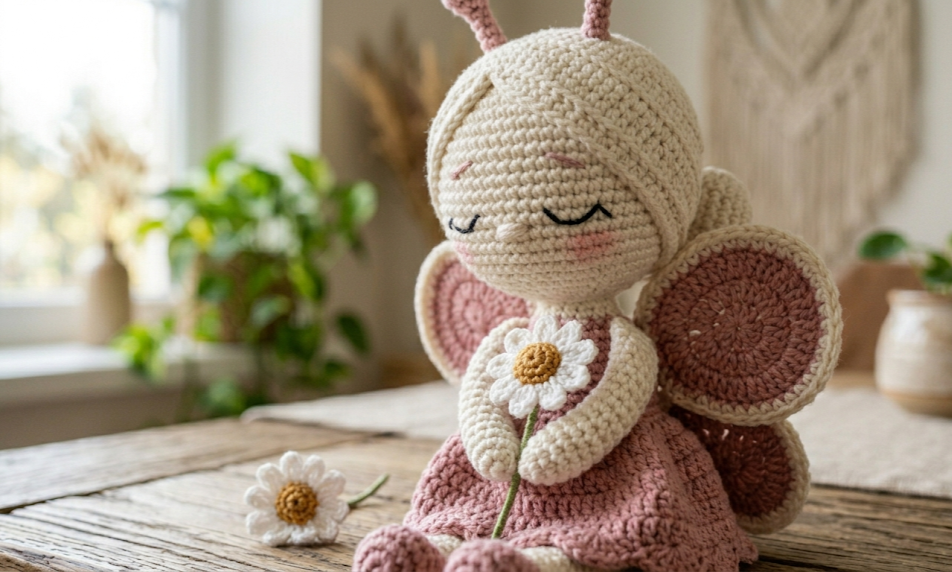
There is something irresistibly dreamy about a tiny crochet butterfly girl nestled in your palm, eyes softly closed, clutching a handmade daisy like she has just drifted in from an enchanted meadow. This butterfly girl amigurumi combines a round, sleepy-faced doll body with graceful scalloped wings, curled antenna loops, a sweet mauve lower body, and a separate crocheted daisy flower she holds as an accessory. The finished piece stands approximately 14cm tall with an 18cm wingspan and is worked almost entirely in the round using a 2.5mm hook and fingering-weight yarn. Whether you are building a whimsical nursery display, making a gift for a fantasy-loving friend, or adding a collector piece to your amigurumi shelf, this butterfly girl delivers maximum charm with satisfying construction throughout.
|
Difficulty
Intermediate
|
Time
6–8 Hours
|
Hook Size
2.5mm
|
Yarn Weight
Fingering / 4-ply
|
Finished Size
14cm tall / 18cm wingspan
|
Gauge
28 single crochet × 30 rows = 10cm square, worked in continuous rounds using a 2.5mm hook and fingering-weight (4-ply) yarn. Gauge affects the finished size but not the structural integrity of the doll; however, working to gauge ensures the safety eyes (if used) are sized correctly relative to the face. Always crochet a gauge swatch before beginning.
Materials List
- Yarn A — Cream / off-white fingering weight (4-ply), approx. 40g
- Yarn B — Dusty pink / mauve fingering weight (4-ply), approx. 25g
- Yarn C — Warm brown fingering weight or embroidery thread, small amount for face embroidery
- Yarn D — Pink fingering weight, small amount for antennae loops
- Yarn E — Pale pink or white fingering weight, approx. 10g for daisy petals
- Yarn F — Warm golden brown fingering weight, small amount for daisy center
- Hook: 2.5mm crochet hook
- Stitch markers: 2–3 locking stitch markers
- Tapestry needle for seaming and weaving in ends
- Polyester fiberfill stuffing, approx. 30–40g
- Black embroidery thread for facial features (eyes and smile)
- Scissors
No wire or armature is required for this pattern. The wings are stiffened through the scalloped construction and attached flat.
Abbreviations
| Abbreviation | Meaning |
|---|---|
| MR | Magic ring: pull yarn into an adjustable loop, work stitches into the ring, then pull tail to close |
| sc | Single crochet |
| inc | Increase: work 2 sc into the same stitch |
| dec | Invisible decrease: insert hook through the front loops only of the next 2 stitches, yarn over and pull through both front loops, then complete as a single crochet — produces a flatter, less visible decrease than a standard sc2tog |
| BLO | Back loop only: work the stitch through the back loop only of the indicated stitch |
| sl st | Slip stitch |
| ch | Chain |
| dc | Double crochet |
| hdc | Half double crochet |
| sp | Space |
| FO | Fasten off |
| PM | Place marker |
Pattern Instructions
PART 1: HEAD (worked in cream, Yarn A)
Work in continuous rounds. Use a stitch marker to mark the first stitch of each round and move it up as you go.
- Round 1: MR, work 6 sc into ring, pull ring closed. (6)
- Round 2: Inc in each st around. (12)
- Round 3: *Sc 1, inc* repeat 6 times. (18)
- Round 4: *Sc 2, inc* repeat 6 times. (24)
- Round 5: *Sc 3, inc* repeat 6 times. (30)
- Round 6: *Sc 4, inc* repeat 6 times. (36)
- Round 7: *Sc 5, inc* repeat 6 times. (42)
- Round 8: *Sc 6, inc* repeat 6 times. (48)
- Rounds 9–18: Sc in each st around. (48) — 10 rounds even
- Round 19: *Sc 6, dec* repeat 6 times. (42)
- Round 20: *Sc 5, dec* repeat 6 times. (36)
- Round 21: *Sc 4, dec* repeat 6 times. (30)
Before continuing, embroider the facial features. Using black embroidery thread, stitch two small curved crescent shapes for closed eyes, positioned between rounds 13 and 14, spaced 8 stitches apart. Stitch a small curved smile directly below, centered. Using Yarn C (warm brown), optionally add a few tiny nose stitches between the eyes if desired. The face embroidery is easier to complete before stuffing is added.
- Round 22: *Sc 3, dec* repeat 6 times. (24)
Begin stuffing the head firmly. Continue stuffing as you close.
- Round 23: *Sc 2, dec* repeat 6 times. (18)
- Round 24: *Sc 1, dec* repeat 6 times. (12)
- Round 25: Dec 6 times. (6)
FO, leaving a short tail. Thread onto tapestry needle and weave through the 6 remaining stitches, pull tight to close. Weave in end.
PART 2: BODY (worked in Yarn A cream for upper body, joining Yarn B mauve for lower body)
- Round 1: MR, work 6 sc into ring. (6)
- Round 2: Inc in each st around. (12)
- Round 3: *Sc 1, inc* repeat 6 times. (18)
- Round 4: *Sc 2, inc* repeat 6 times. (24)
- Round 5: *Sc 3, inc* repeat 6 times. (30)
- Rounds 6–9: Sc in each st around. (30) — 4 rounds even
Switch to Yarn B (mauve) at the end of Round 9.
- Rounds 10–15: Sc in each st around using Yarn B. (30) — 6 rounds even
Begin stuffing the body firmly.
- Round 16: *Sc 3, dec* repeat 6 times. (24)
- Round 17: *Sc 2, dec* repeat 6 times. (18)
- Round 18: *Sc 1, dec* repeat 6 times. (12)
Finish stuffing to desired firmness.
- Round 19: Dec 6 times. (6)
FO and close as for head.
PART 3: WINGS (make 2, worked in Yarn B mauve)
Each wing is worked flat to create the scalloped edge shape.
- Foundation chain: Ch 21.
- Row 1 (RS): Starting in 2nd ch from hook, sc across. (20)
- Row 2: Ch 1, turn. Sc in each st across. (20)
- Row 3 (scallop edge): Do not turn. Working along the top edge of the wing, *sc 1, hdc 1, 3 dc in next st, hdc 1, sc 1, sl st 1* repeat across the top edge to form scallops. Adjust repeat spacing to fit the 20-stitch edge evenly — approximately 2–3 full scallop repeats per wing depending on yarn thickness.
FO, leaving a 25cm tail for sewing.
Make 2 wings.
PART 4: ANTENNAE (worked in Yarn D pink)
For each antenna, leave a 15cm starting tail, then ch 12. Sl st back along the chain from the 2nd ch from hook to create a rounded tip, or work a small MR of 5 sc at the tip and then ch 10 for a round-tipped antenna style. Make 2.
PART 5: DAISY FLOWER
Center (Yarn F — warm golden brown):
- Round 1: MR, 6 sc into ring. (6)
- Round 2: Inc in each st. (12)
- FO with 15cm tail.
Petals (Yarn E — pale pink or white):
Join Yarn E to any stitch of the center with a sl st. *Ch 6, sl st into 2nd ch from hook, sc in next ch, hdc in next ch, dc in next ch, sc in last ch, sl st into same base stitch as starting sl st* — this forms one petal. Move to next stitch and repeat. Work one petal into each of the 12 stitches around the center. (12 petals total)
FO and weave in all ends.
Assembly Steps
- Attach head to body: Pin the base of the head (closed end) to the open top of the body, aligning the center of the face with the front of the body. Using Yarn A and a tapestry needle, whip stitch around the full circumference through corresponding stitches of both pieces. Pull firmly and evenly for a clean join. The head should sit approximately 1–2cm offset toward the front of the body to give the doll a natural forward-leaning posture.
- Attach wings: Place both wings against the back of the body, positioned at rounds 6–12 (the cream section), symmetrically left and right of center back. The inner straight edge of each wing should sit flush against the body. Using the long Yarn B tail, sew each wing through approximately 6–8 stitches along the body back. Wings should angle slightly upward — approximately 30° above horizontal — when viewed from behind. Secure firmly and weave in ends.
- Insert antennae: Using a tapestry needle or bobby pin, thread each antenna tail down through the top of the head, inserting at the crown approximately 1–2 stitches apart from each other. Pull until only the chain portion (approximately 3–4cm) protrudes from the top of the head. Knot the tail inside the head against the stuffing and weave in securely. Antennae should stand 3–4cm above the crown.
- Attach daisy: The daisy is held loosely in the doll’s “hand” area (lower front of body, rounds 14–16). Tack the back of the daisy center to the body front using a few small stitches in Yarn F, angling it slightly as if being held. Alternatively, leave the daisy unattached for a removable accessory.
Beginner and Intermediate Tips
Invisible decrease for smooth shaping: The invisible decrease (dec as defined in the abbreviations) is used throughout this pattern because it avoids the small hole that appears with a standard sc2tog, keeping the fabric tight and preventing stuffing from showing through. Insert the hook through the front loops only of the next two stitches simultaneously, then complete the stitch as normal.
Stuffing the head firmly: A well-stuffed head holds its round shape and makes face embroidery easier to display. Stuff firmly using small pinched amounts of fiberfill rather than large clumps to avoid lumps.
Embroidering on curved surfaces: Pin the embroidery thread to the face first with straight pins to plan placement before committing to stitches. Crescent-shaped closed eyes give the butterfly girl her dreamy character — keep the curve shallow for a serene expression.
Working the scallop edge: The wing scallop row is worked along the top of the wing flat piece with the right side facing. Work each scallop unit snugly to prevent gaps between petals. Blocking the finished wings lightly with a damp cloth and pinning flat while drying will give crisp, even scallops.
Yarn color changes: When switching from Yarn A to Yarn B at Round 9 of the body, complete the last yarn-over of the final Round 9 stitch with the new color to keep the jog clean.
Variations
- Pastel Rainbow Wings: Work the wings in three horizontal sections — lavender, soft pink, and pale yellow — joining colors every 7 chains across the foundation. The resulting ombre wing gives a watercolor effect perfect for spring décor.
- Miniature Mobile Version: Reduce hook size to 2.0mm and use lace-weight yarn to create a 7cm version. Make three or four butterfly girls in different colorways and suspend them from a wooden dowel with cotton thread for a nursery mobile.
- Autumn Harvest Butterfly: Work the body and wings entirely in terracotta, burnt orange, and deep amber to create a monarch butterfly-inspired version. Add a tiny acorn accessory instead of the daisy using brown and tan yarn.
- Winter Frost Fairy: Work the body in ice blue and silver-grey yarn. Add a small crocheted snowflake instead of the daisy accessory, worked using a size 1.75mm hook and white lace-weight yarn in a simple 6-point star pattern.
- Seated Shelf Sitter Version: Omit the lower body entirely and instead work a wider flat base in mauve yarn (a simple disc of 36 stitches at maximum, then decreased to a flat oval) so the butterfly girl sits flat on a shelf or windowsill without tipping.
If you make your own butterfly girl, save this pattern on Pinterest and share your finished photo using #FoodieRippleCrochet — it’s the best way to find the whole FoodieRipple pattern collection in one place!


