The Best Fluffy Pancakes recipe you will fall in love with. Full of tips and tricks to help you make the best pancakes.
Intro
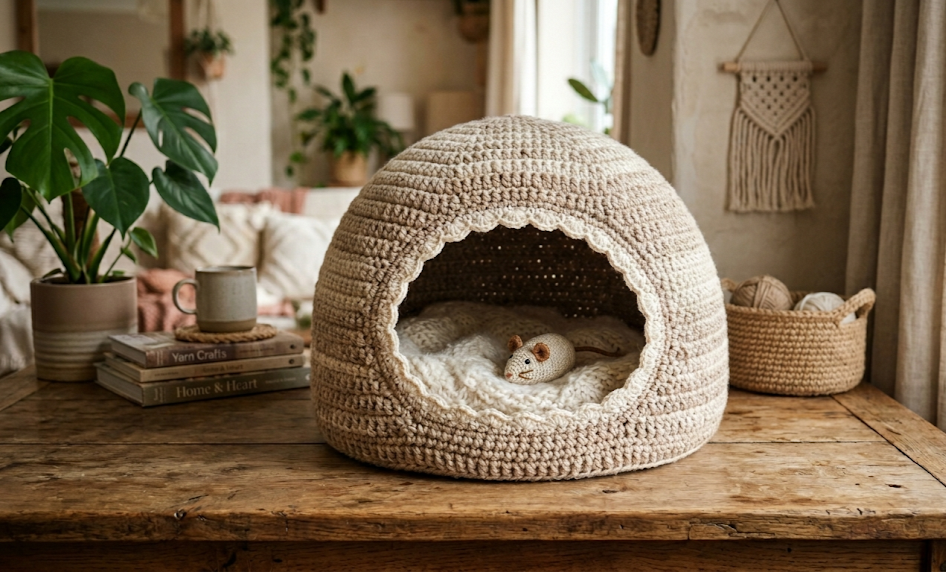
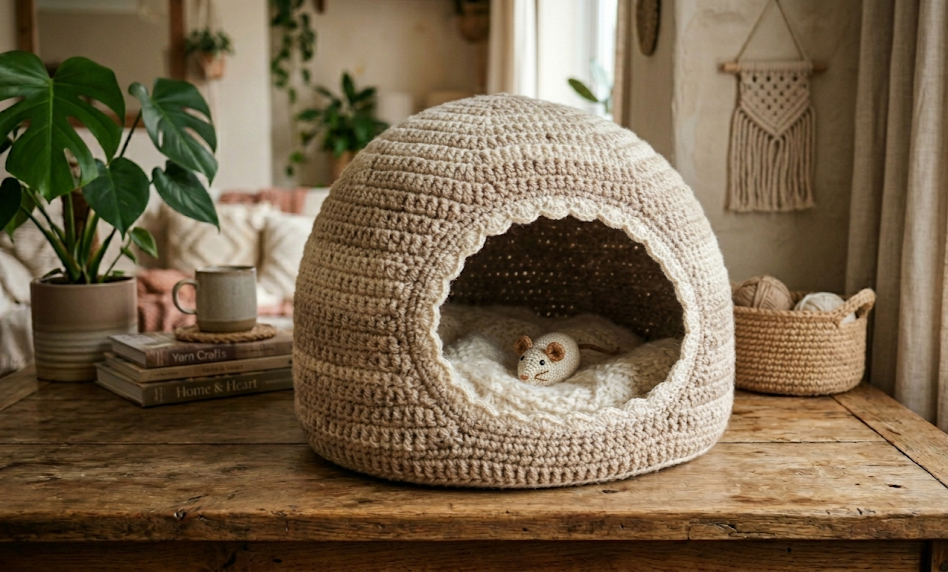
Every cat owner knows that our feline companions have a natural, undeniable obsession with cozy, enclosed spaces. From cardboard boxes to grocery bags, if it has high borders and an opening, a cat will try to curl up inside it. This free crochet cat cave pattern provides the ultimate luxury alternative to unsightly cardboard boxes, seamlessly blending functional pet comfort with a stunning, minimalist boho home decor aesthetic.
Designed as a structured dome with a wide, welcoming front entrance and a plush, contrast-colored removable inner cushion, this crochet project creates a secure sanctuary where your cat or kitten can rest peacefully. The thick, sturdy walls are worked by holding multiple strands of yarn together to form a stiff fabric that holds up beautifully over time, while the ultra-soft cream cushion provides an irresistible, cloud-like sleeping surface. Whether you are crafting this for your own pampered pet or making a thoughtful housewarming gift for a fellow cat lover, this step-by-step pattern is incredibly rewarding to make and even more satisfying to see in use.
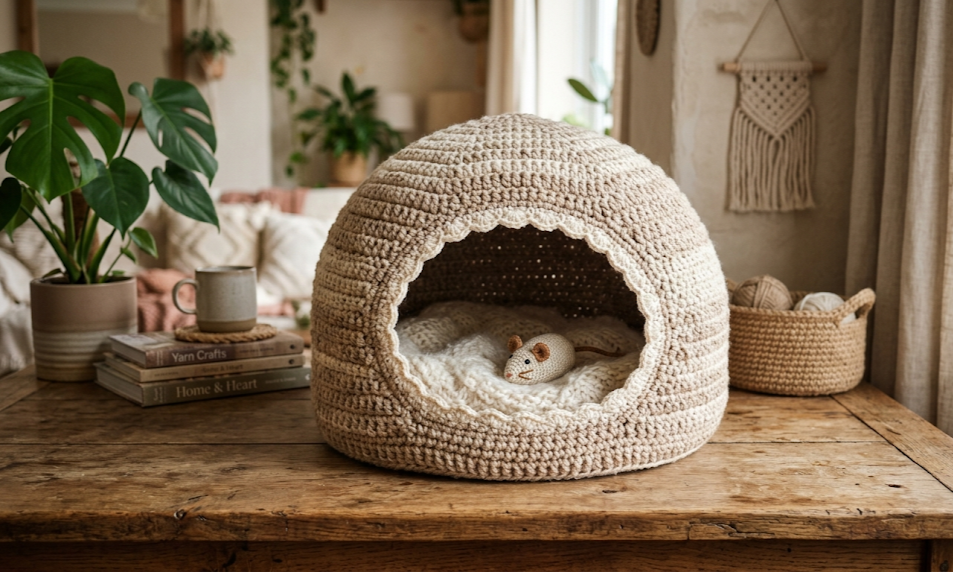
| Difficulty Intermediate | Time 4-6 Hours | Hook Size 9.0mm & 6.0mm | Yarn Weight Super Bulky / Bulky | Finished Size 40cm x 40cm x 35cm |
Gauge
To ensure your cat house holds its dome structure and matches the intended finished dimensions, checking your gauge is an essential step. The gauge for this project is measured using a 10cm x 10cm (4″ x 4″) square worked in single crochet stitches.
- Gauge Swatch Specification: 9 stitches and 10 rows = 10cm (4″) square using a 9.0mm hook and three strands of super bulky yarn held together.
- Hook Size Used: 9.0mm (US M/N) for the main cave body; 6.0mm (US J-10) for the internal cushion.
- Yarn Weight Used: Category 6 (Super Bulky) for the main cave body; Category 5 (Bulky) for the interior cushion.
If your swatch is too small, your stitches are too tight; try switching to a larger hook. If your swatch is too large, your stitches are too loose; switch to a smaller hook to guarantee the structural integrity of the cave walls.
Materials List
- Main Cave Body Yarn: Super Bulky Weight (Category 6); 600 meters / 656 yards of Beige or Heathered Brown. Note: This yarn is held triple throughout the entire main body to give the structure its necessary stiffness.
- Cushion Yarn: Bulky Weight (Category 5); 200 meters / 218 yards of Cream or Off-White. Note: This yarn is held double for a plush, firm finish.
- Crochet Hooks: 9.0mm (US M/N) and 6.0mm (US J-10).
- Notions:
- Large-eye yarn needle for weaving in ends.
- Stitch markers (essential for tracking rounds in continuous spirals).
- Measuring tape.
- High-density polyester fiberfill stuffing for the inner cushion (approximately 250 grams).
Abbreviations Table
| Abbreviation | Stitch / Technique Name |
| ch | Chain |
| st(s) | Stitch(es) |
| sc | Single Crochet |
| inc | Single Crochet Increase (2 sc into the same stitch) |
| dec | Invisible Single Crochet Decrease |
| sl st | Slip Stitch |
| MR | Magic Ring |
| BLO | Back Loop Only |
Pattern Instructions
Main Cave Body (Worked in Beige Yarn held TRIPLE with a 9.0mm Hook)
The main body is worked in continuous rounds. Do not join with a slip stitch at the end of each round; instead, place a stitch marker in the first stitch of each round and move it up as you progress.
Round 1: Begin by creating a Magic Ring (MR). A magic ring is an adjustable loop that allows you to pull the center of your circle completely closed, eliminating any holes. Work 6 sc into the MR. Pull the yarn tail tight to close the center hole. (6)
Round 2: Work 1 inc in each of the next 6 sts around. (12)
Round 3: Work 1 sc in the next st, then work 1 inc in the following st. Repeat from * to * a total of 6 times around. (18)
Round 4: Work 1 sc in each of the next 2 sts, then work 1 inc in the following st. Repeat from * to * a total of 6 times around. (24)
Round 5: Work 1 sc in each of the next 3 sts, then work 1 inc in the following st. Repeat from * to * a total of 6 times around. (30)
Round 6: Work 1 sc in each of the next 4 sts, then work 1 inc in the following st. Repeat from * to * a total of 6 times around. (36)
Round 7: Work 1 sc in each of the next 5 sts, then work 1 inc in the following st. Repeat from * to * a total of 6 times around. (42)
Round 8: Work 1 sc in each of the next 6 sts, then work 1 inc in the following st. Repeat from * to * a total of 6 times around. (48)
Round 9: Work 1 sc in each of the next 7 sts, then work 1 inc in the following st. Repeat from * to * a total of 6 times around. (54)
Round 10: Work 1 sc in each of the next 8 sts, then work 1 inc in the following st. Repeat from * to * a total of 6 times around. (60)
Round 11: Work 1 sc in each of the next 9 sts, then work 1 inc in the following st. Repeat from * to * a total of 6 times around. (66)
Round 12: Work 1 sc in each of the next 10 sts, then work 1 inc in the following st. Repeat from * to * a total of 6 times around. (72)
Round 13: Work this round entirely in the Back Loop Only (BLO). Working in the BLO means inserting your hook only under the strand of the stitch furthest away from you, which creates a clean decorative ridge and helps transition the flat base upward into a vertical wall. Work 1 sc in each of the 72 sts around. (72)
Rounds 14–22: Work 1 sc in each of the 72 sts around. (72)
We will now begin working in turned rows instead of continuous rounds to create the wide front opening of the cat house.
Row 23: Work 1 sc in each of the next 50 sts. Leave the remaining 22 stitches unworked. Ch 1, turn your work. (50)
Row 24: Work 1 sc in each of the 50 sts across. Ch 1, turn. (50)
Row 25: Work 1 sc in each of the 50 sts across. Ch 1, turn. (50)
Row 26 (Decrease Row): Work 1 dec over the first two stitches. An invisible single crochet decrease is worked by inserting the hook into the front loops only of the next two stitches, yarning over, pulling through both loops, yarning over again, and pulling through the remaining loops to cleanly merge two stitches into one. Work 1 sc in each of the next 46 sts, then work 1 dec over the final two stitches. Ch 1, turn. (48)
Row 27: Work 1 sc in each of the 48 sts across. Ch 1, turn. (48)
Row 28 (Decrease Row): Work 1 dec, work 1 sc in each of the next 44 sts, work 1 dec over the final two stitches. Ch 1, turn. (46)
Row 29: Work 1 sc in each of the 46 sts across. Ch 1, turn. (46)
Row 30 (Decrease Row): Work 1 dec, work 1 sc in each of the next 42 sts, work 1 dec over the final two stitches. Ch 1, turn. (44)
Rounds 31–34: Work 1 sc in each of the 44 sts across. Ch 1, turn. (44)
We will now rejoin the stitches to close the top of the front opening and resume working in continuous rounds to form the upper dome roof.
Round 35: Work 1 sc in each of the 44 sts across. When you reach the end of the row, instead of turning, chain 20 loosely. Slip stitch directly into the very first sc of the row to rejoin into a continuous round. Place your stitch marker here. (64)
Round 36: Work 1 sc in each of the 44 sc from the previous row, then work 1 sc into each of the 20 chains. (64)
Round 37: Work 1 sc in each of the 64 sts around. (64)
Round 38: Work 1 sc in each of the next 6 sts, then work 1 dec. Repeat from * to * a total of 8 times around. (56)
Round 39: Work 1 sc in each of the next 5 sts, then work 1 dec. Repeat from * to * a total of 8 times around. (48)
Round 40: Work 1 sc in each of the next 4 sts, then work 1 dec. Repeat from * to * a total of 8 times around. (40)
Round 41: Work 1 sc in each of the next 3 sts, then work 1 dec. Repeat from * to * a total of 8 times around. (32)
Round 42: Work 1 sc in each of the next 2 sts, then work 1 dec. Repeat from * to * a total of 8 times around. (24)
Round 43: Work 1 sc in the next st, then work 1 dec. Repeat from * to * a total of 8 times around. (16)
Round 44: Work 1 dec in each of the next 8 pairs of stitches around. (8)
Fasten off your yarn, leaving a 20cm (8″) tail. Thread the tail onto your yarn needle, weave it through the front loops of the remaining 8 stitches, pull firmly to draw the top of the dome closed, and securely knot the yarn on the inside of the cave before weaving in the loose ends.
Front Opening Ribbed Trim (Worked in Beige Yarn held TRIPLE with a 9.0mm Hook)
To reinforce the opening and ensure the entrance looks clean and structured, finish the rim with a single round of slip stitches.
Join the triple strand of beige yarn with a slip stitch at the bottom right corner of the front cave opening. Work slip stitches evenly up the raw edge of the rows, across the chain edge of Round 35, and down the opposite raw edge of the rows until you return to the starting stitch. Fasten off and weave in all loose yarn ends securely.
Internal Plush Cushion (Make 2 Matching Panels in Cream Yarn held DOUBLE with a 6.0mm Hook)
The internal cushion consists of two identical flat circular discs that are crocheted together and stuffed with fiberfill to provide a firm, supportive mattress.
Round 1: Begin with a Magic Ring (MR). Work 6 sc into the MR. Pull the yarn tail tight to close the center hole. (6)
Round 2: Work 1 inc in each of the next 6 sts around. (12)
Round 3: Work 1 sc in the next st, then work 1 inc in the following st. Repeat from * to * a total of 6 times around. (18)
Round 4: Work 1 sc in each of the next 2 sts, then work 1 inc in the following st. Repeat from * to * a total of 6 times around. (24)
Round 5: Work 1 sc in each of the next 3 sts, then work 1 inc in the following st. Repeat from * to * a total of 6 times around. (30)
Round 6: Work 1 sc in each of the next 4 sts, then work 1 inc in the following st. Repeat from * to * a total of 6 times around. (36)
Round 7: Work 1 sc in each of the next 5 sts, then work 1 inc in the following st. Repeat from * to * a total of 6 times around. (42)
Round 8: Work 1 sc in each of the next 6 sts, then work 1 inc in the following st. Repeat from * to * a total of 6 times around. (48)
Round 9: Work 1 sc in each of the next 7 sts, then work 1 inc in the following st. Repeat from * to * a total of 6 times around. (54)
Round 10: Work 1 sc in each of the next 8 sts, then work 1 inc in the following st. Repeat from * to * a total of 6 times around. (60)
Round 11: Work 1 sc in each of the next 9 sts, then work 1 inc in the following st. Repeat from * to * a total of 6 times around. (66)
Round 12: Work 1 sc in each of the next 10 sts, then work 1 inc in the following st. Repeat from * to * a total of 6 times around. (72)
For the first panel, fasten off and weave in the end. For the second panel, do not cut the yarn; leave it attached so you can immediately begin assembling the cushion.
Assembly Steps
- Cushion Assembly: Place the two cream circular cushion panels directly on top of each other, aligning the outer edge stitches perfectly.
- Using the yarn attached to the second panel and continuing with the 6.0mm hook, insert your hook through the matching outer stitches of both panels simultaneously and work single crochet stitches through both layers around the perimeter to join them.
- Stop crocheting when you have roughly 15 stitches remaining unjoined.
- Pack the polyester fiberfill stuffing evenly through this opening into the center of the cushion until it reaches a uniform thickness of approximately 5cm (2″). Do not overstuff; the cushion must remain flat and level so that it sits comfortably inside the base of the cave without tipping over.
- Continue working single crochet stitches across the remaining 15 stitches to trap the stuffing inside and seal the cushion completely closed. Join with a slip stitch to the first joining stitch, fasten off, and weave in the loose ends cleanly.
- Final Setup: Shape the main beige cave body with your hands, pushing the walls outward to open up the internal space. Gently slide the completed cream cushion through the front opening and press it flat against the inside floor. The cushion should fit snugly against the bottom ridge created by the BLO stitches of Round 13, sitting exactly 1cm below the bottom lip of the front entrance opening.
Beginner/Intermediate Tips
- Stitch Marker Discipline: Working with thick, multiple strands in a continuous spiral can make it difficult to identify the exact start of a round. Always place your stitch marker in the first stitch of the round and verify your stitch count at the end of each round to catch mistakes early.
- Managing Multi-Strand Tension: When holding three strands of super bulky yarn together, it is incredibly easy to accidentally drop one strand while drawing up a loop. Keep a relaxed, uniform grip on your yarn to ensure all three strands maintain identical tension, preventing loose loops from popping up on the surface of your work.
- Keeping the Dome Stiff: If you notice your cave walls are sagging or bowing inward before you insert the cushion, your tension might be a bit too loose. To remedy this, tighten your gauge or drop down to an 8.0mm hook for the walls. The stitches must be firm and compressed to support the overall weight of the dome roof.
Variations
- High-Contrast Border: Crochet the front opening ribbed trim using a contrasting bold color like charcoal grey or mustard yellow to make the entrance visually striking against the neutral beige base.
- Plush Velvet Interior: Substitute the bulky wool blend cushion yarn for a category 5 chenille or velvet blanket yarn to provide an extra soft, luxurious texture that cats will love to knead.
- Tassel Accent: Give the cat cave a whimsical boho update by attaching a large handmade yarn tassel or pom-pom to the peak of the top dome roof.
- Sizing Up for Larger Pets: If you have a larger cat breed like a Maine Coon, increase the flat base circle by adding two more increase rounds (following the established progression up to 84 stitches) before continuing up to the walls.


