The Best Fluffy Pancakes recipe you will fall in love with. Full of tips and tricks to help you make the best pancakes.
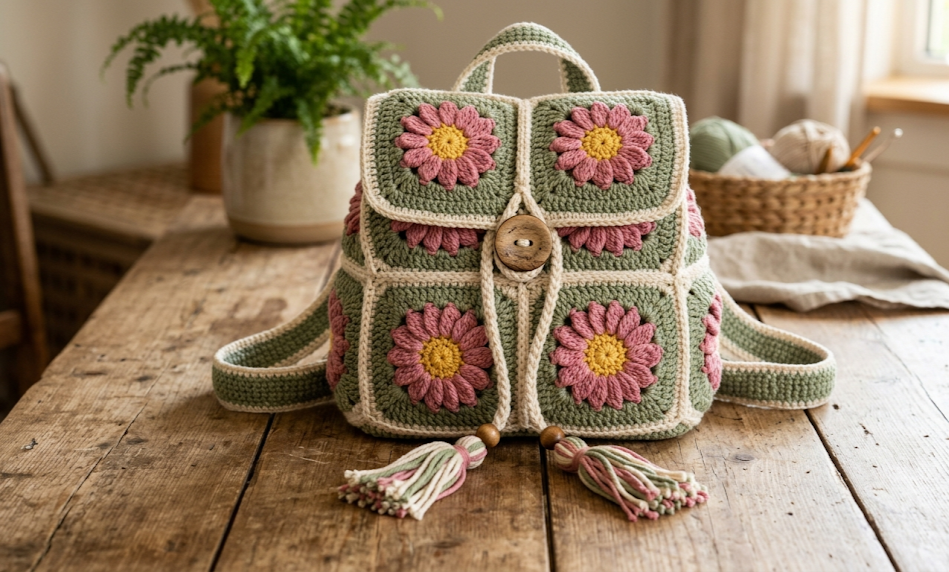
There’s something quietly magical about a handmade bag that goes everywhere with you — to the farmer’s market, a weekend picnic, a coffee shop, or a casual afternoon stroll. This Crochet Granny Square Daisy Backpack is exactly that kind of piece. Built from individual daisy-centered granny squares joined together in a rounded, structured body, this backpack combines the nostalgic charm of traditional granny squares with a modern, wearable silhouette.
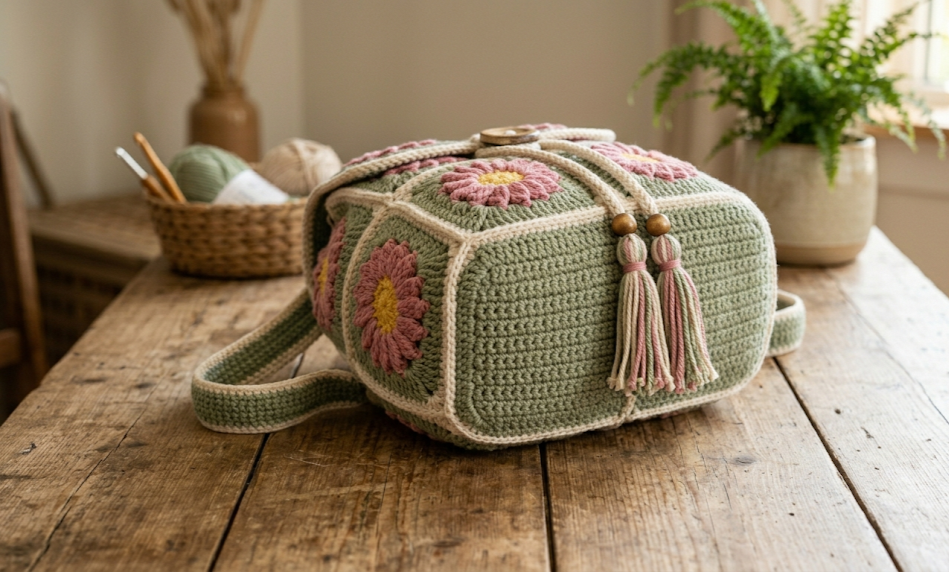
The colorway here — sage green as the body with cream borders, soft yellow flower centers, and dusty pink petal accents — gives it an unmistakably boho, cottagecore feel. A large wooden button closure at the top flap, cream drawstring tassels at the front, and long adjustable straps complete the look. It’s the kind of bag that looks intricate and time-consuming, but once you understand the granny square construction, it comes together one motif at a time.
This pattern is designed for intermediate crocheters comfortable with working in the round, joining granny squares, and surface-level finishing. If you’ve made a few granny squares before, you already have the core skill. Everything else — the rounded base, the structured flap, the strap construction — is explained step by step below.
|
Difficulty
Intermediate
|
Time
15–20 Hours
|
Hook Size
4.0mm
|
Yarn Weight
DK / #3
|
Finished Size
30 × 35 cm
|
Gauge
18 sc × 20 rows = 10 cm (4 inches) square
Hook: 4.0mm
Yarn Weight: DK / Light Worsted (#3)
Taking time to check your gauge before starting is especially important for this bag, because consistent square sizing is what makes the joining clean and even. Crochet a 12 cm swatch in single crochet and measure the center 10 cm. Adjust hook size up or down as needed.
Materials List
Yarn:
- Sage green DK yarn — approx. 500g (main body color)
- Cream / off-white DK yarn — approx. 150g (borders, straps, flap edging)
- Dusty pink DK yarn — approx. 80g (daisy petal rounds)
- Soft yellow DK yarn — approx. 50g (daisy centers)
Hook: 4.0mm crochet hook
Notions:
- 1 large wooden button (approx. 3–4 cm diameter)
- Yarn needle for weaving in ends and joining squares
- Scissors
- Stitch markers (at least 4)
- 2 D-rings or rectangular rings (optional, for adjustable straps)
- Pins for blocking and assembly
- Small piece of stiff interfacing or plastic canvas (optional, for base structure)
Abbreviations
| Abbreviation | Meaning |
|---|---|
| ch | chain |
| sl st | slip stitch |
| sc | single crochet |
| hdc | half double crochet |
| dc | double crochet |
| tr | treble crochet |
| MR | magic ring |
| sp | space |
| sk | skip |
| rep | repeat |
| pm | place marker |
| BLO | back loop only |
| st(s) | stitch(es) |
| RS | right side |
| WS | wrong side |
| [ ] | repeat instructions within brackets |
Technique notes:
- Magic ring (MR): Form a loop with the yarn tail, insert hook, draw up a loop, and work the required stitches into the ring before pulling the tail end to close the center hole tightly.
- BLO (back loop only): Insert your hook into the back loop only of each stitch — the loop farthest from you — creating a subtle ridge on the fabric.
- Joining as you go (JAYG): When joining granny squares, replace the final ch-2 corner of one square with a sl st into the corresponding ch-2 corner of the adjacent square, creating a seamless flat join.
Pattern Instructions
PART 1: DAISY GRANNY SQUARE (Make 20 total)
Each square measures approximately 10 cm × 10 cm after completion.
Round 1 (Yellow — Daisy Center):
MR, ch 3 (counts as first dc), 11 dc into MR, sl st to top of ch-3 to join, pull ring closed. (12 dc)
Round 2 (Cream — Petals):
Ch 1, [sc in next dc, ch 3, tr in same dc, ch 3, sc in same dc] rep in each dc around, sl st to first sc. (12 petal units)
Round 3 (Dusty Pink — Petal Accents):
Working behind the petals of Round 2: sl st into the back loop of each dc from Round 1, ch 4, sl st into next back loop of Round 1 dc, rep around. (12 ch-4 arches behind petals)
Round 4 (Sage Green — First Square Round):
Join sage green in any petal tip space. Ch 3, 2 dc in same sp, [ch 2, 3 dc in next petal tip, ch 1, 3 dc in next petal tip] 3 times, ch 2, 3 dc in next petal tip, ch 1, sl st to top of ch-3. (4 corners with ch-2 sp, 4 sides with ch-1 sp; 24 dc)
Round 5 (Sage Green — Second Square Round):
Sl st into ch-2 corner sp. Ch 3, [2 dc, ch 2, 3 dc] in same corner sp, ch 1, 3 dc in ch-1 sp, ch 1, [3 dc, ch 2, 3 dc] in next corner sp, rep from * to * 3 more times, ch 1, 3 dc in ch-1 sp, ch 1, sl st to top of ch-3. (4 corners with ch-2 sp, 8 ch-1 sp groups; 36 dc)
Round 6 (Cream — Border):
Join cream in any corner ch-2 sp. Ch 1, [3 sc in corner sp, sc in each dc and 1 sc in each ch-1 sp across to next corner] rep around, sl st to first sc. Fasten off. (approx. 44 sc total)
Weave in all ends. Block each square lightly to 10 cm × 10 cm.
PART 2: JOINING THE SQUARES — BAG BODY PANELS
The bag body is constructed in two panels (front and back), each 4 squares wide × 2 squares tall = 8 squares per panel, plus additional squares for the sides.
Front Panel: Arrange 4 squares in a 2×2 grid with 2 plain sage green granny squares (no daisy) on the bottom row. Join using the flat JAYG method: when completing Round 6 of each new square, replace the ch-2 corner with sl st into the corresponding corner of the adjacent joined square, and replace each ch-1 sp with sl st into the corresponding side chain sp. The flat join sits on the WS.
Back Panel: Repeat the same arrangement as the front panel.
Side Panels: Using sage green yarn, join 2 single squares on each side between front and back panels. These form the gusset depth of approximately 10 cm on each side.
PART 3: BAG BASE
Row 1: With sage green and 4.0mm hook, ch 32. Sc in 2nd ch from hook and each ch across. (31 sc)
Rows 2–18: Ch 1, turn. Sc in each sc across. (31 sc)
The finished base should measure approximately 31 cm × 18 cm. Sc evenly around the entire perimeter of the base, placing 3 sc in each corner to turn. Fasten off.
PART 4: FRONT POCKET
Row 1: With sage green, ch 22. Sc in 2nd ch from hook and each ch across. (21 sc)
Rows 2–14: Ch 1, turn. Sc in each sc across. (21 sc)
Pocket Top Edging: Join cream yarn. Ch 1, sc across top edge, working 1 sc in each st. Fasten off.
Set aside. The pocket will be sewn to the lower center front of the bag during assembly.
PART 5: FLAP
The flap is worked in the round to create a semicircle shape, then edged with cream scallop trim.
Round 1: With sage green, MR, ch 3, 11 dc into ring, sl st to ch-3. (12 dc)
Round 2: Ch 3, dc in same st, 2 dc in each dc around, sl st to ch-3. (24 dc)
Round 3: Ch 3, dc in same st, dc in next dc, [2 dc in next dc, dc in next dc] rep around, sl st to ch-3. (36 dc)
Round 4: Ch 3, dc in same st, dc in next 2 dc, [2 dc in next dc, dc in next 2 dc] rep around, sl st to ch-3. (48 dc)
Round 5: Ch 3, dc in same st, dc in next 3 dc, [2 dc in next dc, dc in next 3 dc] rep around, sl st to ch-3. (60 dc)
Round 6: Ch 1, sc in each dc around lower half of circle only (30 sts), stopping at the flat straight edge. Do not join. Turn and work back across the straight top edge in sc. (Approx. 60 sc perimeter of semicircle)
Flap Scallop Edging (Cream):
Join cream at one corner of the straight top edge. Ch 1. Along the curved edge: [sc in next sc, sk 1, 5 dc in next sc, sk 1] rep across curved edge, ending with sl st. Fasten off.
Flap Daisy Square: Sew 1 completed Daisy Granny Square centered onto the RS of the flap.
PART 6: STRAPS (Make 2)
With cream yarn and 4.0mm hook, ch 7.
Row 1: Sc in 2nd ch from hook and each ch across. (6 sc)
Rows 2 onward: Ch 1, turn. Sc BLO in each sc across. (6 sc)
Continue until strap measures 55 cm (or desired length). Fasten off. Repeat for second strap.
PART 7: DRAWSTRING TASSELS (Make 2)
With cream yarn, ch 90 (or approximately 45 cm). Sl st in each ch back to start. Fasten off, leaving a 20 cm tail.
For each tassel head: wrap sage green yarn around a 6 cm piece of cardboard 20 times. Slide off, tie tightly at the top, and fold in half. Bind tightly 1 cm below the fold. Attach to end of each drawstring chain.
Assembly Steps
- Block all pieces. Lightly steam or wet block all joined panels and the flap to their finished measurements before assembling.
- Attach front pocket. Center the pocket on the lower half of the front panel, approximately 2 cm up from the bottom edge. Pin in place. Whipstitch the bottom and both sides of the pocket to the front panel using sage green yarn. Leave the top open.
- Join front and back to base. Pin the front panel to one long edge of the base (31 cm side). Sc panels together through both layers using sage green yarn. Repeat for the back panel on the opposite long side.
- Attach side panels. Pin one side square panel to each short side of the base (18 cm sides) and sc through both layers to join. Then sc up the side edges of the front and back panels to the side squares, closing the bag body fully. The bag should now be a fully closed pouch, open only at the top.
- Attach the flap. Align the straight top edge of the flap with the top back edge of the bag. Whipstitch securely across the full width (approx. 30 cm) using sage green yarn.
- Attach the button. Sew the wooden button to the center front of the bag, approximately 3 cm down from the top edge. The drawstring tassels loop over the button as the closure.
- Thread drawstring. Thread one drawstring chain through the front of the bag just below the flap, in and out through the joining spaces of the granny squares at the top row, exiting at center front with both tassels hanging 12–15 cm.
- Attach straps. Fold the top 4 cm of each strap under and sew securely to the top back corners of the bag, approximately 4 cm in from each side edge. If using D-rings for adjustability, thread the strap end through the ring, fold, and stitch back. The straps should hang evenly and rest comfortably over the shoulders.
- Optional base reinforcement. Cut a piece of stiff plastic canvas to 29 cm × 16 cm and slip it inside the base of the bag before closing to help the bag hold its shape when worn.
- Weave in all remaining ends and trim.
Beginner & Intermediate Tips
- Tension consistency across squares is everything. If some squares are even slightly different in size, the joins will pucker or gap. Work all squares in one sitting if possible, or note your tension and match it each session.
- Block every square before joining. Even a light spritz of water and gentle pinning to size makes a dramatic difference in how cleanly the squares join.
- Use JAYG for a professional finish. If you prefer seaming, a flat whipstitch seam through the back loops only of the border sc stitches gives the neatest result.
- Petal rounds can be fiddly. On Round 2, work each tr firmly so the petals fan outward and sit flat rather than curling inward. If they curl, try going up half a hook size for this round only.
- Strap thickness matters. Six stitches wide in sc BLO gives a firm, non-stretchy strap. If you want a wider strap, simply start with ch 9 or ch 11.
- The wooden button needs to be secured firmly. Because it handles daily stress from the drawstring, sew it through at least 4 holes (or 8 stitches if a shank button) using a doubled strand of thread or thin yarn.

Variations
- Sunflower Colorway: Swap dusty pink for burnt orange and yellow centers for deep gold. Use a brown main body color for a rich autumn sunflower version perfect for fall.
- Mini Backpack Version: Work the granny squares at half scale (5 cm each) using fingering weight yarn and a 2.5mm hook. The finished bag will measure approximately 18 cm × 20 cm — perfect for children or as an evening bag.
- Monochrome Tonal: Work the entire bag — including daisy centers, petals, and border — in varying shades of the same color family (three shades of sage or cream) for a sophisticated, tonal boho look.
- Granny Square Tote Conversion: Use the same daisy square pattern but omit the rounded base and straps. Instead, join squares in a 4×4 flat panel for front and back, seam on three sides, and add long cream handles. A versatile market tote version of the same design.
- Holiday Edition: Use deep red as the main body, white daisy petals, and gold centers for a Christmas-themed version, or try lavender body with white petals and lilac centers for an Easter or spring gift.
If you make this Crochet Granny Square Daisy Backpack, save this pattern to your Pinterest boards so you can find it again — and share your finished bag! Tag your photos with #FoodieRippleCrochet to be featured in our crochet community.


