The Best Fluffy Pancakes recipe you will fall in love with. Full of tips and tricks to help you make the best pancakes.
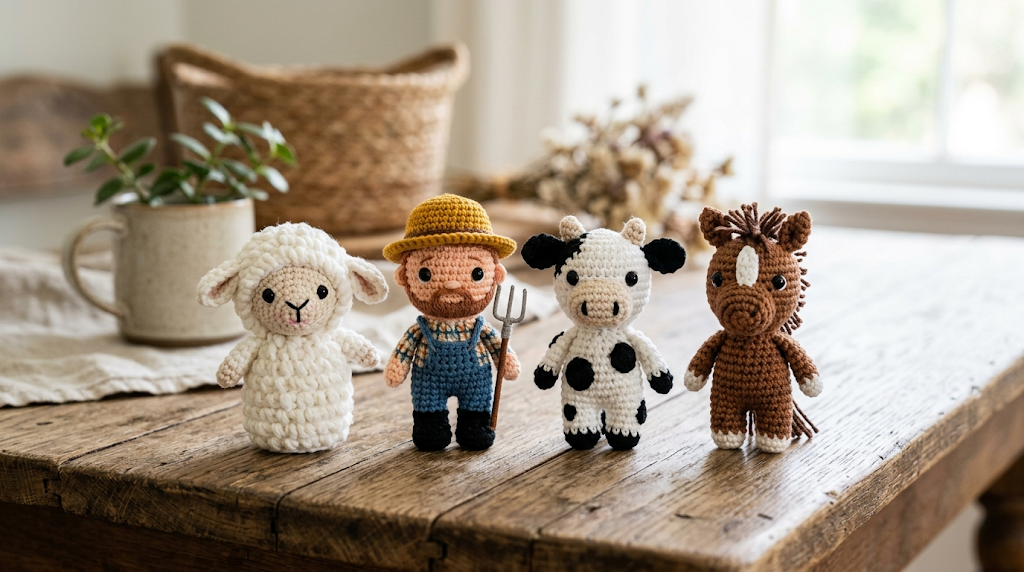
If there is one crochet project that delivers enormous joy for the amount of yarn it consumes, it is a set of farm finger puppets. Tiny, expressive, and endlessly entertaining for children, these four adorable characters — a fluffy white sheep, a cheerful farmer, a black-and-white cow, and a chestnut brown horse — slide onto fingertips and instantly transform story time, playtime, or a farmyard-themed gift into something truly special.
Each puppet measures approximately 6 to 7 centimeters tall and fits snugly on an adult finger or a child’s hand. Made from fingering weight yarn with a small 2.5mm hook, they work up quickly and use only small amounts of yarn in each color, making this the ideal stash-busting project. The set is perfect for intermediate crocheters who are comfortable with working in continuous rounds, magic rings, and basic color changes. Beginners with some amigurumi experience will also find this achievable with a little patience.
Whether these puppets are destined for a gift bag, a classroom puppet theater, a nursery decoration, or simply a rainy afternoon project, this free crochet pattern walks through every single puppet from body to ears to embroidered face details, with complete stitch counts on every round so nothing is left to guesswork.
|
Difficulty
Intermediate
|
Time
6–8 Hours
|
Hook Size
2.5mm
|
Yarn Weight
Fingering (Wt 1)
|
Finished Size
6–7 cm tall
|
Gauge
28 single crochet × 30 rows = 10 cm × 10 cm
Hook size: 2.5mm
Yarn weight: Fingering / Sock weight (Weight 1)
Before beginning, crochet a small gauge swatch in single crochet worked in continuous rounds. Adjust hook size up or down as needed. Gauge affects the finished size of each puppet — a looser gauge will produce a larger puppet that may not fit snugly on a finger.
Materials List
Yarn (Fingering Weight / Weight 1):
- White — approx. 15g (sheep body, cow body base)
- Cream / Off-white — approx. 8g (farmer face, cow snout, horse muzzle)
- Mustard Yellow — approx. 8g (farmer hat)
- Cobalt Blue — approx. 8g (farmer overalls)
- Peach / Skin tone — approx. 6g (farmer face and hands)
- Black — approx. 4g (sheep face, cow spots, eye embroidery)
- Brown / Chestnut — approx. 15g (horse body)
- Dark Brown — approx. 3g (horse mane details)
- Pink — approx. 2g (sheep cheek blush, cow nose accents)
Notions:
- 2.5mm crochet hook
- 3mm black safety eyes — 8 pairs (2 per puppet)
- Polyester fiberfill stuffing — small amount per puppet
- Yarn needle (tapestry needle)
- Scissors
- Stitch markers
- Pins for assembly
- Optional: black embroidery floss for mouth/nose details
Abbreviations
| Abbreviation | Meaning |
|---|---|
| MR | Magic ring |
| ch | Chain |
| sl st | Slip stitch |
| sc | Single crochet |
| inc | Increase (2 sc in same stitch) |
| dec | Invisible decrease (insert hook through front loops of next 2 sts, yarn over, pull through, yarn over, pull through 2 loops) |
| BLO | Back loop only |
| FLO | Front loop only |
| st(s) | Stitch(es) |
| rnd | Round |
| rep | Repeat |
| [ ] × | Repeat instructions in brackets the stated number of times |
Pattern Instructions
IMPORTANT NOTES BEFORE YOU BEGIN:
- All puppets are worked in continuous rounds unless otherwise stated. Do not join at the end of each round unless specified. Use a stitch marker to track the beginning of each round.
- Magic ring: Pull the yarn tail into a loop, insert hook through the loop, pull up a loop of working yarn, and chain 1 to secure. Work stated stitches into the ring, then pull the tail to close.
- Invisible decrease: Insert hook through the front loop only of the next stitch, then through the front loop only of the stitch after that, yarn over, pull through both loops, yarn over, pull through remaining 2 loops. This creates a nearly invisible decrease and is used throughout.
PUPPET BASE BODY TUBE (Same for all 4 puppets — work in the body color)
Rnd 1: MR, 6 sc into ring. Pull tail to close. (6)
Rnd 2: [inc] × 6. (12)
Rnd 3: [sc 1, inc] × 6. (18)
Rnd 4: [sc 2, inc] × 6. (24)
Rnds 5–14: sc in each st around. (24) — 10 rounds even
Rnd 15: [sc 2, dec] × 6. (18)
Rnd 16: sc in each st around. (18)
Do not fasten off. The top opening remains open to fit over the finger. Lightly stuff the bottom 1.5 cm of the body only — too much stuffing will prevent the puppet from fitting on a finger.
PUPPET 1: SHEEP
Body: Work Base Body Tube in white yarn. On Rnd 4 onward, you may work BLO on alternating rounds to create a subtle textured “fleece” effect. BLO (back loop only): Insert hook into the back loop only of each stitch rather than through both loops — this creates a raised ridge on the fabric.
Head:
Rnd 1: MR, 6 sc in black yarn. (6)
Rnd 2: [inc] × 6. (12)
Rnd 3: [sc 1, inc] × 6. (18)
Rnd 4: sc in each st around. (18)
Rnd 5: [sc 1, inc] × 6 in white yarn, changing color at the last stitch of this round. (24) — Color change: work the last yarn over of the final stitch in the new color.
Rnds 6–8: sc in each st around in white. (24)
Rnd 9: [sc 2, dec] × 6. (18)
Insert safety eyes between Rnds 5–6, approximately 5 stitches apart. Lightly stuff head.
Rnd 10: [sc 1, dec] × 6. (12)
Rnd 11: [dec] × 6. (6)
Fasten off, close remaining gap with yarn needle.
Ears (make 2, in white):
Rnd 1: MR, 4 sc. (4)
Rnd 2: [inc] × 4. (8)
Rnd 3: sc in each st around. (8)
Sl st to close. Flatten and fasten off, leaving tail for sewing.
Assembly — Sheep:
- Attach head to top of body tube, centered, sewing through all layers with yarn needle. The head should sit approximately 0.5 cm above the top edge of the body tube opening.
- Sew ears to sides of head at Rnd 6, approximately 3 stitches apart from each eye.
- Using pink yarn, embroider two small “U” shapes on the face for cheeks, positioned below the eyes.
- Using black yarn or embroidery floss, embroider a tiny “V” shape for the nose/mouth between the eyes and cheeks.
PUPPET 2: FARMER
Body — Overalls:
Work Base Body Tube in cobalt blue yarn, Rnds 1–16.
Bib / Chest Detail:
Using blue yarn, ch 5. Row 1: sc in 2nd ch from hook and across. (4) Fasten off, sew onto front of body centered at Rnd 10–12.
Head (in peach/skin tone):
Rnd 1: MR, 6 sc. (6)
Rnd 2: [inc] × 6. (12)
Rnd 3: [sc 1, inc] × 6. (18)
Rnd 4: [sc 2, inc] × 6. (24)
Rnds 5–7: sc in each st around. (24)
Rnd 8: [sc 2, dec] × 6. (18)
Insert safety eyes between Rnds 5–6, 6 stitches apart. Stuff head firmly.
Rnd 9: [sc 1, dec] × 6. (12)
Rnd 10: [dec] × 6. (6)
Fasten off and close.
Hat (in mustard yellow):
Brim — ch 24, join with sl st to form ring.
Rnd 1: sc in each ch around. (24)
Rnd 2 (BLO): sc in each st around. (24)
Rnd 3: [sc 2, dec] × 6. (18)
Rnd 4: [sc 1, dec] × 6. (12)
Rnd 5: [dec] × 6. (6)
Sl st to close top. Fasten off.
Assembly — Farmer:
- Sew head to top of body tube, centered.
- Place hat on head, brim sitting at approximately Rnd 3 of the head. Sew in place around the brim edge.
- Embroider a small “U” smile in black below the eyes.
- Optional: using brown or dark yarn, add 3–4 straight stitches above each eye for eyebrows.
PUPPET 3: COW
Body: Work Base Body Tube in white yarn.
Spots: Using black yarn and yarn needle, embroider 2–3 irregular oval shapes onto the front and side of the body after completion (approximately at Rnds 6–10). Alternatively, sc color changes can be used during body construction by carrying the contrast yarn loosely on the inside.
Head (in white):
Work same as Sheep Head, but do NOT work the black lower face section — work entirely in white.
Snout (in cream):
Rnd 1: MR, 6 sc. (6)
Rnd 2: [inc] × 6. (12)
Rnd 3: sc in each st around. (12)
Sl st to close, fasten off leaving tail.
Ears (make 2 — outer in white, inner in pink):
White outer: MR, 6 sc. [inc] × 6. (12) Flatten, fasten off.
Pink inner: MR, 4 sc. [inc] × 4. (8) Fasten off.
Sew pink inner piece on top of white outer piece, then sew combined ear to head.
Assembly — Cow:
- Sew head to top of body.
- Attach snout to lower center of face (below safety eyes), centered at Rnds 4–6 of head.
- Embroider two small nostrils on the snout using black yarn — two straight vertical stitches approximately 3 stitches apart.
- Sew ears to sides of head at Rnd 5–6.
- Using black yarn, embroider spots on the body if not already worked in during construction.
PUPPET 4: HORSE
Body: Work Base Body Tube in brown/chestnut yarn.
Head (in brown):
Work same as Farmer Head structure but in brown yarn, Rnds 1–10.
Muzzle (in cream):
Rnd 1: MR, 6 sc. (6)
Rnd 2: [inc] × 6. (12)
Rnd 3: sc in each st around. (12)
Flatten and fasten off.
Ears (make 2, in brown):
Rnd 1: MR, 4 sc. (4)
Rnd 2: [inc] × 4. (8)
Rnd 3: sc in each st around. (8)
Sl st, fasten off leaving tail.
Mane:
Cut 6–8 lengths of dark brown yarn approximately 4 cm each. Using a crochet hook, pull each strand through the top center of the head (from Rnd 1 outward) to create a simple fringe mane. Trim evenly to approximately 1.5 cm length.
Assembly — Horse:
- Sew head to top of body tube.
- Attach muzzle/snout to lower center of face.
- Embroider nostrils and a small mouth line with black yarn.
- Sew ears to top of head approximately 4 stitches apart.
- Attach mane pieces along the top center seam of the head.
Assembly Steps — Full Set
- Complete all four puppet bodies and heads before beginning final assembly — this allows for consistent sizing.
- Each head attaches to the body by sewing around the full circumference of the neck join. Use matching yarn and a tapestry needle, sewing through both layers, approximately 8–10 stitches around the join. The head should be level and centered, sitting 0.3–0.5 cm above the top rim of the body tube.
- All safety eyes should be inserted and secured before stuffing and closing the head.
- Each puppet should be stuffed only in the lower closed portion of the body (approximately the bottom 1.5 cm), leaving the upper tube fully hollow to fit over a finger.
- If giving as a gift set, blocking each puppet lightly with a damp cloth and allowing to air dry will give a neater, more professional finish.
- Store or display the set together — a small piece of felt or a miniature barn box makes a charming packaging option.
Beginner and Intermediate Tips
Working with fingering weight yarn: Use the smallest hook that lets you work comfortably without the stitches being too stiff. A very tight tension is actually beneficial for amigurumi — it prevents stuffing from showing through.
Magic ring tension: After completing Round 1 and pulling the ring closed, tug the tail firmly and hold it against the work while crocheting Round 2. This prevents the center from loosening over time.
Safety eyes on small pieces: Mark eye placement with pins or a removable stitch marker before committing to the safety eye position. On a head this small, one stitch in the wrong direction makes a visible difference.
Color changes: When switching colors mid-round (e.g., the sheep’s face), work the last yarn over of the last stitch before the color change in the new color. Carry the unused yarn loosely inside the work for up to 4–5 stitches, or fasten off and rejoin cleanly for longer stretches.
Keeping puppets consistent: Work all four bodies together round by round if possible — this ensures they come out the same height and diameter. Lay them side by side after each round to compare.
Embroidery on small faces: Thread the yarn needle and bring the thread up from the base of the head. Work all face details with one continuous strand where possible to avoid too many ends to weave in. Use back stitch for clean mouth and eyebrow lines.
Variations
- Woodland Animal Set: Replace the farm characters with a fox (orange), a bunny (light grey), a bear (tan), and an owl (brown and cream). The base body tube pattern remains identical — only colors and facial features change.
- Nativity Scene Set: Work the same puppet structure in traditional colors — cream, gold, and deep blue — to create a set of nativity finger puppets. Add a star motif embroidered on the front of one puppet’s robe.
- Ocean Friends Set: A clownfish (orange and white), a whale (blue), a crab (red), and an octopus (purple with added tentacle fringe at the base) make a marine-themed variation using the same tube base.
- Oversized Story Puppets: Scale up by using DK weight yarn and a 3.5mm hook to create larger puppets sized for toddler hands. The stitch count stays the same — the gauge change handles the size increase.
- Seasonal Versions: Work the farmer puppet in a Santa Claus colorway (red body, white brim hat) for a Christmas version, or make a bunny in pastel yellow and lavender for an Easter set.
Pinterest CTA
These farm finger puppets are too sweet not to save! Whether you are making them for a child’s birthday, a classroom gift, or just because tiny crocheted animals are absolutely irresistible, this free pattern has everything you need. Save this pin so you can find it whenever your yarn stash needs a fun small project — and share your finished puppets using #FoodieRippleCrochet so the whole community can see your farm come to life.


