The Best Fluffy Pancakes recipe you will fall in love with. Full of tips and tricks to help you make the best pancakes.
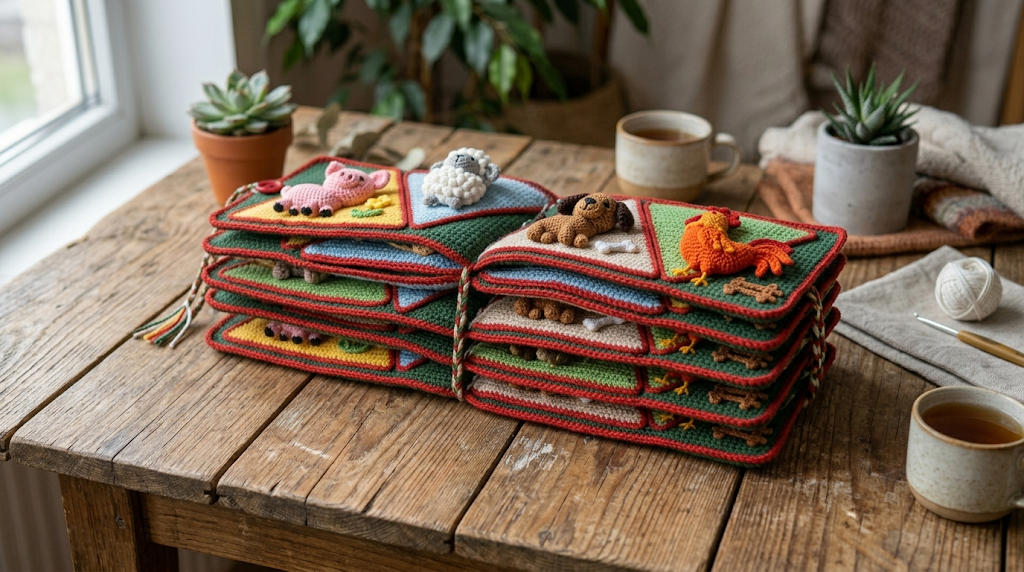
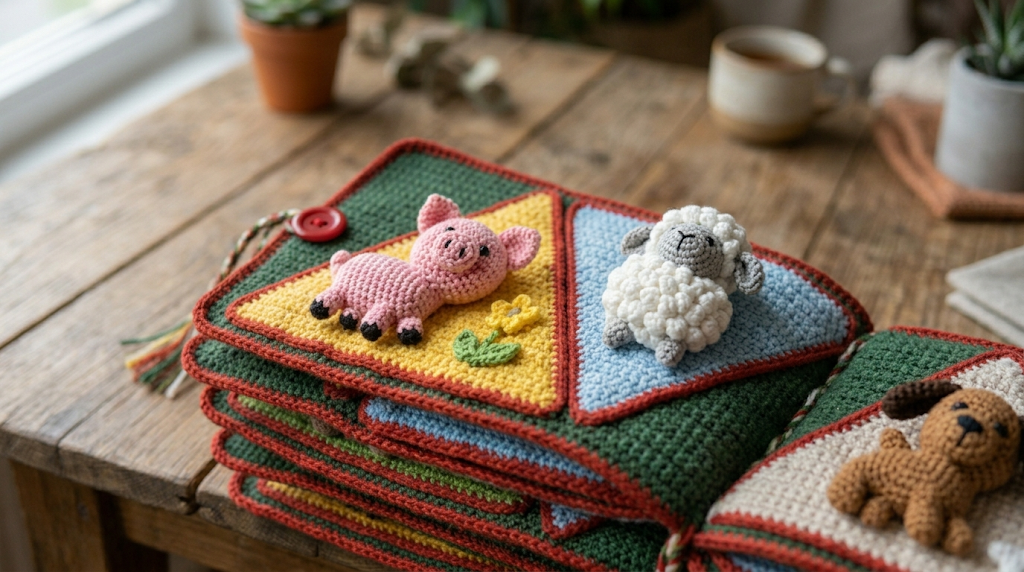
There is something truly magical about giving a child a toy that invites their imagination to roam freely — and a crochet quiet book does exactly that. This Farm Animals Crochet Quiet Book is a soft, yarn-crafted activity book featuring a rotating cast of miniature amigurumi farm animals, each nestled into its own triangular page. A tiny pink pig, a fluffy white sheep, a proud rooster, a loyal dog, a sunny yellow flower, and a bone are all crocheted in fine sport-weight yarn and attached to or stored within the pages of this charming green book. It opens flat into a starburst of triangular panels, each bordered in cheerful red, with pockets that hold little animals in place.
This pattern is ideal for intermediate to advanced crocheters who enjoy detailed amigurumi work and love creating heirloom-quality gifts. It makes a perfect baby shower present, birthday gift for toddlers, or travel toy for quiet car rides and waiting rooms. Every page is interactive, every animal is removable, and every stitch is made with love.

|
Difficulty
Advanced
|
Time
25–35 Hours
|
Hook Size
2.5 mm
|
Yarn Weight
Sport / DK #3
|
Finished Size
30 × 30 cm (open)
|
Gauge
To ensure your finished book pages match the intended size, always begin with a gauge swatch.
Gauge: 24 single crochet × 26 rows = 10 cm × 10 cm
Hook: 2.5 mm
Yarn Weight: Sport / DK Weight (#3)
Work a 15 cm × 15 cm swatch in single crochet, wash and block it, then measure the center 10 cm × 10 cm. Adjust hook size up if your gauge is too tight or down if too loose.
Materials List
Yarn (Sport / DK Weight #3):
- Forest green — 200 g (book pages and base)
- Red — 50 g (border trim)
- Pink — 30 g (pig body)
- White/cream — 30 g (sheep body, bone)
- Gray — 20 g (dog body)
- Orange-red — 20 g (rooster body)
- Yellow — 15 g (flower)
- Brown — 10 g (rooster wattle, animal faces)
- Black — small amount (eyes, nostrils)
Notions:
- 2.5 mm crochet hook
- 3 mm crochet hook (for joining and border)
- Polyfill stuffing
- Safety eyes: 6 mm × 14 pairs
- Stitch markers
- Yarn needle
- Scissors
- Thin cardboard or plastic canvas (optional, for page stiffening — cut to triangular page shape)
- Non-toxic fabric glue (optional, for securing cardboard inserts)
- Sewing pins
Abbreviations
| Abbreviation | Meaning |
|---|---|
| ch | chain |
| sl st | slip stitch |
| sc | single crochet |
| hdc | half double crochet |
| dc | double crochet |
| inc | increase (2 sc in same stitch) |
| dec | invisible decrease (insert hook through front loops of next 2 sts, yarn over, pull through both, yarn over, pull through 2 loops) |
| BLO | back loop only (work through the back loop of the stitch only) |
| FLO | front loop only (work through the front loop of the stitch only) |
| MR | magic ring (an adjustable loop that closes tightly with no center hole) |
| st(s) | stitch(es) |
| rnd | round |
| RS | right side |
| WS | wrong side |
| sk | skip |
| sp | space |
Pattern Instructions
This pattern is divided into seven parts: the Book Base, the Triangular Pages, and five Animals (Pig, Sheep, Dog, Rooster, and Flower + Bone accessories).
PART 1: BOOK BASE (Hexagon Center)
The hexagon base is the central hub from which all triangular pages radiate. It is worked in joined rounds.
With forest green yarn and 2.5 mm hook:
Rnd 1: MR, 6 sc into ring, sl st to join. (6)
(Magic ring: wrap yarn twice around your fingers, insert hook through the loop, pull up a loop, ch 1, then work 6 sc into the ring before pulling the tail to close.)
Rnd 2: Ch 1, 2 sc in each st around, sl st to join. (12)
Rnd 3: Ch 1, [sc in next st, 2 sc in next st] × 6, sl st to join. (18)
Rnd 4: Ch 1, [sc in next 2 sts, 2 sc in next st] × 6, sl st to join. (24)
Rnd 5: Ch 1, [sc in next 3 sts, 2 sc in next st] × 6, sl st to join. (30)
Rnd 6: Ch 1, [sc in next 4 sts, 2 sc in next st] × 6, sl st to join. (36)
Rnd 7: Ch 1, [sc in next 5 sts, 2 sc in next st] × 6, sl st to join. (42)
Rnd 8: Ch 1, [sc in next 6 sts, 2 sc in next st] × 6, sl st to join. (48)
Fasten off, leaving a long tail for attaching pages.
PART 2: TRIANGULAR PAGES (Make 6)
Each triangular page is worked flat, beginning with a chain and decreasing on both sides to form a triangle.
With forest green yarn and 2.5 mm hook:
Foundation: Ch 31.
Row 1 (RS): Sc in 2nd ch from hook and in each ch across. Turn. (30)
Row 2: Ch 1, sc in each st across. Turn. (30)
Row 3: Ch 1, dec, sc to last 2 sts, dec. Turn. (28)
Row 4: Ch 1, sc in each st across. Turn. (28)
Row 5: Ch 1, dec, sc to last 2 sts, dec. Turn. (26)
Row 6: Ch 1, sc in each st across. Turn. (26)
Continue in this pattern — decrease row, even row — until 2 sts remain.
Final row: Dec. (1) Fasten off.
Red Border: Using red yarn and 3 mm hook, work 1 rnd of sc evenly around all edges of each triangle, working 3 sc in each corner point. Sl st to join. Fasten off.
(Optional: Cut thin cardboard to match the triangle shape and insert before closing the border if you want stiffer pages.)
PART 3: PIG AMIGURUMI
Body (make 1):
With pink yarn and 2.5 mm hook:
Rnd 1: MR, 6 sc. (6)
Rnd 2: 2 sc in each st. (12)
Rnd 3: [Sc, inc] × 6. (18)
Rnd 4: [Sc in 2, inc] × 6. (24)
Rnd 5: [Sc in 3, inc] × 6. (30)
Rnds 6–10: Sc in each st. (30)
Rnd 11: [Sc in 3, dec] × 6. (24)
Stuff firmly.
Rnd 12: [Sc in 2, dec] × 6. (18)
Rnd 13: [Sc, dec] × 6. (12)
Rnd 14: [Dec] × 6. (6)
Fasten off, close opening.
Head (make 1):
Rnds 1–4: Same as body through Rnd 4. (24)
Rnds 5–7: Sc in each st. (24)
Rnd 8: [Sc in 2, dec] × 6. (18)
Stuff.
Rnd 9: [Sc, dec] × 6. (12)
Rnd 10: [Dec] × 6. (6)
Fasten off.
Snout (make 1):
Rnd 1: MR, 6 sc. (6)
Rnd 2: 2 sc in each st. (12)
Rnd 3: Sc in each st. (12)
Fasten off.
Ears (make 2):
Rnd 1: MR, 6 sc. (6)
Rnd 2: [Sc, inc] × 3. (9)
Rnd 3: Sc in each st. (9)
Fold flat and sl st across top. Fasten off.
Legs (make 4):
Rnd 1: MR, 6 sc. (6)
Rnd 2: 2 sc in each st. (12)
Rnds 3–5: Sc in each st. (12)
Stuff lightly. Fasten off.
Tail: With pink yarn, ch 12, sc back along chain tightly to create a curl. Fasten off.
Attach safety eyes between Rnds 5–6 of head, approx. 5 sts apart. Sew snout centered on face, embroider nostrils. Sew ears to top of head. Attach head to body. Sew legs to underside. Attach tail.
PART 4: SHEEP AMIGURUMI
Body (make 1) — worked in BLO from Rnd 3 onward to create fluffy texture:
(BLO: Insert hook only into the back loop of each stitch. The unworked front loops create a ridged, textured surface that mimics wool.)
With white yarn and 2.5 mm hook:
Rnd 1: MR, 6 sc. (6)
Rnd 2: 2 sc in each st. (12)
Rnd 3: [Sc, inc] × 6, working in BLO. (18)
Rnd 4: [Sc in 2, inc] × 6, BLO. (24)
Rnd 5: [Sc in 3, inc] × 6, BLO. (30)
Rnds 6–9: Sc in each st, BLO. (30)
Rnd 10: [Sc in 3, dec] × 6, BLO. (24)
Stuff.
Rnd 11: [Sc in 2, dec] × 6. (18)
Rnd 12: [Sc, dec] × 6. (12)
Rnd 13: [Dec] × 6. (6)
Fasten off, close.
Head (make 1):
With cream yarn:
Rnds 1–3 same as pig head. (18)
Rnds 4–5: Sc in each st. (18)
Rnd 6: [Sc, dec] × 6. (12)
Stuff. Rnd 7: [Dec] × 6. (6)
Fasten off.
Ears (make 2):
With cream yarn:
Rnd 1: MR, 5 sc. (5)
Rnd 2: [Sc, inc] × 2, sc. (7)
Fold and sl st to close. Fasten off.
Legs (make 4):
With black yarn:
Rnds 1–2 as pig legs. (12)
Change to cream, Rnds 3–4: Sc in each st. (12)
Fasten off.
Assemble as for pig. Attach safety eyes between Rnds 3–4 of head.
PART 5: DOG AMIGURUMI
With gray yarn, follow the same body and head construction as the pig (Parts 3 body + head), using gray yarn throughout.
Ears (make 2):
Rnd 1: MR, 6 sc. (6)
Rnd 2: 2 sc in each st. (12)
Rnd 3: Hdc in each st. (12)
Do not stuff. Fold flat and sew to top sides of head.
Snout: Same as pig snout in gray. Embroider nose with black yarn.
Tail: Ch 15, sc back along chain. Fasten off. Attach to back.
PART 6: ROOSTER AMIGURUMI
With orange-red yarn, follow the same body construction as the pig.
Beak (make 1):
With yellow yarn: MR, 4 sc. (4)
Rnd 2: 2 sc in each st. (8)
Fasten off. Sew flat to face.
Wattle (make 1):
With red yarn: Ch 4, sc in 2nd ch from hook, sc, sl st. Fasten off. Sew below beak.
Comb (make 1):
With red yarn: Ch 6, [sc in 2nd ch from hook, ch 2, sl st into same ch] × 3. Fasten off. Sew to top of head.
Wings (make 2):
With orange-red yarn:
Rnd 1: MR, 6 sc. (6)
Rnd 2: [Sc, inc] × 3. (9)
Row 3: Working flat, sc 9. (9)
Fasten off. Sew to sides of body.
Attach safety eyes. Assemble.
PART 7: ACCESSORIES
Yellow Flower:
With yellow yarn:
Center: MR, 6 sc. (6)
Petals: [Ch 4, sc in 2nd ch from hook, sc, hdc, sl st back into center ring] × 6. (6 petals)
Fasten off. Add button or French knot center in brown.
Bone:
With white yarn:
Rnd 1: MR, 4 sc. (4)
Rnd 2: 2 sc in each st. (8) — this is one knob end
Work a 3 cm i-cord: Sc 4 for 10 rows. (4)
Work second knob: 2 sc in each of 4 sts. (8)
Rnd: [Dec] × 4. (4)
Sl st and fasten off. Stuff lightly.
Assembly Steps
- Lay out the 6 triangular pages and the hexagon base. Evenly space pages around the base so each triangle base aligns with one side of the hexagon (approx. 60° apart).
- Using forest green yarn and a yarn needle, whipstitch the base edge of each triangle (the longest side, approx. 12.5 cm) firmly to one edge of the hexagon.
- Join adjacent triangles along their long sides using red yarn and a sl st seam, leaving the outer pointed edge open on each page for pocket function — or sew closed if you prefer flat pages.
- Attach the pig to its designated page by sewing through its belly and tacking it down with 4–6 anchor stitches, or leave removable by sewing a small snap or velcro dot (approx. 1 cm) to the page and the animal’s belly.
- Repeat for all animals — sheep, dog, rooster — spacing them one per page.
- Tack the flower accessory to its page. Sew the bone to its page or insert into a pocket seam.
- For the teal/blue pocket page (visible in photo): before joining, fold the triangle in half horizontally and sc along the two side edges, leaving the top open. This creates a pocket approx. 7 cm deep.
- If adding cardboard stiffeners, cut triangles to approx. 0.5 cm smaller than each page and slip inside before final seaming.
- To create a closing feature: sew a button to the outer edge of one triangle, and crochet a small ch-loop button closure on the opposite triangle.
Beginner and Intermediate Tips
- Magic ring tension: Pull the starting tail firmly before beginning Rnd 2 to eliminate any center gap. A gap in amigurumi work allows stuffing to show through.
- Stitch markers are essential when working the hexagon base — mark the first stitch of every round to avoid accidentally spiraling.
- BLO rows on the sheep: Work slowly. BLO stitches are tighter than standard stitches, which is intentional — it creates the bunched, wool-like ridges.
- Safety eyes must go in before closing the head. Decide on placement early: try pinning pieces of yarn where you’d like the eyes to check positioning before committing.
- Invisible decrease vs. standard decrease: The invisible decrease creates a smoother, less bumpy surface on your amigurumi. Always use it for visible decrease rounds.
- Stuffing: Use polyfill generously but not to the point of distorting the shape. Amigurumi should feel firm but not stretched.
- Joining triangular pages: Use stitch markers to pin each triangle to the hexagon before sewing. Rushing this step causes uneven page spacing.
- Cardboard stiffeners make the book more satisfying to “open” and give it structure, but they can be omitted for younger children to keep the book fully soft and washable.
Variations
- Ocean Animals Edition: Swap the farm animals for a crab, starfish, clownfish, and seahorse in bright coral, blue, and yellow. Use teal yarn for the book base.
- Jungle Theme: Replace the pages with animals like a lion, elephant, giraffe, and monkey on a bright orange book base with brown trim.
- Miniature Version: Work at half scale using fingering weight yarn and a 1.5 mm hook. The finished book folds to approx. 7 cm × 7 cm — perfect as a keyring toy.
- Advent Calendar Book: Make 24 triangular pages and arrange them in a long strip. Sew tiny pockets on each page and tuck in a small crocheted treat or toy per day.
- Personalized Baby Gift: Embroider the baby’s name along the spine edge of the hexagon center using chain stitch in a contrasting color, and choose animals based on the nursery theme.
Love this pattern? Save it to your Pinterest boards so you can find it again later! Tag your finished quiet book with #FoodieRippleCrochet — we would love to see your little one playing with their yarn farm friends.


