The Best Fluffy Pancakes recipe you will fall in love with. Full of tips and tricks to help you make the best pancakes.
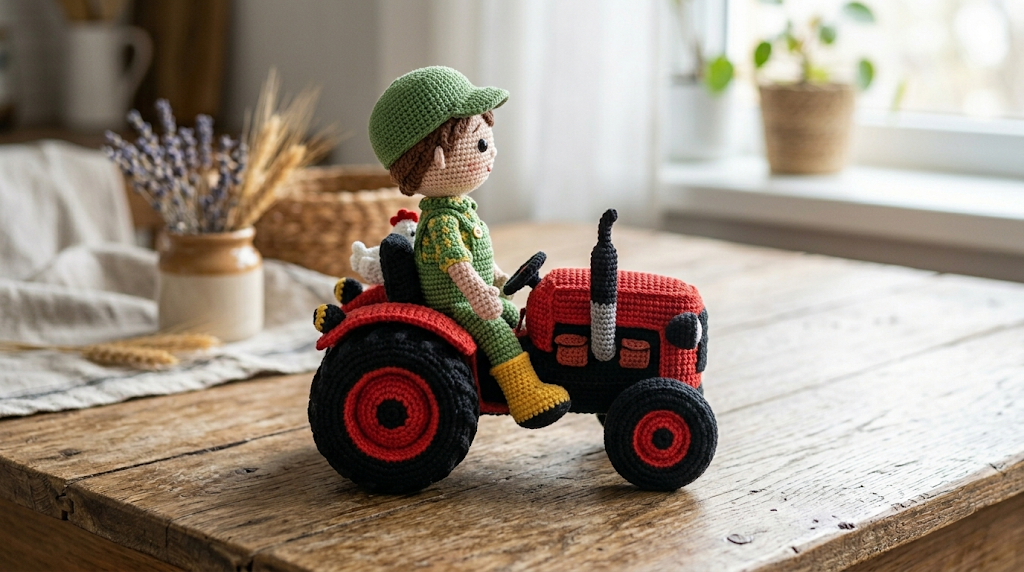
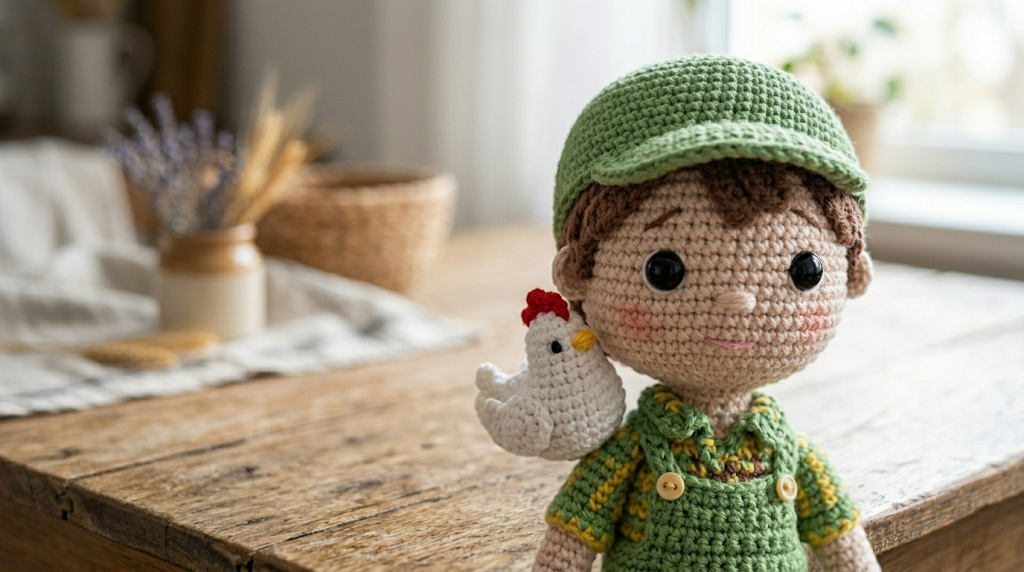
If you have ever dreamed of a crochet project that stops people in their tracks, this farmer boy and tractor amigurumi set is exactly that. A cheerful farmer doll in his green cap and overalls, a bright red tractor with chunky black wheels, and a tiny white chicken companion — all crocheted in fine yarn with precise detail. This advanced amigurumi pattern is ideal for experienced crocheters who love a multi-part project with real character. Whether you are making it as a gift for a child, a decoration for a nursery, or simply for the joy of crafting something extraordinary, this pattern walks you through every single stitch.
The finished set includes four separate crocheted pieces: the farmer boy (including head, body, arms, legs, cap, and boots), the chicken, and the tractor (body, seat, four wheels, and exhaust pipe). Assembly is detailed and satisfying, with each piece fitting together to create a scene that looks like it belongs in a handcrafted toy shop.

|
Difficulty
Advanced
|
Time
15–20 Hours
|
Hook Size
2.5 mm
|
Yarn Weight
Sport / Fine (2)
|
Finished Size
18 cm tall / 20 cm wide
|
Gauge
26 sc × 28 rows = 10 cm (4 inches) in single crochet
Hook: 2.5 mm
Yarn Weight: Sport / Fine (weight 2)
Always make a gauge swatch before starting. Amigurumi pieces must be crocheted tightly to prevent stuffing from showing through. If your gauge is looser, go down a hook size.
Materials List
Yarn (Sport Weight / Fine, weight 2):
- Beige / skin tone — approx. 30 g
- Green (medium) — approx. 35 g (cap, shirt, overalls)
- Dark red — approx. 50 g (tractor body, seat)
- Black — approx. 30 g (tractor wheels, tires, details)
- White — approx. 20 g (chicken body)
- Yellow — approx. 15 g (boots, beak, chicken feet)
- Light gray — approx. 10 g (tractor wheel hubs, exhaust pipe)
- Red (small amount) — for chicken comb
Notions:
- 2.5 mm crochet hook
- Black safety eyes: 8 mm (farmer, ×2), 6 mm (chicken, ×2)
- Polyester fiberfill stuffing
- Yarn needle
- Stitch markers
- Scissors
- Wire (optional, for tractor exhaust pipe stability) — floral wire or pipe cleaner, approx. 8 cm
Abbreviations
| Abbreviation | Meaning |
|---|---|
| MR | Magic ring (adjustable loop) |
| ch | Chain |
| sc | Single crochet |
| inc | Increase (2 sc in same stitch) |
| dec | Invisible decrease (insert hook through front loops of next 2 sts, pull through, complete sc) |
| sl st | Slip stitch |
| BLO | Back loop only |
| FLO | Front loop only |
| st(s) | Stitch(es) |
| rep | Repeat |
| pm | Place marker |
| FO | Fasten off |
| WS | Wrong side |
Technique Notes (first use):
- Magic ring (MR): Make a loop with yarn, insert hook, pull up a loop, and chain 1 before working stitches into the ring. Pull tail to close.
- Invisible decrease (dec): Insert hook through front loop only of next stitch, then front loop only of the following stitch, yarn over and pull through both loops, yarn over and pull through remaining 2 loops. This creates a nearly invisible join.
- BLO: Work into back loop only of each stitch, leaving front loop free. Creates a visible ridge.
Pattern Instructions
PART 1 — FARMER HEAD
Work in continuous rounds. Place stitch marker at beginning of each round.
- Rnd 1: MR, 6 sc into ring. (6)
- Rnd 2: Inc in each st. (12)
- Rnd 3: Sc 1, inc × 6. (18)
- Rnd 4: Sc 2, inc × 6. (24)
- Rnd 5: Sc 3, inc × 6. (30)
- Rnd 6: Sc 4, inc × 6. (36)
- Rnd 7: Sc 5, inc × 6. (42)
- Rnd 8–14: Sc in each st. (42) [7 rounds]
- Rnd 15: Sc 5, dec × 6. (36)
- Rnd 16: Sc 4, dec × 6. (30)
Attach safety eyes between Rnd 10 and 11, approximately 10 sts apart.
- Rnd 17: Sc 3, dec × 6. (24)
- Rnd 18: Sc 2, dec × 6. (18)
Stuff firmly with fiberfill.
- Rnd 19: Sc 1, dec × 6. (12)
- Rnd 20: Dec × 6. (6)
FO, close opening with yarn needle.
PART 2 — FARMER BODY
Use green yarn.
- Rnd 1: MR, 6 sc. (6)
- Rnd 2: Inc × 6. (12)
- Rnd 3: Sc 1, inc × 6. (18)
- Rnd 4: Sc 2, inc × 6. (24)
- Rnd 5–12: Sc in each st. (24) [8 rounds]
- Rnd 13: Sc 2, dec × 6. (18)
- Rnd 14–15: Sc in each st. (18) [2 rounds]
Stuff lightly. FO, leave a tail for attaching to head.
PART 3 — LEGS (make 2)
Use green yarn for upper leg, yellow for boot.
- Rnd 1: MR, 6 sc. (6)
- Rnd 2: Inc × 6. (12)
- Rnd 3–4: Sc in each st. (12)
Switch to yellow yarn.
- Rnd 5: BLO sc in each st. (12)
- Rnd 6–8: Sc in each st. (12)
FO first leg without cutting. Continue to second leg. Join both legs: ch 3, connect to first leg, continue working around both legs and chain. (30)
- Rnd 1 joined: Sc around entire joined row. (30)
- Rnd 2–4: Sc in each st. (30)
This forms the lower body/hip. Continue into body section above.
PART 4 — ARMS (make 2)
Use beige for hand, green for sleeve.
- Rnd 1: MR, 6 sc. (6)
- Rnd 2: Inc × 6. (12)
- Rnd 3–4: Sc in each st. (12)
Switch to green.
- Rnd 5–10: Sc in each st. (12)
FO, leave a long tail for sewing. Stuff lightly.
PART 5 — GREEN CAP
- Rnd 1: MR, 6 sc. (6)
- Rnd 2: Inc × 6. (12)
- Rnd 3: Sc 1, inc × 6. (18)
- Rnd 4: Sc 2, inc × 6. (24)
- Rnd 5: Sc 3, inc × 6. (30)
- Rnd 6–8: Sc in each st. (30)
- Rnd 9 (brim): In FLO, sc 2, inc × 10. (40)
FO, leave tail for sewing onto head.
PART 6 — CHICKEN BODY
Use white yarn.
- Rnd 1: MR, 6 sc. (6)
- Rnd 2: Inc × 6. (12)
- Rnd 3: Sc 1, inc × 6. (18)
- Rnd 4–7: Sc in each st. (18)
- Rnd 8: Sc 1, dec × 6. (12)
Attach 6 mm safety eyes between Rnd 5 and 6, 6 sts apart. Stuff.
- Rnd 9: Dec × 6. (6)
FO and close.
Chicken beak: With yellow yarn, ch 3, sl st in 2nd ch from hook, sl st in next. FO. Sew to front of head between eyes.
Chicken comb: With red yarn, ch 4, sl st back along chain to make tiny comb. Sew to top of head.
Chicken wings (make 2): With white, ch 5, turn, sc in each ch. (4) Ch 1, turn, sc in each. FO. Sew to sides of body.
Chicken feet: With yellow yarn, make a small 3-pronged shape by chaining 3 three times from a central sl st. Sew to base of body.
PART 7 — TRACTOR BODY
Use dark red yarn.
- Rnd 1: MR, 6 sc. (6)
- Rnd 2: Inc × 6. (12)
- Rnd 3: Sc 1, inc × 6. (18)
- Rnd 4: Sc 2, inc × 6. (24)
- Rnd 5: Sc 3, inc × 6. (30)
- Rnd 6: Sc 4, inc × 6. (36)
- Rnd 7–18: Sc in each st. (36) [12 rounds]
At round 10, begin shaping hood area: work 6 additional sc into front 6 sts each round to build up engine hood. This creates the raised hood typical of tractor amigurumi.
- Engine hood top (separate flat piece): Ch 10, turn, sc across, ch 1, sc across for 6 rows. FO. Sew on top of hood section.
Stuff tractor body firmly before closing. FO and leave a long tail.
PART 8 — TRACTOR SEAT
Use dark red yarn.
- Rnd 1: MR, 6 sc. (6)
- Rnd 2: Inc × 6. (12)
- Rnd 3: Sc 1, inc × 6. (18)
- Rnd 4–6: Sc in each st. (18)
FO. Stuff slightly. Sew to top rear of tractor body.
PART 9 — WHEELS (make 4)
Use black for tire, gray for hub.
Tire (flat circle):
- Rnd 1: MR, 8 sc. (8)
- Rnd 2: Inc × 8. (16)
- Rnd 3: Sc 1, inc × 8. (24)
- Rnd 4: Sc 2, inc × 8. (32)
Make two flat circles per wheel. Join by sc-ing around edges together, stuffing lightly to give volume.
Hub (gray, make 4):
- Rnd 1: MR, 6 sc. (6)
- Rnd 2: Inc × 6. (12)
- Rnd 3: Sc in each st. (12)
FO. Sew hub onto center of each assembled wheel.
Back wheels are larger — add two additional increase rounds (Rnd 5: sc 3, inc × 8 = 40, Rnd 6: sc 4, inc × 8 = 48) before joining.
PART 10 — EXHAUST PIPE
Use gray yarn. Optional: insert a 8 cm pipe cleaner or floral wire inside before closing.
- Foundation: Ch 3, join with sl st to form a ring.
- Rnd 1–12: Sc in each st. (3) [12 rounds, working in a very tight spiral]
FO. If using wire: fold one end of pipe cleaner, slide into tube before fastening off, leaving 1–1.5 cm exposed at the bottom for insertion into tractor body.
Assembly Steps
- Attach head to body: Pin farmer head to top of body. The neck join should sit approx. 1 cm into the top of the body. Sew securely around the full circumference.
- Attach legs to body: Sew leg assembly to base of body, centered. The legs should extend approx. 6 cm below the body base.
- Attach arms: Sew arms to sides of body at shoulder level (approx. 1 cm below head join), angled slightly forward so they can rest on tractor handlebars.
- Sew cap onto head: Place cap over top of head, aligning brim at approximately Rnd 8 of the head. Sew all the way around.
- Assemble tractor: Attach front wheels to lower front sides of tractor body, approx. 2 cm from front edge. Attach rear (larger) wheels to lower rear sides, approx. 2 cm from back edge. Wheels should be flush against the body surface.
- Attach exhaust pipe: Insert the exposed wire end (or yarn tail) of the exhaust pipe 1.5 cm into the top-front of the tractor hood. Secure by sewing around the base.
- Seat placement: Sew tractor seat to the rear-top of the tractor body, centered, approx. 3 cm from back edge.
- Position farmer on tractor: Sit the assembled farmer doll on the tractor seat. The legs should drape to the sides. Tack in place with a few invisible stitches through the leg base into the seat surface.
- Place chicken: Sit the chicken on the tractor beside the farmer (to his right, on the hood area). Tack with 2–3 stitches to secure in position.
- Final check: Verify all safety eyes are locked, all pieces are firmly stuffed, and no yarn tails are visible. Weave in all ends.
Beginner/Intermediate Tips
Tight tension is essential. Amigurumi crocheted too loosely will show the stuffing through the stitches. When in doubt, go down half a hook size.
Use a stitch marker religiously. With multiple pieces worked in continuous rounds, it is easy to lose your place. Move the stitch marker up at the beginning of every round.
Stuff as you go. For pieces like the tractor body, begin stuffing before the opening becomes too small to reach inside comfortably.
The invisible decrease keeps surfaces smooth. Regular decreases create a bump on the right side of the fabric. Always use the invisible decrease technique (through front loops only) on any visible surface.
Joining the legs is the trickiest step. When you connect both legs with a chain to create the hip/body, count stitches carefully. It is worth marking the join point and doing a test count before continuing.
Safety eyes must be set early. Attach all safety eyes before final stuffing and closing — they cannot be inserted after the opening is closed.
Color changes for the tractor. When switching between red and black, carry the unused color along the inside for short sections, or cut and rejoin cleanly. Weave in ends well so they do not loosen with handling.
Variations
- Female farmer version: Swap the green cap for a braided yellow yarn ponytail and add a small crochet apron in a floral color over the green body to create a farmgirl character.
- Harvest scene display: Crochet a tiny bale of hay in beige yarn (a simple stuffed oval) and a miniature pumpkin in orange to arrange beside the tractor as a seasonal display piece.
- Mini version: Using 1.5 mm hook and fingering weight yarn, scale the entire set down to roughly half size for a decorative ornament or keychain.
- Holiday tractor: Work the tractor body in dark green with red wheel hubs and a tiny crocheted gift box in the tractor bucket for a Christmas version.
- Personalized farmer: Stitch initials onto the farmer’s overalls using a contrasting yarn color and a tapestry needle for a personalized gift touch.
Save this pattern to your Pinterest boards so you can come back to it any time! Share your finished farmer and tractor using #FoodieRippleCrochet — we would love to see your version of this adorable set.


