The Best Fluffy Pancakes recipe you will fall in love with. Full of tips and tricks to help you make the best pancakes.
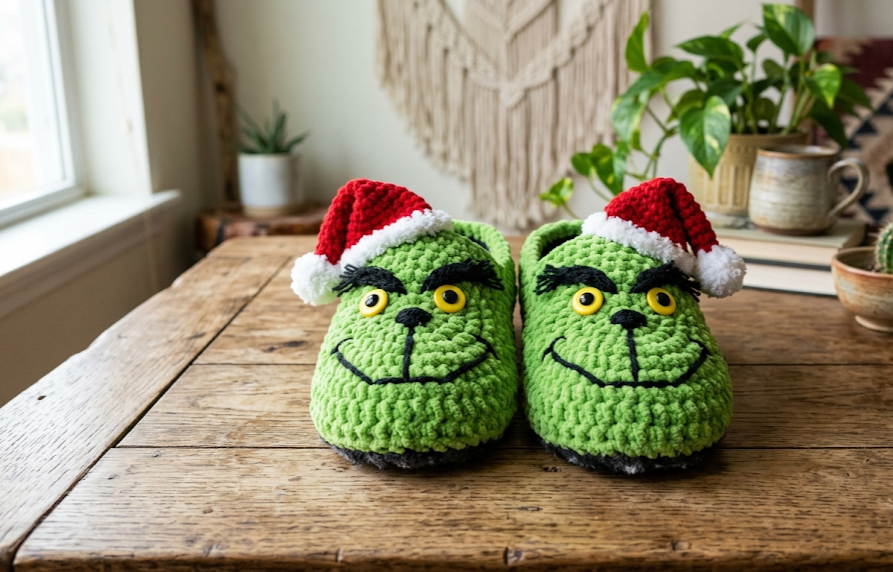
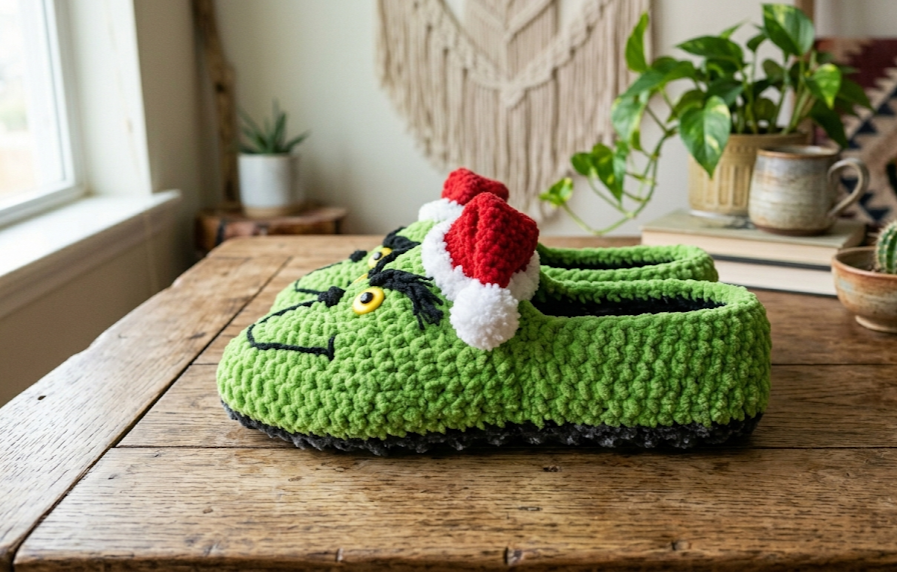
Every holiday season deserves a touch of mischief, and nothing delivers that quite like a pair of handmade crochet Grinch slippers. These cozy, character-packed slippers feature the iconic green grumpy face complete with arched eyebrows, yellow eyes, a stitched scowl, and a tiny red Santa hat perched on top. Whether they’re a gift for the self-proclaimed Grinch in your life or a hilarious addition to your own holiday loungewear rotation, these slippers are guaranteed to steal the show — and maybe a heart or two.
Made with chunky chenille yarn, these slippers work up with surprising speed and have a beautifully soft finish that makes them just as comfortable as they are expressive. The construction is approachable for an intermediate crocheter: you’ll work the slipper base and upper in joined rounds, then add the face details as surface embroidery and small crocheted appliqués. The result is a pair of character slippers that look impressively detailed but are completely achievable in a single weekend.
This pattern is written for adult sizing (approximately US Women’s 7–10 / Men’s 6–9) and produces slippers with a finished length of about 26–28 cm (10–11 inches). Read through the full pattern before starting to familiarize yourself with the construction method.
|
Difficulty
Intermediate
|
Time
6–8 Hours
|
Hook Size
5.0 mm
|
Yarn Weight
Bulky (#5–6)
|
Finished Size
26–28 cm (Adult)
|
Gauge
14 sc × 16 rows = 10 cm (4 inches) worked in single crochet with a 5.0 mm hook and bulky chenille yarn.
Gauge is especially important for slippers to ensure proper fit. Make a gauge swatch before beginning: chain 16, work single crochet across for 17 rows, then measure the center 10 cm square. Adjust hook size up or down as needed to match gauge.
- Hook Size Used: 5.0 mm (US H/8 to J/10, depending on yarn brand)
- Yarn Weight: Bulky / Super Bulky (#5–#6), chenille or velvet texture
Materials List
Yarn:
- Color A – Bright Green chenille/velvet yarn: approximately 150 g (1.5 skeins of a standard 100 g bulky chenille)
- Color B – Red chenille or worsted yarn: approximately 30 g
- Color C – White chenille or worsted yarn: approximately 20 g
- Color D – Black yarn or embroidery floss: small amount for face details
- Color E – Yellow yarn or felt: small amount for eyes
Hook:
- 5.0 mm crochet hook (primary)
- 3.5 mm crochet hook (for Santa hat detail and small appliqués)
Notions:
- Stitch markers
- Yarn needle (tapestry needle)
- Scissors
- Two pairs of 18 mm or 20 mm yellow safety eyes (optional — can substitute embroidery)
- Black embroidery floss or black yarn (for eyebrows and mouth)
- Non-slip fabric paint or non-slip sole pads (optional but recommended for wearable slippers)
- Poly-fil stuffing (small amount, optional for hat tip)
Abbreviations
| Abbreviation | Meaning |
|---|---|
| ch | chain |
| sc | single crochet |
| hdc | half double crochet |
| dc | double crochet |
| sl st | slip stitch |
| inc | increase — 2 sc in the same stitch |
| dec | invisible decrease — insert hook in front loop of next 2 sts, yarn over, pull through both, yarn over, pull through 2 loops |
| MR | magic ring — adjustable loop start |
| BLO | back loop only — work through the back loop of the stitch only |
| FLO | front loop only — work through the front loop of the stitch only |
| sk | skip |
| pm | place marker |
| RS | right side |
| WS | wrong side |
| rep | repeat |
| rem | remaining |
| st(s) | stitch(es) |
Invisible Decrease (dec): Insert your hook through the front loop only of the next stitch, then through the front loop only of the stitch after that, yarn over and pull through both loops, yarn over and pull through the remaining 2 loops on hook. This creates a tidier, less visible decrease than a standard sc2tog.
Magic Ring (MR): Create a loop with the yarn tail, insert the hook through the loop, draw up the working yarn, and work your first round of stitches into this loop. Pull the yarn tail to close the ring before slip-stitching to join.
Pattern Instructions
PART 1: SLIPPER SOLE
The sole is worked in a modified oval foundation, building length first and then adding rounds around the perimeter.
Foundation: Using Color A and 5.0 mm hook, ch 16.
Round 1: Starting in the 2nd ch from hook: sc 14, work 3 sc in the last ch (turning the corner), now work back along the other side of the chain: sc 13, inc in the first ch. Join with sl st to first sc. (32 sts)
Second side of chain note: After reaching the end of the chain, you rotate your work and crochet back along the underside (the “bottom” bumps) of the foundation chain. This creates the oval shape.
Round 2: ch 1, inc, sc 13, inc, inc, sc 13, inc. Join with sl st. (36 sts)
Round 3: ch 1, sc 1, inc, sc 13, inc, sc 1, inc, sc 1, inc, sc 13, inc, sc 1. Join with sl st. (42 sts)
Round 4: ch 1, sc 2, inc, sc 13, inc, sc 2, inc, sc 2, inc, sc 13, inc, sc 2. Join with sl st. (48 sts)
Round 5: ch 1, sc around, working 3 sc in each of the 4 corner increase spots. Join with sl st. (56 sts)
Fasten off, leave a tail for seaming if needed. This is the sole. Set aside.
PART 2: SLIPPER UPPER
The upper is worked in the round directly on top of the sole, starting at the heel end.
Round 1 (Attach at heel): Join Color A to the heel end of the sole with sl st. ch 1, sc around entire sole edge. Join. (56 sts)
Round 2: ch 1, sc around. Join. (56 sts)
Round 3: ch 1, sc around. Join. (56 sts)
Round 4 (Begin toe shaping): ch 1, sc 38, dec, sc 2, dec, sc 12. Join. (54 sts)
Round 5: ch 1, sc 37, dec, sc 2, dec, sc 11. Join. (52 sts)
Round 6: ch 1, sc 36, dec, sc 2, dec, sc 10. Join. (50 sts)
Round 7: ch 1, sc 35, dec, sc 2, dec, sc 9. Join. (48 sts)
Round 8: ch 1, sc 34, [dec] 4 times, sc 8. Join. (44 sts)
Round 9: ch 1, sc 32, [dec] 4 times, sc 6. Join. (40 sts)
Round 10: ch 1, sc 30, [dec] 4 times, sc 4. Join. (36 sts)
Round 11: ch 1, sc 28, [dec] 4 times, sc 2. Join. (32 sts)
Fasten off, leaving a 30 cm tail to close the toe gap if needed. Use a yarn needle to weave the tail through remaining sts and pull tight to close. Weave in ends.
PART 3: SLIPPER CUFF
Round 1: Join Color A to the top opening of the slipper (heel edge). ch 1, sc around opening. Join. (approximately 22–26 sts depending on your slipper width)
Round 2: ch 1, BLO sc around. Join.
BLO (Back Loop Only): Insert your hook under only the back loop of each stitch (the loop farthest from you). This creates a subtle ridge and slight stretch.
Rounds 3–4: ch 1, sc around. Join.
Fasten off and weave in ends.
PART 4: SANTA HAT
Work one hat per slipper. Use 3.5 mm hook for tighter fabric.
Round 1 (MR): Using Color B, MR, 6 sc into ring, pull ring closed. Join. (6 sts)
Round 2: ch 1, [inc] 6 times. Join. (12 sts)
Round 3: ch 1, [sc 1, inc] 6 times. Join. (18 sts)
Round 4: ch 1, [sc 2, inc] 6 times. Join. (24 sts)
Round 5: ch 1, [sc 3, inc] 6 times. Join. (30 sts)
Rounds 6–10: ch 1, sc around. Join. (30 sts each round)
Round 11 (brim): Join Color C. ch 1, sc around. Join. (30 sts)
Round 12: ch 1, inc, sc around. Join. (31 sts) — slight brim flare
Fasten off and weave in ends.
Hat Pompom: Using Color C, make a small pompom (wrap yarn around 3 fingers approximately 30 times, tie at center, trim into a round ball about 2.5 cm diameter). Attach securely to the tip of the hat.
PART 5: EYES (make 2 per slipper = 4 total)
Use 3.5 mm hook and Color E (yellow).
Round 1 (MR): MR, 6 sc into ring. Pull closed. (6 sts)
Round 2: ch 1, [inc] 6 times. Join. (12 sts)
Round 3: ch 1, [sc 1, inc] 6 times. Join. (18 sts)
Fasten off, leaving a long tail for sewing. Using Color D (black), embroider or attach a safety eye in the center. If using safety eyes, attach before closing Round 3.
Assembly Steps
- Attach Santa Hat: Position the Santa hat on the toe section of each slipper, centered across the top. The hat opening (brim) should sit approximately 3–4 cm back from the very tip of the toe. Use the yarn tail and needle to whip stitch around the entire brim circumference. Make sure the hat sits slightly tilted to one side (about 20 degrees) for the classic Grinch look.
- Attach Eyes: Position the two yellow eye circles on the front toe panel of the slipper, approximately 5–6 cm back from the toe tip and spaced about 3 cm apart (center to center). Sew down firmly around the full circumference using the long tail. Weave in ends through the interior.
- Embroider Eyebrows: Using Color D (black embroidery floss or thin yarn), embroider two thick arched eyebrows above the eyes — angling sharply downward toward the center nose area to create the Grinch’s characteristic scowl. Each eyebrow should be approximately 3 cm long. Use a backstitch or chain stitch for clean lines.
- Embroider Mouth: Using Color D, embroider the Grinch’s curled smirk approximately 3–4 cm below the eyes. Work a curved line about 4–5 cm wide, curling slightly upward at one end for the sneer. A stem stitch or chain stitch works well here.
- Nose (optional): Using Color A or a slightly darker green yarn, embroider 2–3 small horizontal stitches just above the mouth to suggest nostrils.
- Non-Slip Soles: Paint the sole underside with non-slip fabric paint in dots or lines, or glue on pre-cut non-slip sole pads (available at craft stores, cut to size). Allow to dry fully before wearing.
- Final Check: Press slippers gently flat, check that all embellishments are tightly secured, and weave in any remaining yarn ends.
Beginner & Intermediate Tips
- Chenille yarn can be tricky because the pile hides stitch definition. Count your stitches at the end of every round during the sole and toe shaping — do not rely on visual cues alone.
- For a cleaner magic ring, after completing Round 1 of any small piece, use your fingernail to hold the ring closed while pulling the tail snug. Weave the tail in two different directions to secure.
- The invisible decrease is essential with chenille yarn — the standard sc2tog creates a visible bump that disrupts the Grinch’s smooth face texture. Always use the front-loop-only method for dec.
- Embroidery tip: Transfer your face design lightly with a water-soluble fabric marker before stitching. This lets you test the placement and symmetry before committing.
- Fit adjustment: If your slipper is too loose, reduce by 2 sts across Rounds 2–3 of the upper. If too tight, add one extra plain sc round (no shaping) between Rounds 3 and 4.
- Matching pairs: Work the sole and upper of both slippers at the same time (or immediately one after the other) to ensure consistent tension and sizing.
Variations
- Baby/Toddler Grinch Slippers: Work the sole foundation with ch 8 instead of ch 16 and reduce increase rounds to 3. Scale the Santa hat and eyes accordingly. A great gift option for newborns and toddlers up to age 2.
- Grinch Slippers Without the Hat: Skip the Santa hat and add a small crocheted tuft of green “hair” at the tip of the toe instead. This works great as a year-round novelty slipper, not just a holiday item.
- Grinch Slippers with Ankle Strap: After the cuff, add two ch loops on each side and thread a 1.5 cm wide ribbon or elastic through to create an adjustable ankle strap — perfect for preventing slippage on smooth floors.
- Mini Grinch as Ornament: Work the sole at a miniature scale (ch 7 foundation), stuff lightly, and omit the cuff. Add a hanging loop of red yarn and gift as a Christmas tree ornament. Make the face with embroidery thread for finer detail.
- Holiday Color Swap: Replace the green with a deep navy or burgundy for a “Grumpy Holiday Character” that isn’t Grinch-specific — great for gifting when intellectual property is a concern, while keeping the same expressive face format.


