
The Best Fluffy Pancakes recipe you will fall in love with. Full of tips and tricks to help you make the best pancakes.

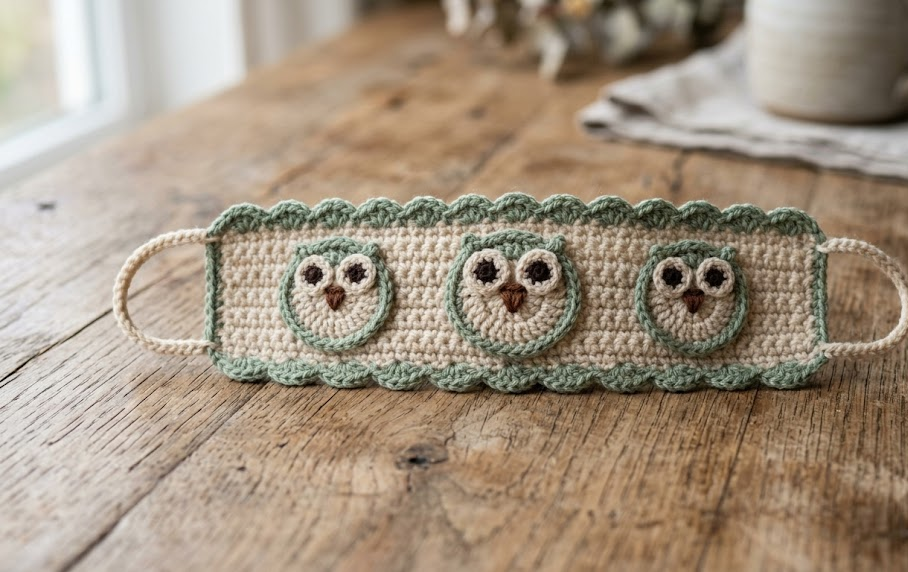
If you love Harry Potter and you love crochet, this Harry Potter owl ear saver pattern is about to become your new favorite project. Whether you are still wearing a mask for medical reasons, working in healthcare, or simply want a charming accessory to gift someone special, this crocheted ear saver band is as practical as it is magical. Featuring a cream base edged in sage green with adorable circular owl motifs inspired by Hedwig and the wizarding world, this little band hooks over your ears and takes all the pressure off the back of your head. It works up in just a couple of hours, making it the perfect handmade gift for any Harry Potter fan in your life — or a treat for yourself.
This pattern is written for an intermediate crocheter who is comfortable with basic stitches, simple shaping, and working small appliqué circles. No pattern pieces are needed, no sewing machine is required, and you only need a small amount of yarn to complete it. Read through the full instructions once before you begin and you will find this project flows quickly and satisfyingly from start to finish.
|
Difficulty
Intermediate
|
Time
2–3 Hours
|
Hook Size
3.5mm
|
Yarn Weight
DK (#3)
|
Finished Size
18cm × 2.5cm
|
Gauge
22 single crochet × 28 rows = 10cm × 10cm square
Hook: 3.5mm
Yarn weight: DK (#3)
Gauge matters here because the ear saver needs to be long enough to comfortably clear the back of the head but not so loose that it sags. Work a swatch before beginning. If your swatch is larger than 10cm, go down a hook size. If it is smaller, go up a hook size.
Materials
- Yarn A (Cream/Beige): DK weight (#3), approximately 25–30 meters
- Yarn B (Sage Green): DK weight (#3), approximately 15–20 meters
- Yarn C (Dark Brown or Black): DK weight (#3) or sport weight, approximately 3–5 meters for owl eye centers
- Hook: 3.5mm crochet hook
- Yarn needle: For weaving in ends and sewing appliqués
- Scissors
- 2 small buttons or plastic D-rings (optional, for adjustable length — omit for fixed-length band)
- Stitch markers (2–3)
Abbreviations
| Abbreviation | Meaning |
|---|---|
| ch | chain |
| sl st | slip stitch |
| sc | single crochet |
| hdc | half double crochet |
| dc | double crochet |
| MR | magic ring |
| sk | skip |
| st(s) | stitch(es) |
| BLO | back loop only |
| sp | space |
| rep | repeat |
| RS | right side |
| WS | wrong side |
| PM | place marker |
| yo | yarn over |
Technique notes:
- Magic ring (MR): Make a loop with the yarn, insert hook through the loop, pull up a loop and ch 1 to begin working into the ring. After the first round, pull the yarn tail to close the center hole completely.
- BLO (back loop only): Insert your hook only into the back loop of the stitch (the loop furthest from you) rather than under both loops. This creates a visible ridge on the front of your work.
Pattern Instructions
Part 1: Main Band
The main band is worked flat in rows to create a firm, structured strip.
With Yarn A and 3.5mm hook:
Foundation chain: Ch 7.
Row 1 (RS): Sc in 2nd ch from hook and in each ch across. (6 sc)
Row 2: Ch 1, turn. Sc in BLO of each st across. (6 sc)
(Working BLO on this and all even rows creates the subtle ribbed texture visible on the finished band.)
Row 3: Ch 1, turn. Sc in both loops of each st across. (6 sc)
Rows 4–36: Rep Rows 2–3 alternately until band measures approximately 17–18cm from the starting edge, ending after a RS row. You should have approximately 36 rows total, though this may vary slightly based on your gauge. Try the band around the back of your head before finishing — it should feel snug but not tight.
Fasten off Yarn A, leaving a long tail for edging.
Part 2: Sage Green Border Edge
This border is worked along both long edges of the completed band to create the characteristic green framing visible in the finished piece.
With Yarn B and 3.5mm hook, join to the top-right corner of the band (RS facing):
Border Row — Top Edge:
Ch 1. Sc evenly along the entire top edge of the band, working 1 sc per row end. Continue along both short ends with 3 sc in each corner st to turn neatly. Do not work along the bottom edge yet — that will be a second pass.
Sl st to first sc to join if working as a round, or fasten off and reattach at bottom edge.
Border Row — Bottom Edge:
With Yarn B, join to bottom-left corner. Rep as above along bottom long edge.
Fasten off Yarn B and weave in all ends.
Part 3: Owl Motifs (Make 3)
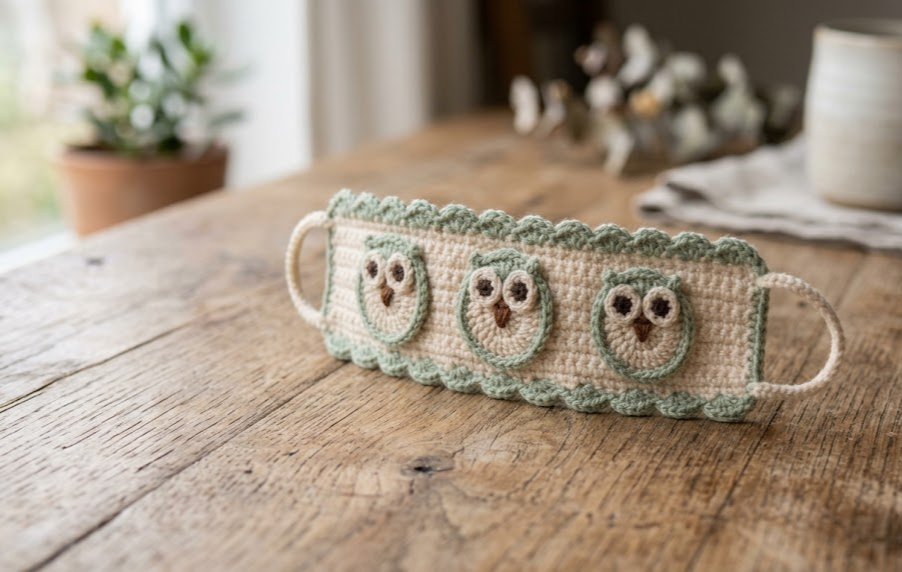
Each owl motif is a layered circle worked in the round. Three motifs spaced evenly across the band reproduce the pattern of owl faces visible in the photo.
Outer Ring — With Yarn B (Sage Green):
Rnd 1: MR, ch 1, work 6 sc into ring, pull tail to close. (6 sc)
Rnd 2: Ch 1, 2 sc in each st around, sl st to first sc to join. (12 sc)
Rnd 3: Ch 1, sc in next st, 2 sc in next st, rep from * to * around, sl st to first sc to join. (18 sc)
Rnd 4: Ch 1, sc in each st around, sl st to first sc. (18 sc)
Fasten off Yarn B, leaving a 15cm tail for sewing.
Inner Ring — With Yarn A (Cream):
Rnd 1: MR, ch 1, work 6 sc into ring, pull tail to close. (6 sc)
Rnd 2: Ch 1, 2 sc in each st around, sl st to first sc. (12 sc)
Fasten off Yarn A, leaving a 15cm tail.
Eye Center — With Yarn C (Dark Brown):
Rnd 1: MR, ch 1, work 5 sc into ring, sl st to first sc to join. Pull tail firmly to close. (5 sc)
Fasten off Yarn C, leaving a tail for sewing.
Assembly
- Layer the owl circles: Place the Yarn A cream inner circle centered on top of the Yarn B sage green outer ring. Using the Yarn A tail and a yarn needle, sew the inner circle to the outer ring using whip stitch around the entire perimeter, keeping stitches small and even. The cream circle should sit flat with no puckering.
- Attach the eye centers: Place the small dark brown center circle in the middle of the cream inner ring. Sew down firmly using whip stitch. The finished owl face should measure approximately 2.5–3cm in diameter.
- Position the owl motifs on the band: Lay the completed band flat with the RS facing you. Place the three owl faces evenly spaced along the center of the band. With the band measuring 18cm, position the first owl 3cm from the left end, the second owl in the exact center (9cm), and the third owl 3cm from the right end. Pin each one before sewing.
- Sew the motifs to the band: Using the Yarn B tail threaded on a yarn needle, sew each outer ring to the band using whip stitch all the way around the perimeter of the motif, catching the band fabric with each stitch. Pull snugly enough to secure but not so tight that the band puckers.
- Optional button or D-ring attachment: If adding buttons, sew one button to each short end of the band on the WS. The button sits at the center of the short end so a mask loop can hook onto it. If using D-rings, fold each short end approximately 1cm back on itself, thread a D-ring onto the fold, and sew the folded end down securely with whip stitch.
- Final press: Gently hand-block the finished band by dampening it lightly with water, shaping it flat, and allowing it to dry. This evens out any tension inconsistencies and makes the owl motifs sit neatly.
Beginner and Intermediate Tips
Gauge is everything on a small project like this. An ear saver that is 2cm too long will slip down the head rather than sitting neatly. Work your gauge swatch and adjust your hook size before committing to 36 rows.
The BLO ribbing technique is what gives the band its structure. If you skip it and work through both loops on every row, the band will be thinner and less substantial. The alternating BLO rows create the slight texture that makes the finished piece look intentionally designed rather than just a simple strip.
When working the magic ring for the owl motifs, pull the tail before joining each round to keep the center hole as tight as possible. A loose center reads as sloppy on a motif this small.
Sew the owl layers down before attaching to the band. If you try to sew all three layers at once directly onto the band, the motifs will shift and the alignment becomes very difficult to control. Build each motif fully first, then sew the completed face onto the band.
Use a blunt yarn needle for all seaming. A sharp needle can split the DK yarn plies, making weaving and joining messier than necessary. The blunt tip slides between fibers cleanly.
If the finished band feels too stiff, try working it in fingering or sport weight yarn with a 2.75mm hook. The finished dimensions will be slightly smaller but the drape will be softer.
Variations
1. Hogwarts House Colorways
Swap the cream and sage green for house-specific colors: red and gold for Gryffindor, green and silver for Slytherin, yellow and black for Hufflepuff, or blue and bronze for Ravenclaw. This is an easy way to customize the band as a gift for a specific fan.
2. Longer Headband Version
Instead of 36 rows, work 60–70 rows to create a full headband rather than an ear saver. The owl motifs scale up beautifully to a full headband width of 20cm and can be increased to five or six owls evenly spaced.
3. Wristband or Bookmark
Work only 4 stitches wide for 36 rows to create a narrow wristband or bookmark. A single owl motif centered on the strip is all you need. Add a ribbon tie at each end for a wristband or a tassel for a bookmark.
4. Mixed Stitch Texture Band
Replace the BLO rows with half double crochet rows for a taller, slightly thicker band with a different texture. The hdc version works up slightly faster and has a plushier hand feel that some people prefer for extended wear.
5. Personalised Initial Motif
Instead of the third owl motif in the center, crochet a small letter using tapestry crochet or cross stitch embroidery on a plain sc circle. This turns the band into a personalized gift with someone’s initial flanked by two owls.
If you made this Harry Potter owl ear saver, save this pin so you can find the pattern again! Share your finished make on Pinterest using #FoodieRippleCrochet — we would love to see your version



