
The Best Fluffy Pancakes recipe you will fall in love with. Full of tips and tricks to help you make the best pancakes.

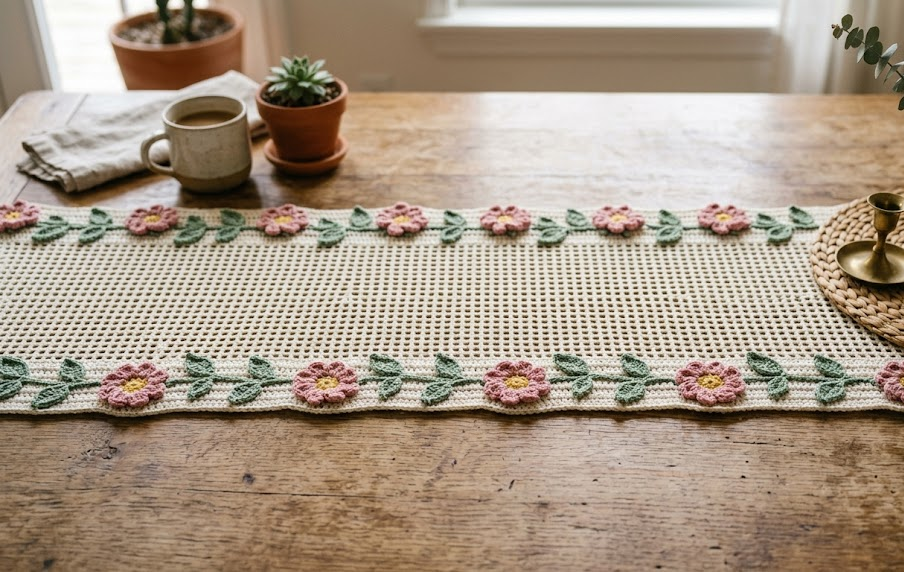
There’s something quietly magical about a handmade table runner that turns an ordinary tabletop into a gathering place worth lingering at. This floral lace table runner combines a classic filet crochet mesh body with a romantic border of crocheted leaves and dimensional flowers, creating a piece that feels equal parts vintage heirloom and modern boho statement. The airy, open stitch pattern lets light filter through the cream-colored mesh, while the sage green leaves and dusty pink blossoms along the edges add a soft, garden-inspired touch that never goes out of style.
This project is perfect for crocheters who already have basic double crochet and chain stitches down and are ready to try their hand at filet mesh and simple crocheted flower motifs. It’s an ideal weekend project for someone who wants a decorative runner for a dining table, console table, or dresser top, and it also makes a lovely handmade gift for a housewarming, wedding, or holiday table setting. Because the pattern uses fine cotton thread, the finished piece has a delicate, lace-like drape that pairs beautifully with rustic wood furniture, farmhouse decor, or cottagecore-style interiors.
Unlike bulky yarn projects that work up in an evening, this table runner rewards patience. The filet mesh body is simple and meditative to stitch once you get into the rhythm, while the flower and leaf border pieces are small, portable, and satisfying to complete one at a time. By the end, you’ll have a finished piece that looks like it came from a boutique linen shop but was made entirely with your own hands.
|
Difficulty
Intermediate
|
Time
14–16 hours
|
Hook Size
2.5mm (C/2)
|
Yarn Weight
Lace / Size 3 Cotton
|
Finished Size
45cm x 30cm
|
Gauge
9 mesh spaces (each made of 1 double crochet + chain 1) and 9 rows = 10cm x 10cm square, using a 2.5mm hook and lace weight (size 3) crochet cotton thread. Always make a gauge swatch before starting — filet mesh patterns are sensitive to gauge, and being even slightly off will change your finished runner’s dimensions significantly.
Materials List
- Size 3 (lace weight) crochet cotton thread, cream/ivory color — approximately 250g for the runner body
- Size 3 crochet cotton thread, sage green — approximately 60g for leaves and stems
- Size 3 crochet cotton thread, dusty pink — approximately 40g for flowers
- Small amount of yellow crochet cotton thread for flower centers
- 2.5mm (C/2) crochet hook
- Tapestry/yarn needle for weaving in ends
- Stitch markers
- Fabric scissors
- Optional: spray starch or fabric stiffener for crisp flower shaping
- Optional: small woven fabric label if you want to personalize your piece
Abbreviations
| Abbreviation | Meaning |
|---|---|
| ch | chain |
| sl st | slip stitch |
| sc | single crochet |
| dc | double crochet |
| tr | treble crochet |
| st(s) | stitch(es) |
| sp(s) | space(s) |
| rep | repeat |
| BLO | back loop only |
| MR | magic ring |
| RS | right side |
| WS | wrong side |
| ( ) | stitch count at end of row/round |
Pattern Instructions
Part 1: Filet Mesh Body
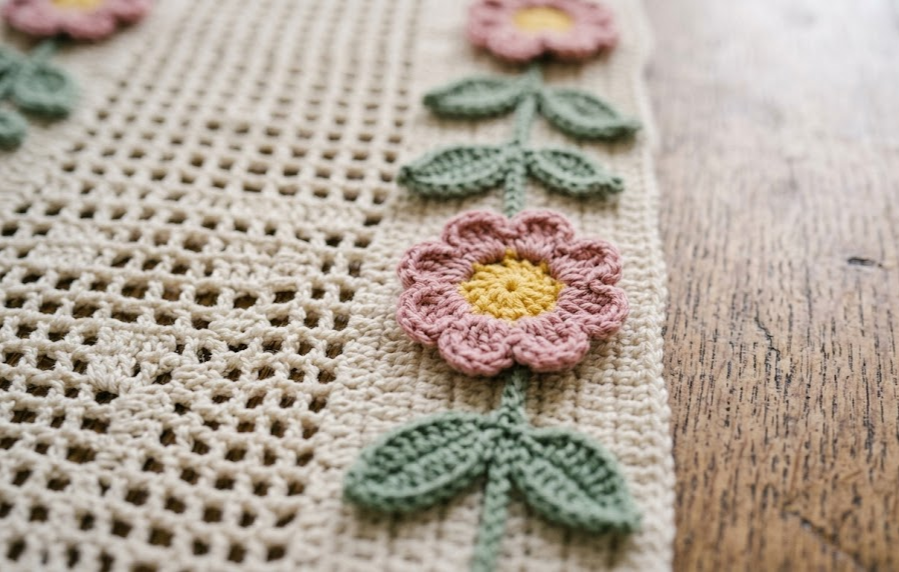
Technique note: A filet mesh is created by alternating double crochet stitches with chain spaces, forming an open grid pattern.
With cream thread and 2.5mm hook, ch 82.
Row 1 (RS): Dc in 8th ch from hook (this counts as your first mesh), *ch 1, skip 1 ch, dc in next ch; rep from * across. (38 mesh)
Row 2: Ch 4 (counts as first dc + ch 1 throughout), turn, dc in first ch-1 sp, *ch 1, dc in next ch-1 sp; rep from * across to last mesh, dc in top of turning ch. (38 mesh)
Rows 3–38: Rep Row 2. This creates a solid mesh rectangle roughly 30cm x 45cm.
Note: Every 5 rows, work one row of “solid block” pattern for visual interest by working 2 dc in each ch-1 sp instead of ch 1, dc — this creates the horizontal textured stripes seen in the finished piece. Return to open mesh on the following row.
Fasten off, weave in ends.
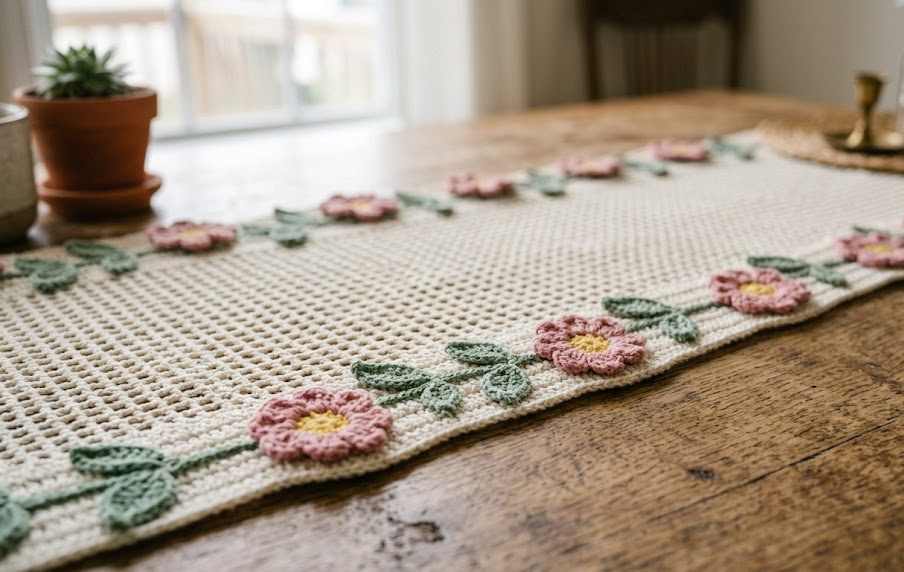
Part 2: Leaf Motif (make 24)
With sage green thread and 2.5mm hook, ch 12.
Row 1: Sc in 2nd ch from hook, hdc in next ch, dc in next 6 ch, hdc in next ch, 3 sc in last ch (this turns the corner to work down the other side of the starting chain — work into the same chain stitches from the opposite side). (11 sts)
Technique note: Working the “second side of the chain” means continuing your stitches around the bottom of the original starting chain to create a symmetrical leaf shape.
Row 2: Continue down second side of starting chain: hdc in next ch, dc in next 6 ch, hdc in next ch, sc in last ch. (10 sts)
Sl st to first sc to join. Fasten off, leaving a 15cm tail for sewing.
Part 3: Flower Motif (make 18)
With pink thread and 2.5mm hook, make a MR (magic ring).
Technique note: A magic ring is an adjustable loop that lets you crochet stitches into it and then pull the center closed tightly, leaving no hole.
Round 1: Ch 1, 10 sc into MR, pull ring closed, sl st to join. (10)
Round 2: *Ch 3, sl st in next st; rep from * around to create 5 petals. (5 petals)
Fasten off, leaving a 15cm tail.
Flower Center: With yellow thread, MR, ch 1, 6 sc into ring, pull closed, sl st to join, fasten off leaving a tail. Sew center into middle of each flower.
Part 4: Vine/Stem (border connector)
With sage green thread, ch a length to run along all 4 sides of the mesh body (approximately 260cm total, worked in one continuous piece or in 4 segments for each side).
Row 1: Sc in 2nd ch from hook and in each ch across. Fasten off.
Assembly Steps
- Block the filet mesh body by pinning it to measurements (45cm x 30cm) on a towel and lightly steaming, then let it dry fully.
- Pin the sage green stem/vine strip around the entire perimeter of the mesh body, positioning it so it sits just at the edge, and sew in place using a whip stitch through the back loops only (BLO) of the mesh edge stitches.
- Space the 24 leaf motifs evenly along the vine, with leaves spaced approximately 3–4cm apart, alternating direction (some pointing outward, some angled) for a natural look. Sew each leaf at its base using the tail left from Part 2.
- Space the 18 flowers along the border, placing one flower at each corner first, then distributing the remaining flowers evenly between corners, roughly one flower every 8–10cm.
- Sew each flower securely at its center point using the tail from Part 3, making sure the petals lie flat against the leaf border.
- Weave in all remaining ends on the wrong side of the work.
- Give the finished runner a final light steam block to help the flowers and leaves lie flat and crisp.
Beginner/Intermediate Tips
- Keep consistent tension in your chain-1 spaces throughout the filet mesh — uneven spacing is the most common cause of a wavy runner.
- When working the leaf motif’s second side of the chain, take care not to twist your starting chain before beginning Row 1; a twisted chain will make the leaf lopsided.
- Use stitch markers to track your solid-block rows in the mesh body so you don’t lose count of your row pattern.
- If your flowers curl instead of lying flat, a light spray of starch before sewing them on will help them hold their shape.
- Work your magic rings snugly — a loose center will leave a visible gap in your flowers.
Variations
- Monochrome Version: Skip the pink and yellow flowers and crochet the entire border in a single sage green for a minimalist botanical look.
- Mini Coaster Set: Use the same flower and leaf motifs to create a matching set of round coasters using just the border elements.
- Seasonal Palette: Swap the dusty pink and sage green for deep red and forest green for a festive holiday-themed runner.
- Extra-Long Table Runner: Add additional mesh rows to the body to create a longer runner for larger dining tables, adjusting your leaf and flower count proportionally.
- Wall Hanging Display: Frame the runner in an embroidery hoop or attach a hanging rod to the top edge to display it as textile wall art instead of a table piece.
Save this pattern to your crochet board so you can come back to it anytime you’re ready to start your own floral table runner! #FoodieRippleCrochet



