
The Best Fluffy Pancakes recipe you will fall in love with. Full of tips and tricks to help you make the best pancakes.

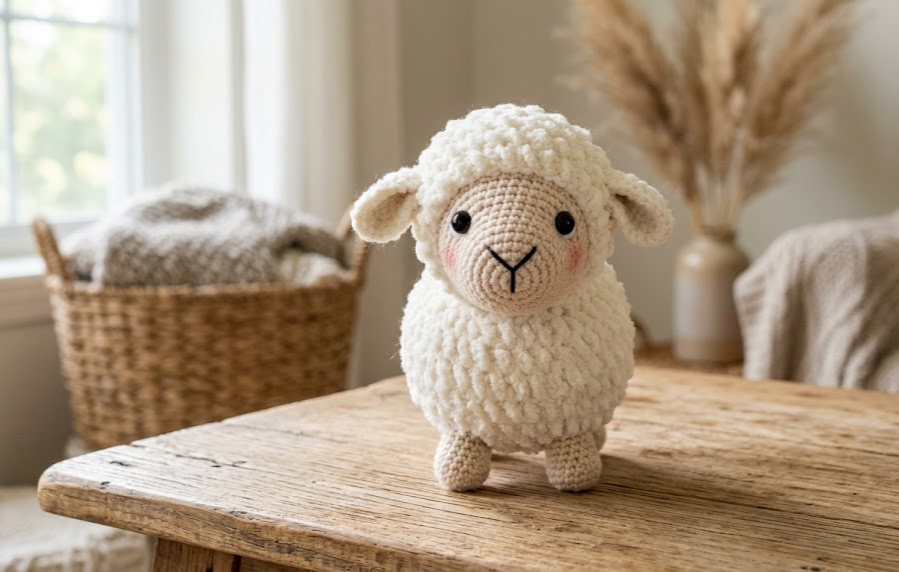
There’s something irresistibly sweet about a tiny crochet lamb. With its round fluffy body, soft beige snout, and gentle button eyes, this fluffy white lamb amigurumi is the kind of project that makes you want to start a second one before you’ve even finished the first. It’s a perfect nursery shelf companion, a springtime gift, or a cozy addition to a farmhouse-themed collection of handmade animals.
This pattern is written for the intermediate crocheter — someone comfortable with magic rings, basic increases and decreases, and simple hand-sewn assembly. If you’ve made an amigurumi animal before, you’ll move through this project smoothly. If this is your first, don’t worry: every round is spelled out completely, every stitch count is given, and every technique that isn’t obvious gets a quick explanation the first time it shows up.
By the end, you’ll have a soft, standing lamb about 12cm tall and 10cm long — small enough to sit in your palm, sturdy enough to survive years of shelf life or gentle play.
|
Difficulty
Intermediate
|
Time
4–5 Hours
|
Hook Size
3.0mm
|
Yarn Weight
DK (Light Worsted)
|
Finished Size
~12cm x 10cm
|
Gauge
Gauge matters more in amigurumi than in almost any other kind of crochet, because a looser gauge means stuffing shows through the fabric. For this pattern:
- 5 sc x 5 rows = 2.5cm x 2.5cm, worked in single crochet in continuous spiral rounds
- Hook used: 3.0mm
- Yarn used: DK weight (Light Worsted, #3)
Your gauge doesn’t need to match exactly, but aim for a fabric tight enough that you can’t see stuffing peeking through the stitches. If your fabric looks loose, drop down half a hook size.
Materials List
- DK weight yarn in cream white — approx. 40g (for head, body, ears, tail)
- DK weight yarn in light beige — approx. 15g (for snout and legs)
- Small amount of pink yarn or embroidery floss (for cheeks)
- Small amount of black yarn or embroidery floss (for nose and mouth details)
- 3.0mm crochet hook
- Pair of 6mm black safety eyes
- Polyester fiberfill stuffing
- Stitch marker
- Yarn needle
- Scissors
Abbreviations
| Abbreviation | Meaning |
|---|---|
| MR | Magic ring |
| sc | Single crochet |
| inc | Increase (2 sc in same stitch) |
| dec | Invisible decrease (2 stitches worked together as one) |
| st(s) | Stitch(es) |
| rnd | Round |
| sl st | Slip stitch |
| ( ) | Stitch count at end of round |
| approx. | Approximately |
Pattern Instructions
Part 1: Head (Cream White, make 1)
Rnd 1: 6 sc in MR (6)
Rnd 2: inc around (12)
Rnd 3: (1 sc, inc) x6 (18)
Rnd 4: (2 sc, inc) x6 (24)
Rnd 5: (3 sc, inc) x6 (30)
Rnd 6: (4 sc, inc) x6 (36)
Rnds 7–11: sc around, 5 rounds even (36)
Technique note: a magic ring lets you start a round with a fully closed center instead of a hole — pull the tail after your first round to close it snugly.
Insert safety eyes between rounds 8–9, spaced about 7 stitches apart.
Rnd 12: (4 sc, dec) x6 (30)
Rnd 13: (3 sc, dec) x6 (24)
Stuff the head firmly at this point, adding more as you close.
Rnd 14: (2 sc, dec) x6 (18)
Rnd 15: (1 sc, dec) x6 (12)
Rnd 16: dec around (6)
Fasten off, leaving a 20cm tail for sewing to the body.
Technique note: an invisible decrease pulls the front loops of two stitches together before completing them as one, which keeps decrease rounds smooth instead of leaving small holes.
Part 2: Body (Cream White, make 1)
Rnd 1: 6 sc in MR (6)
Rnd 2: inc around (12)
Rnd 3: (1 sc, inc) x6 (18)
Rnd 4: (2 sc, inc) x6 (24)
Rnd 5: (3 sc, inc) x6 (30)
Rnd 6: (4 sc, inc) x6 (36)
Rnd 7: (5 sc, inc) x6 (42)
Rnds 8–15: sc around, 8 rounds even (42)
Stuff firmly as you go, adding more before closing.
Rnd 16: (5 sc, dec) x6 (36)
Rnd 17: (4 sc, dec) x6 (30)
Rnd 18: (3 sc, dec) x6 (24)
Rnd 19: (1 sc, dec) x6 around remaining opening until closed (approx. 18)
Fasten off, leaving a 20cm tail.
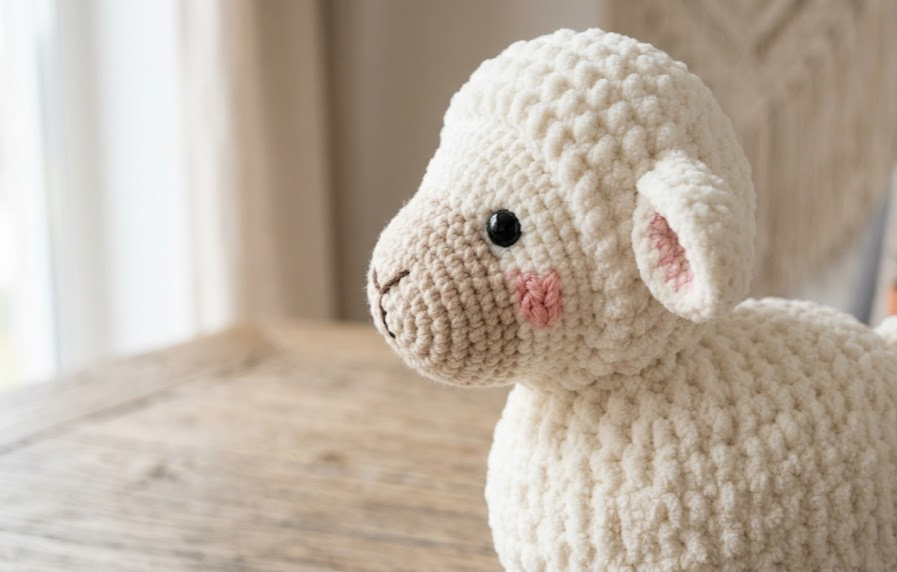
Part 3: Snout (Light Beige, make 1)
Rnd 1: 6 sc in MR (6)
Rnd 2: inc around (12)
Rnds 3–4: sc around, 2 rounds even (12)
Stuff lightly — you want just enough fill to give it a rounded shape without stiffness. Fasten off, leaving a tail for sewing.
Part 4: Ears (Cream White, make 2)
Rnd 1: 6 sc in MR (6)
Rnd 2: inc around (12)
Rnd 3: (1 sc, inc) x6 (18)
Do not stuff. Flatten the piece completely before fastening off. Leave a tail for sewing.
Part 5: Legs (Light Beige, make 4)
Rnd 1: 6 sc in MR (6)
Rnd 2: inc around (12)
Rnds 3–9: sc around, 7 rounds even (12)
Fasten off each leg, leaving a long tail for sewing (approx. 20cm) — you’ll need extra length since legs attach directly to the body.
Part 6: Tail (Cream White, make 1)
Rnd 1: 5 sc in MR (5)
Rnds 2–5: sc around, 4 rounds even (5)
Do not stuff. Fasten off, leaving a tail for sewing.
Assembly
- Attach the head to the body: Position the head centered on top of the body, tilted very slightly forward. Pin in place, then whip stitch around the opening using the tail from the head.
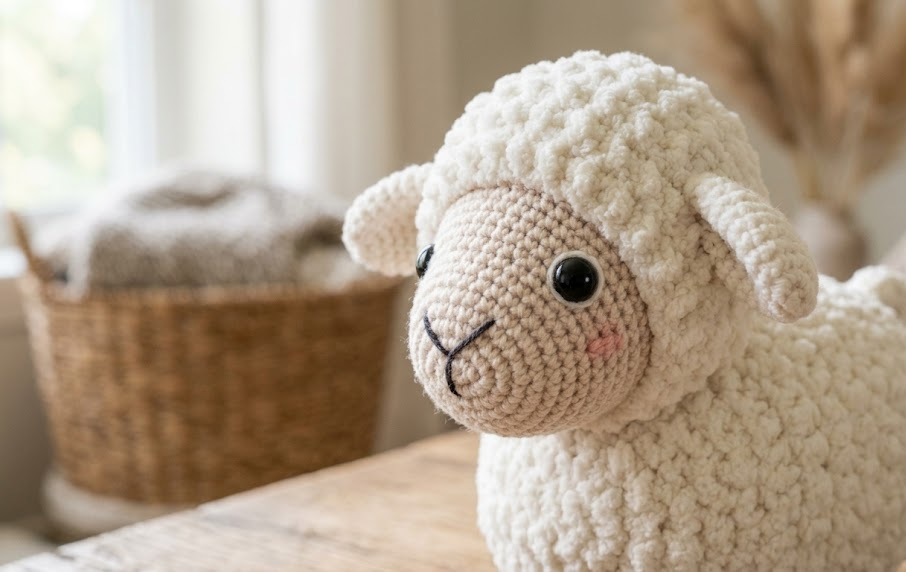
- Attach the ears: Place ears on either side of the head, roughly at the height of rounds 4–5 from the top. Sew flat against the head using a whip stitch around the edge.
- Attach the snout: Center the snout on the lower-front face, just below and between the eyes. Sew around the edge, leaving the last 1–2cm open to add a touch more stuffing if it looks flat, then close.
- Attach the legs: Space the 4 legs evenly around the base of the body — two toward the front, two toward the back, each pair about 2cm apart. Insert the sewing needle up into the body about 1cm deep and secure with several stitches for stability.
- Attach the tail: Sew the tail to the lower back of the body, just above where the back legs meet the body.
- Embroider the face: Using black yarn or floss, stitch a small “V” or straight line for the nose and mouth just below the eyes on the snout.
- Add cheeks: Using pink yarn or floss, stitch two small dots or short satin-stitch circles below each eye for a soft blush effect.
- Final check: Gently tug each attached piece to confirm everything is securely locked in place before giving it to its new home.
Tips for This Pattern
- Stuff the head and body before closing the final rounds, not after — pushing stuffing through a small hole afterward tends to distort your decrease rounds.
- Use a stitch marker to track the start of each round; it’s easy to lose your place during long even rounds.
- When sewing the legs on, angle them very slightly outward rather than straight down — this gives the lamb a more stable, natural standing look.
- If your finished head looks slightly lopsided, that’s usually from uneven tension on the increase rounds — try to keep each stitch the same size as you go.
Variations
- Black Sheep Version: Swap the cream white yarn for dark brown or charcoal for a classic “black sheep” look.
- Baby Lamb Mini: Use a smaller hook (2.25mm) with fingering weight yarn for a keychain-sized version.
- Spring Bonnet Lamb: Crochet a tiny flower or bow to attach at the ear for an Easter-themed display piece.
- Farm Family Set: Make a matching trio in different sizes — baby, medium, and large — for a nursery mobile or shelf display.
Save This Pattern
Loved this fluffy little lamb? Save this pin so you can come back to it anytime you’re ready to crochet, and follow along for more cozy amigurumi patterns just like this one. #FoodieRippleCrochet



