
The Best Fluffy Pancakes recipe you will fall in love with. Full of tips and tricks to help you make the best pancakes.

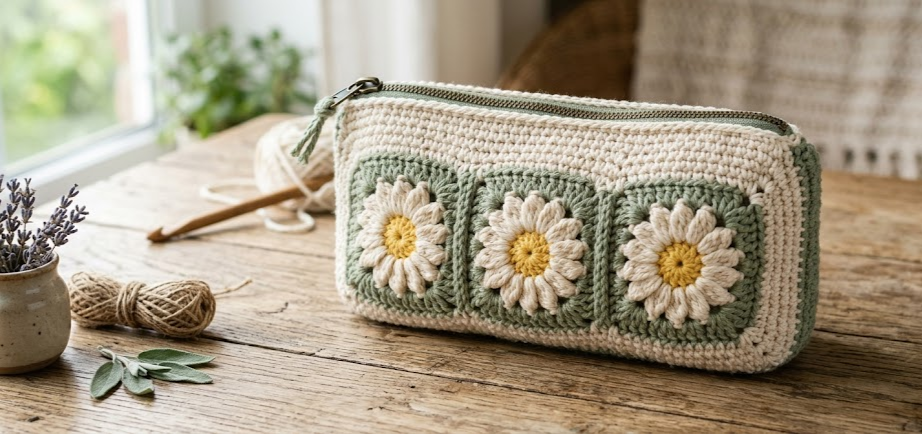
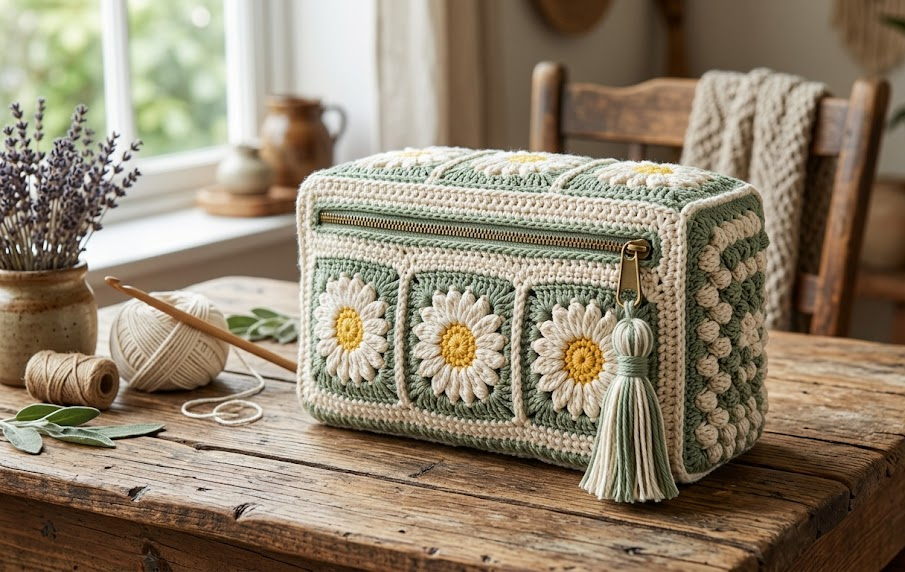
There’s something about a handmade pouch that instantly makes your makeup bag, pencil case, or travel kit feel more special. This Daisy Granny Square Cosmetic Bag combines soft textured single crochet panels with cheerful daisy granny squares in cream, sage green, and sunny yellow — the kind of piece that looks equally at home on a bathroom shelf or tucked into a weekender bag. It’s a boxy, structured pouch with a smooth brass zipper closure, finished edges, and a little crochet loop pull that adds the perfect handmade touch.
This pattern is ideal for anyone who has made a few granny squares before and is ready to combine motifs with panel construction and a zipper insertion. It’s not a beginner’s first project, but if you’re comfortable with basic stitches and ready to learn a few new techniques, you’ll walk away with a genuinely useful, gift-worthy accessory. Grab your hook and let’s get started.
|
Difficulty
Intermediate
|
Time
~7 Hours
|
Hook Size
4mm (G/6)
|
Yarn Weight
Worsted (#4)
|
Finished Size
20 x 10 x 8cm
|
Gauge
14 sts x 16 rows = 10cm x 10cm (4in x 4in) in single crochet, using a 4mm (US G/6) hook and worsted weight (#4) yarn. Daisy granny square motif measures approximately 10cm x 10cm using the same hook and yarn weight. Always make a gauge swatch first — if your square comes out larger, size down your hook; if smaller, size up.
Materials List
- Worsted weight (#4) yarn in cream/ivory — approx. 120g
- Worsted weight (#4) yarn in sage green — approx. 60g
- Worsted weight (#4) yarn in white — approx. 30g
- Worsted weight (#4) yarn in mustard yellow — small amount, approx. 10g
- 4mm (US G/6) crochet hook
- 20cm (8in) zipper, brass or antique gold tone
- Yarn needle for weaving in ends and sewing seams
- Stitch markers
- Sewing needle and matching thread (for attaching zipper securely)
- Scissors
- Optional: piece of fabric or felt for lining (20cm x 30cm)
- Optional: rigid plastic canvas or bag stiffener insert for structure
Abbreviations Table
| Abbreviation | Meaning |
|---|---|
| ch | chain |
| sl st | slip stitch |
| sc | single crochet |
| hdc | half double crochet |
| dc | double crochet |
| st(s) | stitch(es) |
| rnd(s) | round(s) |
| row(s) | row(s) |
| sp | space |
| BLO | back loop only |
| MR | magic ring |
| RS | right side |
| WS | wrong side |
| ( ) | stitch count at end of round/row |
Pattern Instructions
Part 1: Daisy Granny Squares (make 4)
Notes: A magic ring (MR) is an adjustable loop that lets you crochet your first round of stitches into it, then pull the tail to close the center hole tightly — this keeps the daisy center neat with no gap.
Round 1 (Yellow): MR, ch 1, 10 sc into ring, sl st to join. Pull tail to close ring. (10)
Round 2 (White — Petals): Join white yarn in any st. Ch 3, dc, ch 3, sl st into same st as join — this creates one petal. Sl st into next st, repeat petal pattern in every stitch around. (10 petals)
Round 3 (Green — Border): Join sage green in back loop of any petal base stitch (working into the base sts behind the petals, not the petal chains themselves). Ch 3 (counts as first dc), dc in same st, dc twice in each st around, working behind the petals. Join with sl st. (20)
Round 4 (Green — Square Corners): Ch 3, dc in next 4 sts, 3 dc in next st (corner), dc in next 5 sts repeat around 3 more times, sl st to join. (36, with 4 corner groups)
Round 5 (Cream — Outer Edge): Join cream in any corner space. Ch 1, sc evenly around, working 3 sc into each corner st to keep the square flat. Sl st to join, fasten off. Square should measure approx. 10cm x 10cm.
Make 4 daisy squares total in this same color sequence.
Part 2: Side Panels — Textured Stitch (make 2)
These are the smooth-textured cream panels that form the bag’s ends.
Row 1: With cream yarn, ch 15. Sc in 2nd ch from hook and each ch across. (14)
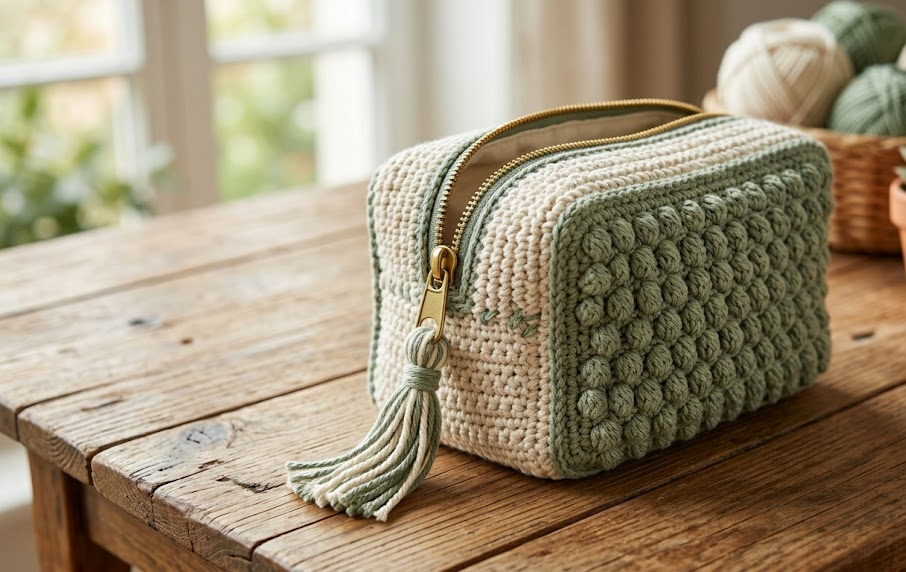
Rows 2–16: Ch 1, turn, sc BLO in each st across. (14) — working in BLO (back loop only) creates the subtle ridged texture seen in the sample photo; simply insert your hook under only the back loop of each stitch instead of both loops.
Fasten off. Panel should measure approx. 10cm wide x 10cm tall.
Part 3: Bottom Panel
Row 1: With cream yarn, ch 26. Sc in 2nd ch from hook and each ch across. (25)
Rows 2–9: Ch 1, turn, sc in each st across. (25)
Fasten off. Panel should measure approx. 20cm x 8cm.
Assembly Steps
- Lay out pieces: two daisy squares side by side form the front, two form the back, the bottom panel connects them along the base, and the two textured side panels close the ends.
- Join front panel: With RS facing, whip stitch the two front daisy squares together along one edge using cream yarn, forming a 20cm x 10cm front panel.
- Join back panel: Repeat step 2 with the remaining two daisy squares for the back panel.
- Attach bottom: Whip stitch the long edges of the bottom panel to the lower edges of the front and back panels, right sides together, leaving side edges open.
- Attach side panels: Whip stitch each textured side panel into the remaining side gaps, matching corners carefully so the bag forms a closed box shape with only the top open. Check that the assembled bag measures approx. 20cm long x 10cm tall x 8cm deep before proceeding.
- Insert lining (optional): Cut fabric or felt to match the bag’s interior dimensions with a 1cm seam allowance, sew into a pouch shape, and slip inside the crochet shell for structure and to protect the zipper stitching.
- Sew in the zipper: Pin the 20cm zipper along the top opening, right side facing out, so the zipper teeth sit centered in the opening. Using sewing needle and thread, whip stitch the zipper tape to the inside edge of the crochet opening on both sides, keeping stitches close together (about 0.5cm apart) for a secure, gap-free seam.
- Add zipper pull loop: Cut a 15cm length of cream yarn, fold in half, and knot it through the zipper pull, then trim ends to about 2cm for a tidy tassel loop.
- Weave in all ends using your yarn needle, and give the finished bag a light steam or spritz-block to even out the panel edges.
Beginner/Intermediate Tips
- When crocheting the daisy petals, keep your ch-3 loops slightly loose so the petals sit in a soft curve rather than pulling flat — this is what gives the daisy its dimensional look.
- Use stitch markers on round 4 to mark your four corner stitches; it’s easy to lose track of increases once the square gets busy with color changes.
- Block your daisy squares before assembly — pin them to size and lightly steam so all four squares match exactly, which makes whip-stitching the panels together much easier.
- Sew the zipper in with the bag turned inside out first for the neatest finish, then flip right-side out to check placement before doing your final pass.
- If your BLO texture panels start to curl, that’s normal for this stitch — blocking flattens it right out.
Variations
- Monochrome Bloom: Make all four squares in a single tonal palette (blush pink petals, dusty rose border) for a softer, less contrasty look.
- Mini Coin Purse: Reduce to one daisy square per side and a shorter zipper for a small 10cm x 10cm coin pouch.
- Sunflower Swap: Replace the white petal round with a wide double-crochet petal in deep orange and a brown center for a sunflower version.
- Chunky Weekender Pouch: Size up to bulky (#5) yarn and a 6mm hook, and use 2 squares per side for an oversized toiletry bag.
- Ombre Border: Crochet each square’s border round in a slightly different shade of green, from sage to forest, for a subtle gradient effect around the bag.
Save this pattern to your favorite crochet board so you can find it again next time you’re ready to stitch one up — and be sure to share your finished daisy pouch! #FoodieRippleCrochet



