
The Best Fluffy Pancakes recipe you will fall in love with. Full of tips and tricks to help you make the best pancakes.

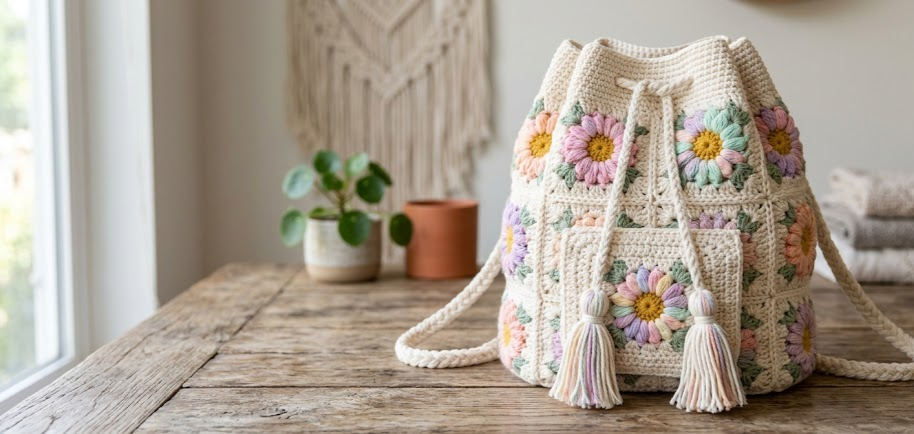
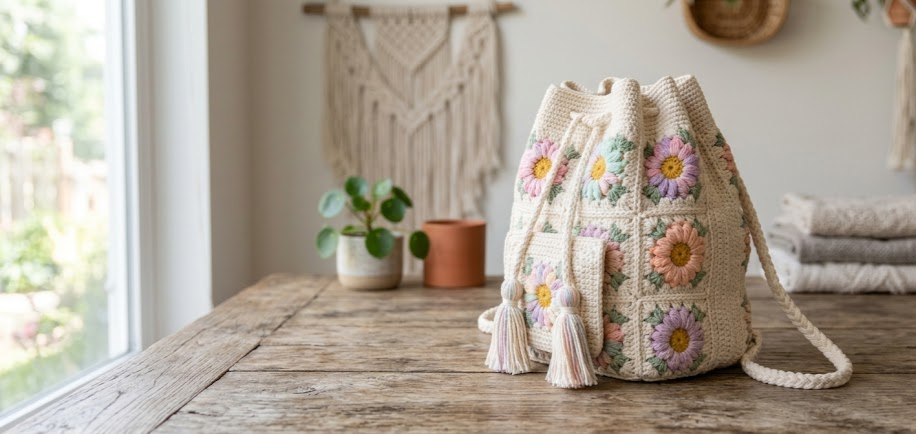
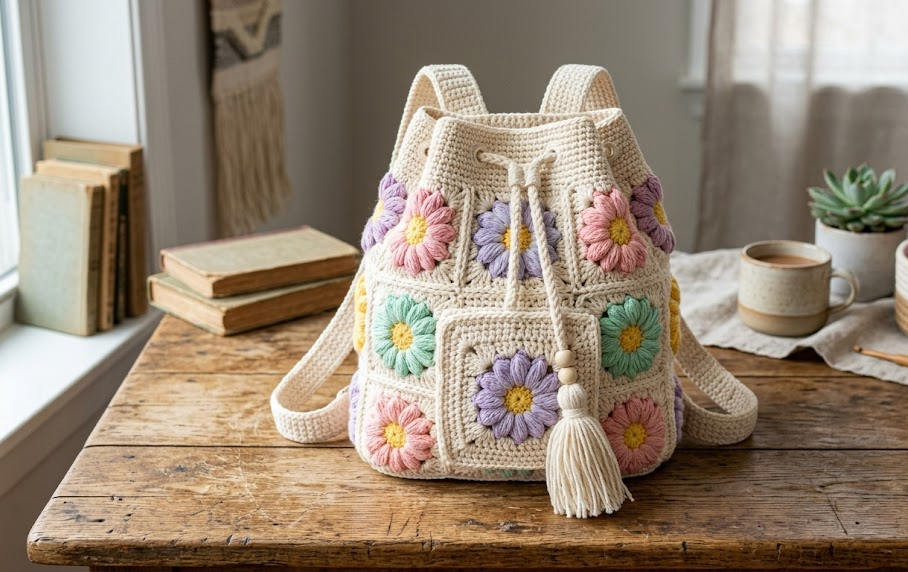
If you’ve ever wanted a bag that feels like carrying a little garden with you, this is it. The Blooming Meadow Granny Square Backpack combines soft puff-stitch daisies in pink, lavender, mint, yellow, and peach with a classic cream granny square border, all stitched into a roomy drawstring backpack with a matching front pocket. It’s the kind of piece that turns heads at the farmers market, looks perfect slung over a picnic basket, and makes a genuinely useful project out of all those leftover pastel yarn scraps sitting in your stash.
This pattern is written for the intermediate crocheter — someone comfortable with granny squares, puff stitches, and basic seaming — who’s ready to take those skills into a full garment-style project. There’s nothing here that requires special equipment or advanced shaping; it’s simply a lot of pretty squares joined together with a bit of construction know-how. By the end, you’ll have a one-of-a-kind backpack that costs a fraction of what you’d pay for something similar in a boutique.
|
Difficulty
Intermediate
|
Time
15–20 hours
|
Hook Size
4.5mm (US 7)
|
Yarn Weight
Worsted (Aran)
|
Finished Size
30 x 35 x 13 cm
|
Gauge
One Daisy Granny Square measures 10cm x 10cm (4in x 4in) using a 4.5mm (US 7) hook and worsted weight yarn.
Gauge swatch: 14 sc x 14 rows = 10cm x 10cm square in plain single crochet.
Always make a test square first and adjust your hook size up or down until your square measures 10cm x 10cm, since finished bag dimensions depend on this.
Materials List
- Worsted weight (Aran, #4) yarn:
- Cream (main color, border, straps, gusset) – approx. 400g
- Soft pink – 40g
- Lavender purple – 40g
- Mint green – 40g
- Buttery yellow – 40g
- Peach – 40g
- Sage green (leaves) – 60g
- 4.5mm (US 7) crochet hook
- Tapestry needle for weaving in ends and seaming
- Stitch markers (at least 2)
- Scissors
- Optional: piece of stiff cardboard or plastic canvas (13cm x 30cm) for a firmer bag base
- Optional: fabric of your choice for a bag liner
Abbreviations Table
| Abbreviation | Meaning |
|---|---|
| ch | chain |
| sc | single crochet |
| dc | double crochet |
| sl st | slip stitch |
| st(s) | stitch(es) |
| rnd | round |
| sp | space |
| puff st | puff stitch |
| MC | magic ring |
| rep | repeat |
| yo | yarn over |
Pattern Instructions
Part 1: Daisy Granny Square (make 25 total — 24 for the bag body, 1 for the pocket)
Round 1 (petals): With a petal color of your choice, make a magic ring (a magic ring is an adjustable loop that lets you crochet your first round into it, then pull the tail to close the center hole tightly). Ch 1, then work 8 puff stitches into the ring, chaining 1 between each (a puff stitch is made by yarning over and inserting your hook into the ring, pulling up a loop, three times total in the same spot, then yarning over and pulling through all 7 loops on your hook at once). Join with a sl st to the top of the first puff st. Fasten off. (8 puff sts, 8 ch-1 sps)
Round 2 (leaves): Join sage green in any ch-1 sp. Working around, alternate corners and sides: in 4 of the ch-1 sps work a corner (3 dc, ch 2, 3 dc), and in the remaining 4 ch-1 sps work a side (3 dc), chaining 1 between every group. Join with sl st to first dc. Fasten off. (36 dc total, 4 corner ch-2 sps, 4 side ch-1 sps)
Round 3 (cream frame): Join cream in any corner ch-2 sp. Ch 3 (counts as first dc), (2 dc, ch 2, 3 dc) in same sp, ch 1, 3 dc in next ch-1 side sp, ch 1, (3 dc, ch 2, 3 dc) in next corner ch-2 sp rep around, join with sl st to top of ch-3. (64 dc total, 4 corner ch-2 sps)
Round 4 (border): Ch 1, sc evenly around the entire square, working 3 sc into each corner ch-2 sp to keep the corners square. Join with sl st to first sc, fasten off and weave in ends. (72 sc)
Rotate your petal colors evenly across all 25 squares so no two touching squares share the same flower color — this is what gives the finished bag its rainbow-garden look.
Part 2: Front Pocket Trim (make 1, using one Daisy Granny Square from above)
Round 5 (scallop edge): Join cream in any st along one edge of the square (not through a corner). Skip 1 st, work 5 dc into next st (this creates a shell/scallop), skip 1 st, sl st in next st rep around all four sides, working through the corner stitches as regular sts rather than adding extra shells there. Join with sl st, fasten off. (approx. 18 shells around)
Assembly Steps
- Block every square. Pin and lightly steam or wet-block all 25 squares so each measures exactly 10cm x 10cm. This step matters more than it seems — uneven squares will throw off your whole bag shape.
- Lay out the front panel. Arrange 12 squares in a 3-across x 4-down grid (30cm wide x 40cm tall), rotating your petal colors so the layout looks balanced. Whip stitch or single crochet the squares together through both loops, working all vertical seams first, then horizontal seams.
- Repeat for the back panel using the remaining 12 squares.
- Crochet the gusset strip. With cream, ch 33 and work rows of dc back and forth until the strip measures 86cm long and 13cm wide (this strip forms the sides and bottom of the bag, giving it depth). Fasten off.
- Seam the gusset to both panels. Starting at the top left edge of the front panel, sc the gusset strip down the left side, across the bottom, and up the right side of the front panel. Continue seaming the remaining length of the gusset around the back panel in the same way, so the two panels are joined by the strip running around three sides, with the top left completely open.
- Top opening — eyelet round. With cream, join at the top opening and work 1 rnd of sc evenly around. Rnd 2: ch 2, skip 2 sts, sc in next 2 sts rep around (this creates evenly spaced eyelets for the drawstring). Rnd 3: sc in every st and ch-sp around, fasten off.
- Make two twisted cords for the straps/drawstring, each approximately 150cm long. To twist a cord: cut 3 strands of cream yarn each about 4.5m long, knot the ends together, loop over a doorknob or have a helper hold one end, twist tightly until the strand kinks on itself, then fold in half and let it twist back on itself naturally, smoothing out any bumps. Trim and knot the ends.
- Thread the drawstrings. Starting at the front-right eyelet, thread one cord all the way around through every eyelet and back out at the front-right side. Starting at the front-left eyelet, thread the second cord around and back out at the front-left side. Knot each cord’s two ends together on its respective side — pulling both cords closes the bag opening, and the loops become your backpack straps.
- Attach the front pocket. Position the pocket 6cm down from the top edge of the front panel, centered side to side. Sc the pocket to the front panel along the bottom edge and both side edges only, leaving the top (scalloped) edge open as the pocket opening.
- Make and attach a tassel. Wrap cream yarn 40 times around a 10cm piece of cardboard. Tie off tightly at the top with a separate strand, slide off the cardboard, and cut through the loops at the bottom. Wrap another strand around the tassel about 1.5cm down from the top and knot to form the “neck,” then trim all ends even. Attach the tassel to the point where the two straps meet at the top center of the bag.
- Weave in any remaining ends and give the finished bag a final light steam block to help the squares sit flat against each other.
Beginner/Intermediate Tips
- If puff stitches keep pulling too tight, loosen your tension on the final yarn-over-and-pull-through of each puff — this is usually where puffs collapse.
- Keep a consistent join point (bottom-right corner) on every square as you make them; it makes matching up corners during assembly much faster.
- Whip stitch seams sit flatter than sc seams for joining granny squares — use whip stitch if you want an almost invisible seam line.
- Steam blocking your squares before assembly saves enormous amounts of frustration later; unblocked squares vary in size just enough to make straight seams difficult.
- If your twisted cord keeps untwisting while you work, tape one end to your work surface as you twist.
Variations
- Monochrome bloom: Use a single flower color (like all-lavender petals) with the cream border for an elegant, less scrappy look.
- Mini crossbody version: Make the panels 2 squares wide x 3 squares tall for a smaller crossbody bag instead of a full backpack.
- Sunset palette: Swap the pastel petal colors for warm tones — rust, mustard, terracotta, and burnt orange — for a boho autumn version.
- No-pocket tote: Skip the front pocket and gusset step, seaming the panels directly together for a flatter, simpler market tote.
Save this pattern now so you don’t lose it in your feed — and if you make your own version, share it and tag it #FoodieRippleCrochet so we can see your blooms!



