
The Best Fluffy Pancakes recipe you will fall in love with. Full of tips and tricks to help you make the best pancakes.

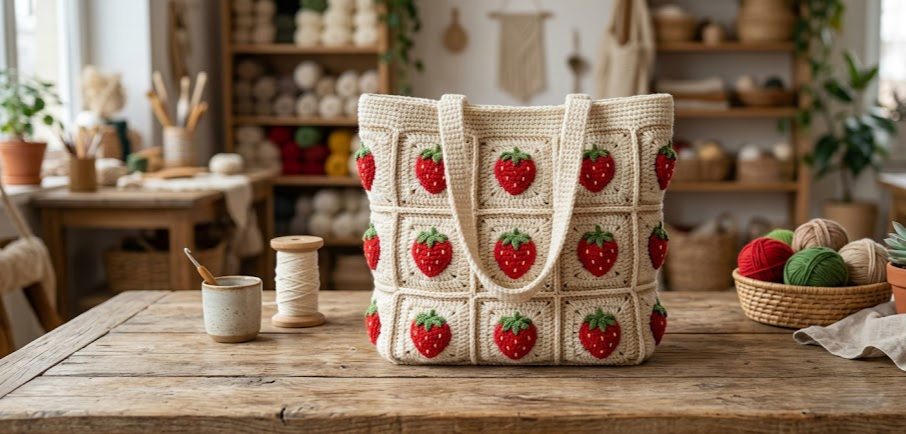
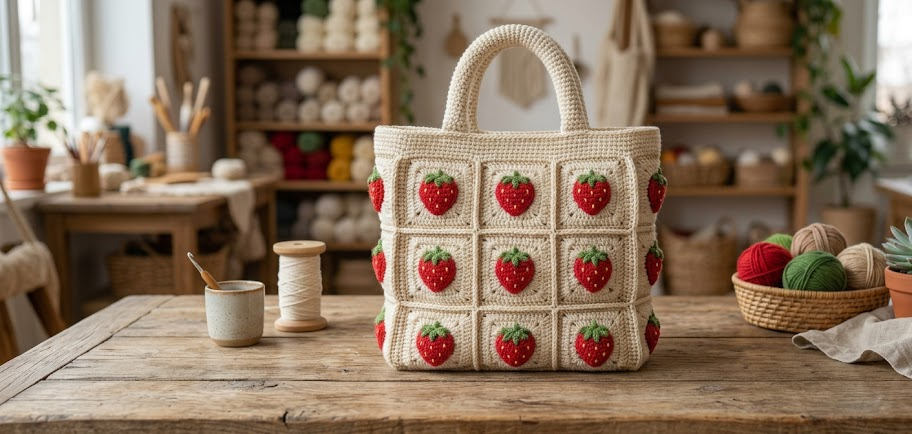
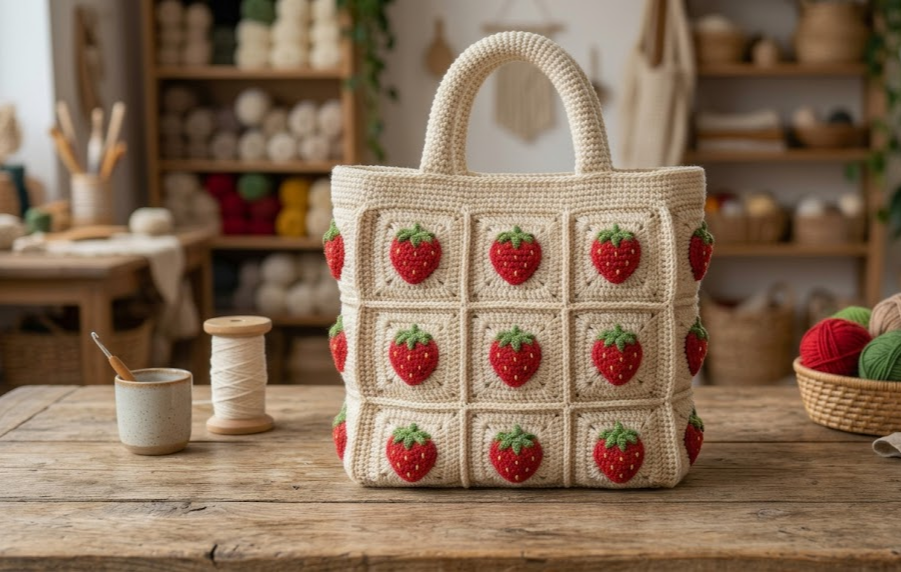
There is something especially charming about a handmade crochet tote covered in tiny strawberries. This Strawberry Fields Granny Square Tote combines the timeless look of classic granny squares with cheerful red strawberries, green leaves, and a warm cream background. The result is a practical everyday bag that feels playful without being overly delicate.
The finished tote is roomy enough for a small book, sunglasses, wallet, crochet supplies, a water bottle, or a few farmers-market finds. Its neutral cream base makes the red-and-green strawberry details stand out beautifully, while the granny-square construction gives the bag a traditional handmade appearance.
This project is best suited to an intermediate crocheter because it combines granny squares, appliqué pieces, seaming, reinforced edges, and crocheted handles. A confident beginner who is comfortable with basic crochet stitches and sewing pieces together can also work through it slowly.
The pattern below is designed as a complete standalone project. The finished bag measures approximately 15 inches wide × 12 inches tall × 4 inches deep, making it large enough for everyday use without becoming excessively bulky.
|
Difficulty
Intermediate
|
Time
10–12 Hours
|
Hook Size
4.0 mm
|
Yarn Weight
Worsted / Weight 4
|
Finished Size
15 × 12 × 4 in
|
Gauge
Before making the tote, crochet the gauge swatch below using the same yarn and hook you will use for the bag.
Gauge: 16 double crochet stitches × 8 rows = approximately 4 × 4 inches (10 × 10 cm).
Gauge swatch: Crochet a small granny-square section through Round 3. Measure across the center of the square rather than stretching the fabric.
Hook: 4.0 mm crochet hook.
Yarn: Medium/worsted-weight yarn, approximately Yarn Weight 4.
If your square is significantly larger than the measurements given, use a smaller hook. If it is smaller, move up to a 4.5 mm hook. Matching the gauge is particularly important because the number and arrangement of squares determine the finished dimensions of the tote.
Materials List
- Approximately 500–550 yards of cream or natural worsted-weight yarn for the granny squares and bag structure
- Approximately 50 yards of red worsted-weight yarn for strawberry motifs
- Approximately 30 yards of green worsted-weight yarn for strawberry leaves
- Approximately 20 yards of dark green yarn for optional leaf detailing
- 4.0 mm crochet hook
- Yarn needle with a blunt tip
- Scissors
- Stitch markers
- Measuring tape
- Small amount of polyester fiberfill for gently stuffing strawberry appliqués
- Sewing pins or removable stitch markers for positioning pieces
- Optional: fabric lining measuring approximately 15 × 13 inches
- Optional: lightweight interfacing if a firmer tote is desired
The exact amount of yarn can vary according to tension, joining method, and handle length.
Abbreviations Table
| Abbreviation | Meaning |
|---|---|
| ch | chain |
| sc | single crochet |
| hdc | half double crochet |
| dc | double crochet |
| sl st | slip stitch |
| st | stitch |
| sts | stitches |
| sk | skip |
| sp | space |
| rnd | round |
| rep | repeat |
| inc | increase |
| dec | decrease |
| BLO | back loop only |
| FLO | front loop only |
Important: The chain-2 spaces at the corners of the granny squares are spaces rather than individual stitches and are not included in the stitch count.
Pattern Instructions
Part 1 — Granny Square
Make 16 cream granny squares.
Each completed square should measure approximately 6 × 6 inches (15 × 15 cm) after blocking.
Round 1
Begin with a magic ring. A magic ring is an adjustable loop that allows the center of the crochet motif to close tightly without leaving a large hole.
Ch 3 (counts as first dc), work 2 dc into the ring, ch 2, (3 dc into the ring, ch 2) three times. Join with a sl st to the top of the beginning ch-3.
(12 dc)
Pull the magic ring closed firmly.
Round 2
Sl st across the next 2 dc and into the corner ch-2 space. Ch 3, 2 dc in the same space, ch 2, 3 dc in the same space.
Ch 1, 3 dc in the next corner ch-2 space, ch 2, 3 dc in the same space.
Repeat from * around. Ch 1 and join with a sl st to the top of the beginning ch-3.
(24 dc)
Round 3
Sl st across the next 2 dc and into the corner ch-2 space. Ch 3, 2 dc in the same space, ch 2, 3 dc in the same space.
Ch 1, 3 dc in the next ch-1 space, ch 1, 3 dc in the next corner ch-2 space, ch 2, 3 dc in the same corner space.
Repeat from * around. Ch 1 and join with a sl st to the beginning ch-3.
(36 dc)
Round 4
Sl st across the next 2 dc and into the corner ch-2 space. Ch 3, 2 dc in the same space, ch 2, 3 dc in the same space.
Ch 1, 3 dc in each side ch-1 space, ch 1, 3 dc in the next corner ch-2 space, ch 2, 3 dc in the same corner space.
Repeat around all four sides. Ch 1 and join with a sl st to the beginning ch-3.
(48 dc)
Fasten off and weave in the end.
Repeat until you have 16 cream granny squares.
Blocking the Squares
Lightly dampen the completed squares and gently shape each one to approximately 6 × 6 inches. Allow them to dry completely before assembling the bag.
Blocking helps straighten the corners and gives the finished tote a much cleaner appearance.
Part 2 — Strawberry Motifs
Make 16 strawberry motifs, one for each granny square.
The strawberry is worked from the top downward.
Strawberry Body — Round 1
With red yarn, make a magic ring.
Ch 1, work 6 sc into the ring. Join with a sl st to the first sc.
(6 sc)
Round 2
Ch 1. Work 2 sc in each stitch around. Join with a sl st to the first sc.
(12 sc)
Round 3
Ch 1. Sc in the next stitch, 2 sc in the next stitch. Repeat around. Join with a sl st.
(18 sc)
Round 4
Ch 1. Sc in the next 2 stitches, 2 sc in the next stitch. Repeat around. Join with a sl st.
(24 sc)
Round 5
Ch 1. Sc in each stitch around. Join with a sl st.
(24 sc)
Round 6
Ch 1. Sc in the next stitch, sc2tog. Repeat around.
A sc2tog is an invisible-style single-crochet decrease: insert the hook into the first stitch, pull up a loop, insert the hook into the next stitch, pull up a loop, then yarn over and pull through all three loops.
Join with a sl st.
(16 sc)
Round 7
Ch 1. Work 2 sc in each of the first 2 stitches, then sc2tog around until the strawberry tapers to the pointed bottom.
Join with a sl st and fasten off.
(10 sc)
Add a very small amount of stuffing if desired. Do not overfill the motif because the strawberry should remain fairly flat against the tote.
Part 3 — Strawberry Leaves
Attach green yarn at the top center of a strawberry.
Row 1
Ch 1, sc in the same point, ch 2, 3 dc in the same point, ch 2, sc in the same point.
(5 sts)
Fasten off.
For a more natural leafy crown, work three additional small leaf points separately across the top.
Leaf Point 2
Attach green yarn beside the first leaf.
Ch 1, sc in the same point, ch 2, 2 dc in the same point, ch 2, sc in the same point.
(4 sts)
Fasten off.
Leaf Point 3
Attach green yarn on the opposite side.
Ch 1, sc in the same point, ch 2, 2 dc in the same point, ch 2, sc in the same point.
(4 sts)
Fasten off.
Weave in all ends carefully on the back.
Part 4 — Strawberry Seeds
Using a small amount of cream, pale yellow, or white yarn, embroider approximately 7–10 tiny seed stitches over each strawberry.
Keep the seeds irregularly spaced rather than arranging them in perfect rows. Short vertical stitches approximately ⅛–¼ inch long give the strawberry a natural appearance.
Do not pull the embroidery tightly enough to distort the strawberry.
Part 5 — Attaching the Strawberries
Place one completed strawberry in approximately the center of each granny square.
For the closest appearance to the pictured tote, position the strawberry approximately 1½ inches above the bottom edge of the square and centered from side to side.
Pin each strawberry in place.
Using matching red yarn and a yarn needle, sew around the outside edge of the strawberry. Use small whip stitches that remain hidden in the crochet texture.
Sew around the green leaf section with green yarn.
Tip: Keep the stitches loose enough that the granny square remains flexible.
Repeat until all 16 squares have a strawberry.
Part 6 — Joining the Granny Squares
Arrange the squares into the following panels:
- Front panel: 3 squares wide × 2 squares tall
- Back panel: 3 squares wide × 2 squares tall
- Left side: 1 square wide × 2 squares tall
- Right side: 1 square wide × 2 squares tall
- Bottom: 3 squares wide × 1 square deep
This arrangement uses 16 squares total.
Each finished panel should be approximately:
- Front: 18 × 12 inches
- Back: 18 × 12 inches
- Each side: 6 × 12 inches
- Bottom: 18 × 6 inches
Because crochet naturally stretches, the completed tote will settle closer to approximately 15 inches wide × 12 inches tall × 4 inches deep when assembled.
Joining Method
Place two squares together with their wrong sides facing each other.
Using cream yarn, insert the hook through both corresponding stitches.
Work 1 sc through both layers.
Continue with 1 sc through both corresponding stitches across the seam.
(48 sc)
Fasten off.
Repeat until the required front, back, side, and bottom panels are assembled.
This method creates a slightly raised decorative seam while providing a sturdy connection.
Part 7 — Joining the Bag Body
Place the front and back panels with right sides facing outward.
Position the side panels between them.
Using cream yarn, single crochet the front panel to the first side panel from the top edge to the bottom edge.
(96 sc)
Fasten off.
Repeat on the opposite side.
(96 sc)
Next attach the bottom panel to the lower edge of the front.
(144 sc)
Attach the bottom to the back panel.
(144 sc)
Finally, attach both side edges of the bottom panel to the side panels.
(48 sc each side)
Fasten off and weave in every end securely.
The bag should now resemble an open box without a top.
Part 8 — Reinforced Top Edge
With cream yarn, attach the yarn at the upper edge of the bag.
Round 1
Ch 1. Work 1 sc evenly around the complete opening, placing approximately 2 sc across each granny-square seam where necessary to prevent the edge from pulling inward.
Join with a sl st.
(192 sc approximately)
Round 2
Ch 1. Sc in each stitch around. Join with a sl st.
(192 sc approximately)
Round 3
Ch 1. Sc in each stitch around. Join with a sl st.
(192 sc approximately)
Fasten off.
The reinforced top edge prevents the bag opening from becoming floppy after repeated use.
Part 9 — Crochet Handles
Make 2 handles, each approximately 22 inches long.
For a sturdier handle, crochet each handle as a narrow tube-like strap.
Handle Row 1
With cream yarn, ch 9.
Sc in the second chain from hook and in each chain across.
(8 sc)
Rows 2–80
Ch 1, turn. Sc in each stitch across.
(8 sc)
Repeat until the strap measures approximately 20 inches.
Fasten off.
Fold the strap lengthwise and whip stitch the long edges together using cream yarn.
This creates a thicker handle approximately ½ inch wide.
Repeat for the second handle.
Handle Reinforcement
Before attaching the handles, stitch a second layer of cream yarn through the handle seams. This reinforces the stress points that receive the most pulling force when the tote is full.
Part 10 — Attaching the Handles
Place the first handle on the front of the bag.
Position its ends approximately 3 inches inward from each side seam.
Each handle end should overlap the bag by approximately 2½ inches.
Pin securely.
Sew each handle end to the bag using a tight rectangular stitch pattern, then add an X-shaped reinforcement through the center of the rectangle.
Repeat on the back.
Attach the second handle at exactly the same measurements.
Before finishing, gently pull each handle several times to check that the attachment points do not stretch excessively.
Assembly Steps
- Block all 16 granny squares to approximately 6 × 6 inches and allow them to dry completely.
- Make 16 strawberry motifs using red yarn and add green leafy crowns.
- Embroider the strawberry seeds using cream, white, or pale yellow yarn.
- Sew one strawberry onto every square, keeping each motif approximately centered.
- Join three squares across and two squares high for the front panel.
- Repeat the same arrangement for the back panel.
- Make one side panel using two squares stacked vertically.
- Repeat for the second side.
- Attach the bottom panel, checking that all four corners meet evenly.
- Reinforce the entire top opening with three rounds of single crochet.
- Make two approximately 20-inch crocheted handles.
- Position each handle approximately 3 inches from the side seams.
- Overlap every handle end approximately 2½ inches onto the bag.
- Sew each handle end securely using a rectangular reinforcement and an X across the middle.
- Check all seams and weave in remaining yarn tails.
- Gently steam or wet-block the completed tote if necessary. Avoid excessive stretching.
- Allow the bag to dry completely before placing anything heavy inside.
Beginner/Intermediate Tips
Keep your granny squares consistent
The most important thing for a neat finished tote is making every square the same size. If one square is noticeably larger than another, the seams may ripple.
Don’t overstuff the strawberries
A tiny amount of stuffing makes the red strawberry motifs slightly dimensional, but too much will cause them to bulge dramatically and make the bag less practical.
Use stitch markers at the seams
When joining the panels, place markers at every corner. This makes it much easier to keep the bag square.
Reinforce the handles
The handles are the highest-stress portion of the project. Even if your stitches are tight, add extra sewing at the handle ends. The rectangular reinforcement with an X is especially useful for a tote that will carry books or groceries.
Check your gauge early
If your squares measure closer to 7 inches instead of 6 inches, making all 16 squares that way will create a significantly larger bag. Adjust your hook before making the full set.
Hide your yarn tails properly
Because the tote will experience friction and movement, simply trimming yarn ends is not enough. Weave each tail through several stitches in different directions before trimming.
Keep the top edge firm
The three rounds of single crochet around the opening help stabilize the tote. If your fabric is naturally loose, add a fourth round.
Variations
1. Pink Strawberry Tote
Replace the red strawberry yarn with soft pink, dusty rose, or coral. Keep the cream granny-square background and green leaves for a softer cottagecore appearance.
2. Mini Strawberry Market Bag
Use a smaller hook and lightweight yarn, then make the granny squares approximately 4½–5 inches across. The smaller proportions create a compact handbag perfect for lightweight items.
3. Oversized Beach Tote
Use a sturdy cotton worsted-weight yarn and increase each granny square to approximately 7 inches. Make the handles 24–26 inches long for comfortable shoulder carrying.
4. Vintage Cottage Style
Use oatmeal or beige yarn instead of bright cream, deep burgundy strawberries, and muted sage leaves. The darker palette creates an aged vintage-market aesthetic.
5. Strawberry & Flower Version
Replace several strawberry motifs with small crocheted flowers. Alternating strawberries and flowers gives the tote a whimsical spring garden look.
6. Plain Granny Square Handles
For a simpler appearance, make the handles in alternating cream and strawberry-red sections. This gives the finished tote a more colorful handmade look without changing the body pattern.
Final Thoughts
This Strawberry Fields Granny Square Tote is a lovely project when you want something that is both decorative and genuinely useful. The classic granny-square construction makes the bag feel timeless, while the tiny strawberries give it a playful seasonal personality.
The cream background also makes this design especially adaptable. Change the strawberry color for a romantic pink version, use darker shades for a vintage tote, or introduce flowers and other small motifs for an entirely different garden-inspired look.
The finished tote makes a thoughtful handmade gift for a crocheter, gardener, market shopper, teacher, mother, daughter, or anyone who loves cheerful handmade accessories. It can also become a practical everyday crochet bag for carrying books, yarn, sunglasses, or small shopping items.
Once you’ve finished your Strawberry Fields Granny Square Tote, save this pattern so you can return to it for your next colorful crochet project, and share your finished creation with #FoodieRippleCrochet.



